2022/4/25

電商營收數據指標

商品成交金額 GMV

商品成交金額(Gross Merchandise Volume,簡稱GMV

  • GMV = (來客數) 流量 × 購買轉換率 × 平均客單價

來客數、流量

可再區分裝置 (PC/Mobile/APP)、通路(自然流量/付費流量)

  • Unique Visitor

    不重複的來客數,實際上有多少訪客

  • Page View

    每一個頁面的瀏覽數量

  • Session

    使用者進入網站的次數,同一個使用者可能連接很多 Page。

  • MAU/WAU

    每月/週活躍用戶,檢視吸引用戶的能力

  • 下載量

    APP 下載數量

轉換率

從來店人流數量,轉換為真正購買的來客數量

  • CVR, Conversion Rate

    各頁面的轉換率

    從進入平台到結帳前,分析客戶是從哪個步驟跳開,分析產品的「訊息流」「任務流」

    訊息流 是從商品供給角度提供的商品內容與資訊,例如商品規格、評價、導購文章等

    任務流 是從用戶需求的角度去搜尋並找到他所需要的商品,例如搜尋篩選器、熱銷排行榜、推薦商品等

  • Bounce Rate

    CVR 的相反,了解是從哪裡跳開的

平均客單價 ABS、AOV

ABS (Average Basket Size) AOV (Average Order Value)

當客戶流量降低時,提升 ABS 是提升毛利的方法,常見的方法有:免運、折扣、跨銷、綁售

電商營運指標

流量指標

  • Session
  • Unique Visitor
  • Page View

轉化指標

  • CVR

用戶指標

  • 客單價 AOV

  • 用戶黏性

    • DAU (Daily Activited Users)

      日活躍用戶數

    • MAU (Monthly Activited Users)

      自統計之日算起一個月內登錄過APP的使用者總量

  • 用戶留存 Retention 回購

商品指標

  • 商品總數

    • SKU (Stock Keeping Unit)

      單品項管理、最小存貨單位

    • 庫存

  • 商品優勢

    • 個別商品轉化率&收入佔比、商品最低價比例

風險管控指標

  • 評價、投訴率、退貨率

拆解營收

  • 營收 = 來客數 * 購買轉換率 * 客單價

  • 營收 = 新客數 * 新客轉化率 * 新客的單價 + 舊客數 * 舊客回訪率 * 舊客轉換率 * 舊客單價

    區分新舊客戶數量

  • 營收 = 某某 channel 導流數 * 各自channel 轉化率 * 客單價

    區分網路流量來源,ex: EDM、LINE 官方帳號、搜尋流量、直接流量、網紅流量

  • 營收 = 品類一 * 銷售量 * 單價 + 品類二 * 銷售量 * 單價

    區分商品品項

  • 營收 = 通路一 * 銷售量 * 單價 + 通路二 * 銷售量 * 單價

    區分通路

  • 營收 = Campiagn 時期流量 * 轉化率 * 客單價 + 平常時期流量 * 轉化率 * 客單價

    區分週年慶時期

  • 營收 = 流量池導流數 * 轉化率 * 客單價 + 付費流量 * 轉化率 * 客單價 + 自然流量 * 轉化率 * 客單價

    LINE 官方帳號、APP 用戶,都被歸類在流量池

  • 營收 = 獲客數 * 回訪率 * 付費轉換率 * 付費頻率 * 客單價

    ex: 免費手遊

References

電商營收哪裡來?拆解各項重要數據指標

八種拆解營收的方法

電商 PM 都應了解的 5 大數據運營指標 -【數據乾貨大全】

電商人必備!68個常見電商專有名詞

2022/4/18

vuex

Vuex 是 state management pattern + library 工具,集中儲存所有 components,加上特定改變狀態的規則。

State Management Pattern

  • state: 目前 app 的狀態
  • view: 根據 state 產生的畫面
  • actions: 從 view 取得 user input,修改 state

如果有多個 components 共享 common state 會遇到的問題

  • multiple views 會由 the same piece of state 決定
  • 由不同的 views 產生的 actions,可改變 the same piece of state

Vuex 提出的方法是將 shared state 由 components 取出來,並用 global singleton 管理。
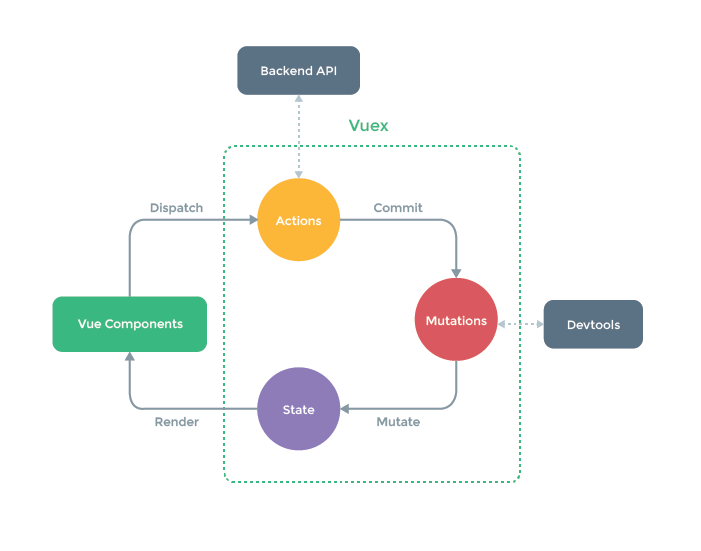
Vuex 可協助處理 shared state management,如果 app 很簡單,不是大型 SPA,就不需要 Vuex,只需要用 store pattern 即可

Store Pattern

如果有兩個 component 需要共享一個 state 時,可能會這樣寫

<div id="app-a">App A: {{ message }}</div>
<div id="app-b">App B: {{ message }}</div>

<script>
const { createApp, reactive } = Vue

const sourceOfTruth = reactive({
  message: 'Hello'
})

const appA = createApp({
  data() {
    return sourceOfTruth
  }
}).mount('#app-a')

const appB = createApp({
  data() {
    return sourceOfTruth
  },
  mounted() {
    sourceOfTruth.message = 'Goodbye' // both apps will render 'Goodbye' message now
  }
}).mount('#app-b')

</script>

畫面上兩個文字部分,都會變成 Goodbye

因為 sourceOfTruth 可以在程式中任意一個地方,被修改資料,當程式變多,會造成 debug 的難度。

這個問題就用 store pattern 處理。

store 類似 java 的 data object,透過 set method 修改資料內容,資料以 reactive 通知 Vue 處理異動。

<div id="app-a">{{sharedState.message}}</div>
<div id="app-b">{{sharedState.message}}</div>

<script>
const { createApp, reactive } = Vue

const store = {
  debug: true,

  state: reactive({
    message: 'Hello!'
  }),

  setMessageAction(newValue) {
    if (this.debug) {
      console.log('setMessageAction triggered with', newValue)
    }

    this.state.message = newValue
  },

  clearMessageAction() {
    if (this.debug) {
      console.log('clearMessageAction triggered')
    }

    this.state.message = ''
  }
}

const appA = createApp({
  data() {
    return {
      privateState: {},
      sharedState: store.state
    }
  },
  mounted() {
    store.setMessageAction('Goodbye!')
  }
}).mount('#app-a')

const appB = createApp({
  data() {
    return {
      privateState: {},
      sharedState: store.state
    }
  }
}).mount('#app-b')

Simplest Store

Vuex app 的核心就是 store,用來儲存 app 的狀態,以下兩點,是 Vuex store 跟 global object 的差異

  1. Vuex stores 是 reactive,如果 Vue component 使用了 state,將會在 state 異動時,自動更新 component
  2. 無法直接修改 store 的 state,修改的方式是透過 committing mutations,可確保 state change 可被追蹤

透過 mutations methods 異動 state

<div id="app-a">
  {{sharedState.count}}
   <button @click="increment">increment</button>
</div>

<script>
// import { createApp } from 'vue'
// import { createStore } from 'vuex'
const { createApp, reactive } = Vue
const { createStore } = Vuex

// Create a new store instance.
const store = createStore({
  state () {
    return {
      count: 0
    }
  },
  mutations: {
    increment (state) {
      state.count++
    }
  }
})

const app = createApp({
  data() {
    return {
      privateState: {},
      sharedState: store.state
    }
  },
  methods: {
    increment() {
      this.$store.commit('increment')
      console.log(this.$store.state.count)
    }
  }
})

app.mount('#app-a')
app.use(store)

</script>

State

Single State Tree

single state tree 就是包含 application 所有 state 的單一物件,也就是 "single sure of truth",每一個 application 都只有一個 store。單一物件容易使用部分 state 資料,也很容易 snapshot 目前的狀態值。

single state 並不會跟 modularity 概念衝突,後面會說明如何將 state 與 mutations 分割到 sub modules

store 儲存的 data 遵循 Vue instance 裡面的 data 的規則

Getting Vuex State into Vue Components

因為 Vuex store 是 reactive,最簡單的方法就是透過 computed property 取出部分 store state

以下產生一個 component,並將 store inject 到 component 中,透過 this.$store 存取

<div id="app">
  <counter></counter>
</div>

<script>
// import { createApp } from 'vue'
// import { createStore } from 'vuex'
const { createApp, reactive } = Vue
const { createStore } = Vuex

// Create a new store instance.
const store = createStore({
  state () {
    return {
      count: 0
    }
  },
  mutations: {
    increment (state) {
      state.count++
    }
  }
})


const app = createApp({
  data() {
    return {
      privateState: {},
      sharedState: store.state
    }
  },

})

const Counter = {
  template: `<div>{{ count }}</div> <button @click="increment">increment</button>`,
  computed: {
    count () {
      return this.$store.state.count
    }
  },
  methods: {
    increment() {
      this.$store.commit('increment')
      console.log(this.$store.state.count)
    }
  }
}

app.use(store)
app.component('counter', Counter)

app.mount('#app')

</script>

mapState

當 component 需要使用多個 store state properties or getters,宣告多個 computed property 會很麻煩,Vuex 用 mapState 產生 computed getter functions

<div id="app">
  <counter></counter>
</div>

<script>
// import { createApp } from 'vue'
// import { createStore } from 'vuex'
const { createApp, reactive } = Vue
const { createStore, mapState } = Vuex

// Create a new store instance.
const store = createStore({
  state () {
    return {
      count: 0
    }
  },
  mutations: {
    increment (state) {
      state.count++
    }
  }
})


const app = createApp({
  data() {
    return {
      privateState: {},
      sharedState: store.state
    }
  },

})

const Counter = {
  template: `<div>{{ count }}</div>
    <div>{{ countAlias }}</div>
    <div>{{ countPlusLocalState }}</div>
    <button @click="increment">increment</button>`,
  data() {
    return {
      localCount: 2,
    };
  },
  computed: mapState({
    // arrow functions can make the code very succinct!
    count: state => state.count,

    // passing the string value 'count' is same as `state => state.count`
    countAlias: 'count',

    // to access local state with `this`, a normal function must be used
    countPlusLocalState (state) {
      return state.count + this.localCount
    }
  }),
  methods: {
    increment() {
      this.$store.commit('increment')
      console.log(this.$store.state.count)
    }
  }
}

app.use(store)
app.component('counter', Counter)

app.mount('#app')

</script>

也可以直接傳入 string array 給 mapState,mapped computed property 的名稱要跟原本 state sub tree name 一樣

  computed: mapState([
      'count'
    ]),

Object Spread Operator

mapState 會回傳一個物件,如果要組合使用 local computed property,通常要用 utility 將多個物件 merge 在一起,再將該整合物件傳給 computed

利用 object spread operator 可簡化語法

<div id="app">
  <counter></counter>
</div>

<script>
// import { createApp } from 'vue'
// import { createStore } from 'vuex'
const { createApp, reactive } = Vue
const { createStore, mapState, mapGetters } = Vuex

// Create a new store instance.
const store = createStore({
  state () {
    return {
      count: 0,
      todos: [{
          id: 1,
          text: '...',
          done: true
        },
        {
          id: 2,
          text: '...',
          done: false
        }
      ]
    }
  },
  getters: {
    doneTodos: state => {
      return state.todos.filter(todo => todo.done)
    },
    doneTodosCount: (state,getters) => {
      return getters.doneTodos.length
    },
    getTodoById: (state) => (id) => {
      return state.todos.find(todo => todo.id === id)
    }
  },
  mutations: {
    increment (state) {
      state.count++
    }
  }
})


const app = createApp({
  data() {
    return {
      privateState: {},
      sharedState: store.state
    }
  },

})

const Counter = {
  template: `<div>
    <div>{{count}}</div>
    <div>{{countAlias}}</div>
    <div>{{countPlusLocalState}}</div>

    <div>{{doneTodos}}</div>
    <div>{{doneTodosAlias}}</div>
    <div>{{doneTodosCount}}</div>
    <div>{{getTodoById}}</div>
  </div>
    <button @click="increment">increment</button>`,
  data() {
    return {
      localCount: 2,
    };
  },
  computed: {

    // 本地 computed
    getTodoById() {
      return this.$store.getters.getTodoById(2);
    },

    // 使用展開運算符將 mapState 混合到外部物件中
    ...mapState([
      'count',
    ]),
    ...mapState({
      countAlias: 'count',
      countPlusLocalState(state) {
        return state.count + this.localCount;
      },
    }),

    // 使用展開運算符將 mapGetters 混合到外部物件中
    ...mapGetters([
      'doneTodos',
      'doneTodosCount',
    ]),
    ...mapGetters({
      doneTodosAlias: 'doneTodos',
    }),
  },
  methods: {
    increment() {
      this.$store.commit('increment')
      console.log(this.$store.state.count)
    }
  }
}

app.use(store)
app.component('counter', Counter)

app.mount('#app')

</script>

Getters

有時候需要根據儲存的 state 計算出衍生的 state

ex:

computed: {
  doneTodosCount () {
    return this.$store.state.todos.filter(todo => todo.done).length
  }
}

如果有多個 component 需要這個 function,可以在 store 裡面定義 getters,第一個參數固定為 state

const store = createStore({
  state: {
    todos: [
      { id: 1, text: '...', done: true },
      { id: 2, text: '...', done: false }
    ]
  },
  getters: {
    doneTodos (state) {
      return state.todos.filter(todo => todo.done)
    }
  }
})

Property-Style Access

getters 是透過 store.getters 物件使用

store.getters.doneTodos // -> [{ id: 1, text: '...', done: true }]

可接受其他 getters 為第二個參數

getters: {
  // ...
  doneTodosCount (state, getters) {
    return getters.doneTodos.length
  }
}
store.getters.doneTodosCount // -> 1

在 component 可這樣呼叫

computed: {
  doneTodosCount () {
    return this.$store.getters.doneTodosCount
  }
}

Method-Style Access

可利用 return a function 傳給 getters 參數,這對於查詢 store 裡面的 array 很有用

getters: {
  // ...
  getTodoById: (state) => (id) => {
    return state.todos.find(todo => todo.id === id)
  }
}
store.getters.getTodoById(2) // -> { id: 2, text: '...', done: false }

mapGetters

map store getters 為 local computed properties

import { mapGetters } from 'vuex'

export default {
  // ...
  computed: {
    // mix the getters into computed with object spread operator
    ...mapGetters([
      'doneTodosCount',
      'anotherGetter',
      // ...
    ])
  }
}

可 mapping 為不同名稱

...mapGetters({
  // map `this.doneCount` to `this.$store.getters.doneTodosCount`
  doneCount: 'doneTodosCount'
})

Mutations

修改 state 的方式是透過 committing a mutation

Vuex mutations 類似 events,每個 mutation 都有 string type 及 a handler

const store = createStore({
  state: {
    count: 1
  },
  mutations: {
    increment (state) {
      // mutate state
      state.count++
    }
  }
})

不能直接呼叫 mutation handler,必須這樣呼叫

store.commit('increment')

Commit with Payload

傳送新增的參數給 store.commit 稱為 mutation 的 payload

// ...
mutations: {
  increment (state, n) {
    state.count += n
  }
}

呼叫

store.commit('increment', 10)

通常 payload 會是一個 object,裡面有多個欄位

// ...
mutations: {
  increment (state, payload) {
    state.count += payload.amount
  }
}

呼叫

store.commit('increment', {
  amount: 10
})

Object-Style Commit

commit a mutation 的另一個方式

store.commit({
  type: 'increment',
  amount: 10
})

這時候,整個物件會成為 payload,故 handler 不變

mutations: {
  increment (state, payload) {
    state.count += payload.amount
  }
}

Using Constants for Mutation Types

常見到在 Flux 會使用 constants 為 mutation types,優點是可將所有 constants 集中放在一個檔案裡面,可快速知道整個 applicaiton 的 mutations

// mutation-types.js
export const SOME_MUTATION = 'SOME_MUTATION'
// store.js
import { createStore } from 'vuex'
import { SOME_MUTATION } from './mutation-types'

const store = createStore({
  state: { ... },
  mutations: {
    // we can use the ES2015 computed property name feature
    // to use a constant as the function name
    [SOME_MUTATION] (state) {
      // mutate state
    }
  }
})

Mutations Must Be Synchronous

mutation handler functions must be synchronous

如果這樣寫,當 commit mutation 時 callback 無法被呼叫。devtool 無法得知什麼時候被呼叫了 callback

mutations: {
  someMutation (state) {
    api.callAsyncMethod(() => {
      state.count++
    })
  }
}

Committing Mutations in Components

可用 this.$store.commit('xxx') 或是 mapMutations helper

import { mapMutations } from 'vuex'

export default {
  // ...
  methods: {
    ...mapMutations([
      'increment', // map `this.increment()` to `this.$store.commit('increment')`

      // `mapMutations` also supports payloads:
      'incrementBy' // map `this.incrementBy(amount)` to `this.$store.commit('incrementBy', amount)`
    ]),
    ...mapMutations({
      add: 'increment' // map `this.add()` to `this.$store.commit('increment')`
    })
  }
}

Vuex 的 mutations 是 synchronous transactions

store.commit('increment')
// any state change that the "increment" mutation may cause
// should be done at this moment.

如果需要用到 asynchronous opertions,要使用 Actions


Actions

類似 mutations,差別:

  • actions commit mutations,而不是 mutating the state
  • actions 可封裝任意非同步 operations

這是簡單的 actions 例子

const store = createStore({
  state: {
    count: 0
  },
  mutations: {
    increment (state) {
      state.count++
    }
  },
  actions: {
    increment (context) {
      context.commit('increment')
    }
  }
})

action handler 以 context 為參數,裡面是 store instance 的 methods/properties,故能呼叫 context.commit commit a mutation,context.statecontext.getters

也能用 context.dispatch 呼叫其他 actions

只使用 commit 的時候,可這樣簡化寫法

actions: {
  increment ({ commit }) {
    commit('increment')
  }
}

Dispatching Actions

store.dispatch 會驅動 actions

store.dispatch('increment')

因為 mutations 必須要為 synchronous,故如要處理 asynchronous operations,而不是直接呼叫 store.commit('increment')

actions: {
  incrementAsync ({ commit }) {
    setTimeout(() => {
      commit('increment')
    }, 1000)
  }
}

actions 支援 payload format & object-style dispatch

// dispatch with a payload
store.dispatch('incrementAsync', {
  amount: 10
})

// dispatch with an object
store.dispatch({
  type: 'incrementAsync',
  amount: 10
})

這是更真實的例子:checkout a shopping cart

actions: {
  checkout ({ commit, state }, products) {
    // save the items currently in the cart
    const savedCartItems = [...state.cart.added]
    // send out checkout request, and optimistically
    // clear the cart
    commit(types.CHECKOUT_REQUEST)
    // the shop API accepts a success callback and a failure callback
    shop.buyProducts(
      products,
      // handle success
      () => commit(types.CHECKOUT_SUCCESS),
      // handle failure
      () => commit(types.CHECKOUT_FAILURE, savedCartItems)
    )
  }
}

Dispatching Actions in Components

可使用 this.$store.dispatch('xxx')mapActions helper 在 component 中 dispatch actions

import { mapActions } from 'vuex'

export default {
  // ...
  methods: {
    ...mapActions([
      'increment', // map `this.increment()` to `this.$store.dispatch('increment')`

      // `mapActions` also supports payloads:
      'incrementBy' // map `this.incrementBy(amount)` to `this.$store.dispatch('incrementBy', amount)`
    ]),
    ...mapActions({
      add: 'increment' // map `this.add()` to `this.$store.dispatch('increment')`
    })
  }
}

Composing Actions

因 action 是非同步的,可利用 Promise 得知 action 已完成

actions: {
  actionA ({ commit }) {
    return new Promise((resolve, reject) => {
      setTimeout(() => {
        commit('someMutation')
        resolve()
      }, 1000)
    })
  }
}

現在就能這樣呼叫

store.dispatch('actionA').then(() => {
  // ...
})

////// 在另一個 action 可這樣呼叫
actions: {
  // ...
  actionB ({ dispatch, commit }) {
    return dispatch('actionA').then(() => {
      commit('someOtherMutation')
    })
  }
}

可利用 async/await 撰寫 actions

// assuming `getData()` and `getOtherData()` return Promises

actions: {
  async actionA ({ commit }) {
    commit('gotData', await getData())
  },
  async actionB ({ dispatch, commit }) {
    await dispatch('actionA') // wait for `actionA` to finish
    commit('gotOtherData', await getOtherData())
  }
}

Modules

因使用 single state tree,application 的所有 states 集中在一個物件中,如果 application 很大,store 也會很大

Vuex 可將 store 切割為 modules,每個 module 有各自的 state, mutations, actions, getters, nested modules

const moduleA = {
  state: () => ({ ... }),
  mutations: { ... },
  actions: { ... },
  getters: { ... }
}

const moduleB = {
  state: () => ({ ... }),
  mutations: { ... },
  actions: { ... }
}

const store = createStore({
  modules: {
    a: moduleA,
    b: moduleB
  }
})

store.state.a // -> `moduleA`'s state
store.state.b // -> `moduleB`'s state

Module Local State

在 module 的 mutations 與 getters,第一個參數為 module 的 local state

const moduleA = {
  state: () => ({
    count: 0
  }),
  mutations: {
    increment (state) {
      // `state` is the local module state
      state.count++
    }
  },
  getters: {
    doubleCount (state) {
      return state.count * 2
    }
  }
}

在 module action,透過 context.state存取 local state,透過 context.rootState 存取 root state

const moduleA = {
  // ...
  actions: {
    incrementIfOddOnRootSum ({ state, commit, rootState }) {
      if ((state.count + rootState.count) % 2 === 1) {
        commit('increment')
      }
    }
  }
}

在 module getter,rootState 是第三個參數

const moduleA = {
  // ...
  getters: {
    sumWithRootCount (state, getters, rootState) {
      return state.count + rootState.count
    }
  }
}

Namespacing

actions, mutations, getters 預設註冊為 global namespace

可用 namespaces:true ,自動加上 module name

const store = createStore({
  modules: {
    account: {
      namespaced: true,

      // module assets
      state: () => ({ ... }), // module state is already nested and not affected by namespace option
      getters: {
        isAdmin () { ... } // -> getters['account/isAdmin']
      },
      actions: {
        login () { ... } // -> dispatch('account/login')
      },
      mutations: {
        login () { ... } // -> commit('account/login')
      },

      // nested modules
      modules: {
        // inherits the namespace from parent module
        myPage: {
          state: () => ({ ... }),
          getters: {
            profile () { ... } // -> getters['account/profile']
          }
        },

        // further nest the namespace
        posts: {
          namespaced: true,

          state: () => ({ ... }),
          getters: {
            popular () { ... } // -> getters['account/posts/popular']
          }
        }
      }
    }
  }
})
  • Accessing Global Assets in Namespaced Modules

rootStaterootGetters 有傳入 getter function 作為第三、四個參數,且可透過 context 物件使用 properties

如果要使用 global namespace 的 actions, mutations,要在 dispatch, commit 傳入 {root:true}

modules: {
  foo: {
    namespaced: true,

    getters: {
      // `getters` is localized to this module's getters
      // you can use rootGetters via 4th argument of getters
      someGetter (state, getters, rootState, rootGetters) {
        getters.someOtherGetter // -> 'foo/someOtherGetter'
        rootGetters.someOtherGetter // -> 'someOtherGetter'
        rootGetters['bar/someOtherGetter'] // -> 'bar/someOtherGetter'
      },
      someOtherGetter: state => { ... }
    },

    actions: {
      // dispatch and commit are also localized for this module
      // they will accept `root` option for the root dispatch/commit
      someAction ({ dispatch, commit, getters, rootGetters }) {
        getters.someGetter // -> 'foo/someGetter'
        rootGetters.someGetter // -> 'someGetter'
        rootGetters['bar/someGetter'] // -> 'bar/someGetter'

        dispatch('someOtherAction') // -> 'foo/someOtherAction'
        dispatch('someOtherAction', null, { root: true }) // -> 'someOtherAction'

        commit('someMutation') // -> 'foo/someMutation'
        commit('someMutation', null, { root: true }) // -> 'someMutation'
      },
      someOtherAction (ctx, payload) { ... }
    }
  }
}
  • register global actions in namespaces modules
{
  actions: {
    someOtherAction ({dispatch}) {
      dispatch('someAction')
    }
  },
  modules: {
    foo: {
      namespaced: true,

      actions: {
        someAction: {
          root: true,
          handler (namespacedContext, payload) { ... } // -> 'someAction'
        }
      }
    }
  }
}
  • binding helpers with namespace

如果要呼叫 nested module 的 getters, action 會比較麻煩

computed: {
  ...mapState({
    a: state => state.some.nested.module.a,
    b: state => state.some.nested.module.b
  }),
  ...mapGetters([
    'some/nested/module/someGetter', // -> this['some/nested/module/someGetter']
    'some/nested/module/someOtherGetter', // -> this['some/nested/module/someOtherGetter']
  ])
},
methods: {
  ...mapActions([
    'some/nested/module/foo', // -> this['some/nested/module/foo']()
    'some/nested/module/bar' // -> this['some/nested/module/bar']()
  ])
}

可用 module namespace string 作為第一個參數鎚入 helpers

computed: {
  ...mapState('some/nested/module', {
    a: state => state.a,
    b: state => state.b
  }),
  ...mapGetters('some/nested/module', [
    'someGetter', // -> this.someGetter
    'someOtherGetter', // -> this.someOtherGetter
  ])
},
methods: {
  ...mapActions('some/nested/module', [
    'foo', // -> this.foo()
    'bar' // -> this.bar()
  ])
}

也可以用 createNamespacedHelpers

import { createNamespacedHelpers } from 'vuex'

const { mapState, mapActions } = createNamespacedHelpers('some/nested/module')

export default {
  computed: {
    // look up in `some/nested/module`
    ...mapState({
      a: state => state.a,
      b: state => state.b
    })
  },
  methods: {
    // look up in `some/nested/module`
    ...mapActions([
      'foo',
      'bar'
    ])
  }
}
  • caveat for plugin developers

如果有 plugin 提供 module,並讓使用者加入 vuex store,如果 plugin user 把 module 加入某個 namespaced module,會讓使用者的 module 也被 namespaced

可透過 plugin option 的 namedspace 參數解決此問題

// get namespace value via plugin option
// and returns Vuex plugin function
export function createPlugin (options = {}) {
  return function (store) {
    // add namespace to plugin module's types
    const namespace = options.namespace || ''
    store.dispatch(namespace + 'pluginAction')
  }
}

Dynamic Module Registration

可在 store 產生後,再透過 store.registerModule 註冊 module

import { createStore } from 'vuex'

const store = createStore({ /* options */ })

// register a module `myModule`
store.registerModule('myModule', {
  // ...
})

// register a nested module `nested/myModule`
store.registerModule(['nested', 'myModule'], {
  // ...
})

module 的 state 為 store.state.myModule and store.state.nested.myModule

動態註冊的 module,可用 store.unregisterModule(moduleName) 移除

可用 store.hasModule(moduleName) 檢查是否有被註冊

  • Preserving state

註冊新的 module 時,可用 preserveState option: store.registerModule('a', module, { preserveState: true }) 保留 state

Module Reuse

有時候需要產生 module 的多個 instance,ex:

  • 用一個 module 產生多個 store
  • 在一個 store 重複註冊某個 module

如果用 plain object 宣告 state of the module,state object 會以 reference 方式被分享,如果 mutated 時,會造成 cross store/module state pollution

解決方法:use a function for declaring module state

const MyReusableModule = {
  state: () => ({
    foo: 'bar'
  }),
  // mutations, actions, getters...
}

References

Vuex

2022/4/11

Vue AJAX with axios

Vue AJAX with axios

axios 是支援 Promise 的 HTTP client library,Vue 可透過 axios 向 server 取得資料。使用時,可搭配 ES6 語法,用 async/await 及 Promise,可以取消 request,自動轉換 JSON。

get, post

<!DOCTYPE html>
<html lang="en">
<head>
  <!-- <script src="https://unpkg.com/vue@3.2.10"></script> -->
  <!-- <script src="https://unpkg.com/vue@3.2.10/dist/vue.global.js"></script> -->
  <script src="https://unpkg.com/vue@3.2.10/dist/vue.global.prod.js"></script>

  <script src="https://unpkg.com/axios/dist/axios.min.js"></script>

</head>

<body>

<div id="app">
  {{ info }}
</div>

<script type = "text/javascript">
const vm = Vue.createApp({
  data () {
    return {
      info: null
    }
  },
  mounted () {
    axios
      .get('1-1-axios.json')
      .then(response => (this.info = response))
      .catch(function (error) {
        console.log(error);
      });
  }
}).mount('#app')
</script>
</body>

</html>

執行頁面

{ "data": { "name": "網站", "num": 3, "sites": [ { "name": "Google", "info": [ "Android", "Google 搜索", "Google 翻譯" ] }, { "name": "Yahoo", "info": [ "Yahoo", "Yahoo", "Yahoo" ] }, { "name": "Facebook", "info": [ "Facebook", "Facebook" ] } ] }, "status": 200, "statusText": "OK", "headers": { "accept-ranges": "bytes", "connection": "Keep-Alive", "content-length": "274", "content-type": "application/json", "date": "Tue, 14 Sep 2021 09:06:24 GMT", "etag": "\"112-5cbf0e53aa9b4\"", "keep-alive": "timeout=5, max=99", "last-modified": "Tue, 14 Sep 2021 09:06:21 GMT", "server": "Apache/2.4.6 (CentOS) OpenSSL/1.0.1e-fips mod_fcgid/2.3.9 PHP/5.4.16 mod_wsgi/3.4 Python/2.7.5" }, "config": { "url": "1-1-axios.json", "method": "get", "headers": { "Accept": "application/json, text/plain, */*" }, "transformRequest": [ null ], "transformResponse": [ null ], "timeout": 0, "xsrfCookieName": "XSRF-TOKEN", "xsrfHeaderName": "X-XSRF-TOKEN", "maxContentLength": -1, "maxBodyLength": -1, "transitional": { "silentJSONParsing": true, "forcedJSONParsing": true, "clarifyTimeoutError": false } }, "request": "[object XMLHttpRequest]" }

透過 JSON 搭配 v-for

<div id="app">
  <div
    v-for="site in info"
  >
    {{ site.name }}
  </div>
</div>

<script type = "text/javascript">
const vm = Vue.createApp({
  data () {
    return {
      info: null
    }
  },
  mounted () {
    axios
      .get('1-1-axios.json')
      .then(response => (this.info = response.data.sites))
      .catch(function (error) {
        console.log(error);
      });
  }
}).mount('#app')
</script>

剛剛看到的是使用 get method,也可以用 post method 傳入參數

axios.post('/user', {
    firstName: 'Fred', 
    lastName: 'Flintstone'
  })
  .then(function (response) {
    console.log(response);
  })
  .catch(function (error) {
    console.log(error);
  });

axios.all

如果有兩個 request,並希望兩個都要完成

function getUserAccount() {
  return axios.get('/user/12345');
}

function getUserPermissions() {
  return axios.get('/user/12345/permissions');
}
axios.all([getUserAccount(), getUserPermissions()])
  .then(axios.spread(function (acct, perms) {
    // 兩個 request 都執行完成
  }));

config

可用 config 物件,傳送給 axios 的寫法

axios(config)

// Send a POST request
axios({
  method: 'post',
  url: '/user/12345',
  data: {
    firstName: 'Fred',
    lastName: 'Flintstone'
  }
});

// GET request for remote image in node.js
axios({
  method: 'get',
  url: 'http://bit.ly/2mTM3nY',
  responseType: 'stream'
})
  .then(function (response) {
    response.data.pipe(fs.createWriteStream('ada_lovelace.jpg'))
  });

axios(url[, config])

// Send a GET request (default method)
axios('/user/12345');

Request method alias

使用 alias 語法時,config 不需要指定 url, method, and data properties

axios.request(config)
axios.get(url[, config])
axios.delete(url[, config])
axios.head(url[, config])
axios.options(url[, config])
axios.post(url[, data[, config]])
axios.put(url[, data[, config]])
axios.patch(url[, data[, config]])

instance

可用 custom config 產生 instance of axios

axios.create([config])

const instance = axios.create({
  baseURL: 'https://some-domain.com/api/',
  timeout: 1000,
  headers: {'X-Custom-Header': 'foobar'}
});

instance methods

axios#request(config)
axios#get(url[, config])
axios#delete(url[, config])
axios#head(url[, config])
axios#options(url[, config])
axios#post(url[, data[, config]])
axios#put(url[, data[, config]])
axios#patch(url[, data[, config]])
axios#getUri([config])

config

以下為 config options,裡面只有 url 為必要欄位

{
  // `url` is the server URL that will be used for the request
  url: '/user',

  // `method` is the request method to be used when making the request
  method: 'get', // default

  // baseURL 會加到 url 前面
  baseURL: 'https://some-domain.com/api/',

  // 可在傳給 server 前,修改 request data 及 headers 物件
  // 只能用在 PUT, POST, PATCH, DELETE
  // 在 array 的最後一個 function必須回傳 string 或 Buffer, ArrayBuffer, FormData, Stream
  transformRequest: [function (data, headers) {
    // Do whatever you want to transform the data

    return data;
  }],

  // 可在傳送給 then, catch 以前,修改 response data
  transformResponse: [function (data) {
    // Do whatever you want to transform the data

    return data;
  }],

  // `headers` are custom headers to be sent
  // 自訂 headers
  headers: {'X-Requested-With': 'XMLHttpRequest'},

  // URL parameter,一定要是 plain object 或 URLSearchParams object
  params: {
    ID: 12345
  },

  // `paramsSerializer` is an optional function in charge of serializing `params`
  // (e.g. https://www.npmjs.com/package/qs, http://api.jquery.com/jquery.param/)
  paramsSerializer: function (params) {
    return Qs.stringify(params, {arrayFormat: 'brackets'})
  },

  // `data` is the data to be sent as the request body
  // Only applicable for request methods 'PUT', 'POST', 'DELETE , and 'PATCH'
  // When no `transformRequest` is set, must be of one of the following types:
  // - string, plain object, ArrayBuffer, ArrayBufferView, URLSearchParams
  // - Browser only: FormData, File, Blob
  // - Node only: Stream, Buffer
  data: {
    firstName: 'Fred'
  },

  // syntax alternative to send data into the body
  // method post
  // only the value is sent, not the key
  data: 'Country=Brasil&City=Belo Horizonte',

  // `timeout` specifies the number of milliseconds before the request times out.
  // If the request takes longer than `timeout`, the request will be aborted.
  timeout: 1000, // default is `0` (no timeout)

  // `withCredentials` indicates whether or not cross-site Access-Control requests
  // should be made using credentials
  withCredentials: false, // default

  // `adapter` allows custom handling of requests which makes testing easier.
  // Return a promise and supply a valid response (see lib/adapters/README.md).
  adapter: function (config) {
    /* ... */
  },

  // `auth` indicates that HTTP Basic auth should be used, and supplies credentials.
  // This will set an `Authorization` header, overwriting any existing
  // `Authorization` custom headers you have set using `headers`.
  // Please note that only HTTP Basic auth is configurable through this parameter.
  // For Bearer tokens and such, use `Authorization` custom headers instead.
  auth: {
    username: 'janedoe',
    password: 's00pers3cret'
  },

  // `responseType` indicates the type of data that the server will respond with
  // options are: 'arraybuffer', 'document', 'json', 'text', 'stream'
  //   browser only: 'blob'
  responseType: 'json', // default

  // `responseEncoding` indicates encoding to use for decoding responses (Node.js only)
  // Note: Ignored for `responseType` of 'stream' or client-side requests
  responseEncoding: 'utf8', // default

  // `xsrfCookieName` is the name of the cookie to use as a value for xsrf token
  xsrfCookieName: 'XSRF-TOKEN', // default

  // `xsrfHeaderName` is the name of the http header that carries the xsrf token value
  xsrfHeaderName: 'X-XSRF-TOKEN', // default

  // `onUploadProgress` allows handling of progress events for uploads
  // browser only
  onUploadProgress: function (progressEvent) {
    // Do whatever you want with the native progress event
  },

  // `onDownloadProgress` allows handling of progress events for downloads
  // browser only
  onDownloadProgress: function (progressEvent) {
    // Do whatever you want with the native progress event
  },

  // `maxContentLength` defines the max size of the http response content in bytes allowed in node.js
  maxContentLength: 2000,

  // `maxBodyLength` (Node only option) defines the max size of the http request content in bytes allowed
  maxBodyLength: 2000,

  // `validateStatus` defines whether to resolve or reject the promise for a given
  // HTTP response status code. If `validateStatus` returns `true` (or is set to `null`
  // or `undefined`), the promise will be resolved; otherwise, the promise will be
  // rejected.
  validateStatus: function (status) {
    return status >= 200 && status < 300; // default
  },

  // `maxRedirects` defines the maximum number of redirects to follow in node.js.
  // If set to 0, no redirects will be followed.
  maxRedirects: 5, // default

  // `socketPath` defines a UNIX Socket to be used in node.js.
  // e.g. '/var/run/docker.sock' to send requests to the docker daemon.
  // Only either `socketPath` or `proxy` can be specified.
  // If both are specified, `socketPath` is used.
  socketPath: null, // default

  // `httpAgent` and `httpsAgent` define a custom agent to be used when performing http
  // and https requests, respectively, in node.js. This allows options to be added like
  // `keepAlive` that are not enabled by default.
  httpAgent: new http.Agent({ keepAlive: true }),
  httpsAgent: new https.Agent({ keepAlive: true }),

  // `proxy` defines the hostname, port, and protocol of the proxy server.
  // You can also define your proxy using the conventional `http_proxy` and
  // `https_proxy` environment variables. If you are using environment variables
  // for your proxy configuration, you can also define a `no_proxy` environment
  // variable as a comma-separated list of domains that should not be proxied.
  // Use `false` to disable proxies, ignoring environment variables.
  // `auth` indicates that HTTP Basic auth should be used to connect to the proxy, and
  // supplies credentials.
  // This will set an `Proxy-Authorization` header, overwriting any existing
  // `Proxy-Authorization` custom headers you have set using `headers`.
  // If the proxy server uses HTTPS, then you must set the protocol to `https`. 
  proxy: {
    protocol: 'https',
    host: '127.0.0.1',
    port: 9000,
    auth: {
      username: 'mikeymike',
      password: 'rapunz3l'
    }
  },

  // `cancelToken` specifies a cancel token that can be used to cancel the request
  // (see Cancellation section below for details)
  cancelToken: new CancelToken(function (cancel) {
  }),

  // `decompress` indicates whether or not the response body should be decompressed 
  // automatically. If set to `true` will also remove the 'content-encoding' header 
  // from the responses objects of all decompressed responses
  // - Node only (XHR cannot turn off decompression)
  decompress: true // default

  // `insecureHTTPParser` boolean.
  // Indicates where to use an insecure HTTP parser that accepts invalid HTTP headers.
  // This may allow interoperability with non-conformant HTTP implementations.
  // Using the insecure parser should be avoided.
  // see options https://nodejs.org/dist/latest-v12.x/docs/api/http.html#http_http_request_url_options_callback
  // see also https://nodejs.org/en/blog/vulnerability/february-2020-security-releases/#strict-http-header-parsing-none
  insecureHTTPParser: undefined // default

  // transitional options for backward compatibility that may be removed in the newer versions
  transitional: {
    // silent JSON parsing mode
    // `true`  - ignore JSON parsing errors and set response.data to null if parsing failed (old behaviour)
    // `false` - throw SyntaxError if JSON parsing failed (Note: responseType must be set to 'json')
    silentJSONParsing: true, // default value for the current Axios version

    // try to parse the response string as JSON even if `responseType` is not 'json'
    forcedJSONParsing: true,

    // throw ETIMEDOUT error instead of generic ECONNABORTED on request timeouts
    clarifyTimeoutError: false,
  }
}

response schema

{
  // `data` is the response that was provided by the server
  data: {},

  // `status` is the HTTP status code from the server response
  status: 200,

  // `statusText` is the HTTP status message from the server response
  statusText: 'OK',

  // `headers` the HTTP headers that the server responded with
  // All header names are lower cased and can be accessed using the bracket notation.
  // Example: `response.headers['content-type']`
  headers: {},

  // `config` is the config that was provided to `axios` for the request
  config: {},

  // `request` is the request that generated this response
  // It is the last ClientRequest instance in node.js (in redirects)
  // and an XMLHttpRequest instance in the browser
  request: {}
}

可用 then 取得

axios.get('/user/12345')
  .then(function (response) {
    console.log(response.data);
    console.log(response.status);
    console.log(response.statusText);
    console.log(response.headers);
    console.log(response.config);
  });

config default

// global axios defaults

axios.defaults.baseURL = 'https://api.example.com';

// Important: If axios is used with multiple domains, the AUTH_TOKEN will be sent to all of them.
// See below for an example using Custom instance defaults instead.
axios.defaults.headers.common['Authorization'] = AUTH_TOKEN;

axios.defaults.headers.post['Content-Type'] = 'application/x-www-form-urlencoded';


//////////////////////////////
// custom instance defaults
// Set config defaults when creating the instance
const instance = axios.create({
  baseURL: 'https://api.example.com'
});

// Alter defaults after instance has been created
instance.defaults.headers.common['Authorization'] = AUTH_TOKEN;

優先順序

// Create an instance using the config defaults provided by the library
// At this point the timeout config value is `0` as is the default for the library
const instance = axios.create();

// Override timeout default for the library
// Now all requests using this instance will wait 2.5 seconds before timing out
instance.defaults.timeout = 2500;

// Override timeout for this request as it's known to take a long time
instance.get('/longRequest', {
  timeout: 5000
});

Interceptors

在 then, catch 以前,攔截處理

// Add a request interceptor
axios.interceptors.request.use(function (config) {
    // Do something before request is sent
    return config;
  }, function (error) {
    // Do something with request error
    return Promise.reject(error);
  });

// Add a response interceptor
axios.interceptors.response.use(function (response) {
    // Any status code that lie within the range of 2xx cause this function to trigger
    // Do something with response data
    return response;
  }, function (error) {
    // Any status codes that falls outside the range of 2xx cause this function to trigger
    // Do something with response error
    return Promise.reject(error);
  });

// 移除 interceptor
const myInterceptor = axios.interceptors.request.use(function () {/*...*/});
axios.interceptors.request.eject(myInterceptor);

// add interceptor
const instance = axios.create();
instance.interceptors.request.use(function () {/*...*/});

錯誤處理

axios.get('/user/12345')
  .catch(function (error) {
    if (error.response) {
      // The request was made and the server responded with a status code
      // that falls out of the range of 2xx
      console.log(error.response.data);
      console.log(error.response.status);
      console.log(error.response.headers);
    } else if (error.request) {
      // The request was made but no response was received
      // `error.request` is an instance of XMLHttpRequest in the browser and an instance of
      // http.ClientRequest in node.js
      console.log(error.request);
    } else {
      // Something happened in setting up the request that triggered an Error
      console.log('Error', error.message);
    }
    console.log(error.config);
  });

取消

用 Cancel Token 取消 request

const CancelToken = axios.CancelToken;
const source = CancelToken.source();

axios.get('/user/12345', {
  cancelToken: source.token
}).catch(function (thrown) {
  if (axios.isCancel(thrown)) {
    console.log('Request canceled', thrown.message);
  } else {
    // handle error
  }
});

axios.post('/user/12345', {
  name: 'new name'
}, {
  cancelToken: source.token
})

// cancel the request (the message parameter is optional)
source.cancel('Operation canceled by the user.');

透過 CancelToken 建立時傳入的 executor

const CancelToken = axios.CancelToken;
let cancel;

axios.get('/user/12345', {
  cancelToken: new CancelToken(function executor(c) {
    // An executor function receives a cancel function as a parameter
    cancel = c;
  })
});

// cancel the request
cancel();

References

axios

Vue 3 使用 axios 套件取得遠端資料

Vue.js Ajax(axios)

Retiring vue-resource

2022/3/28

Vue Router

以下為 Vue Router 的一個例子,Vue Router 的用途,是能夠在單一網頁頁面中,在 browser 不重新載入到新的 url 的狀況下,能夠增加 url history 並調整頁面內容狀態的功能,也就是能夠實現 SPA (single page application) 的功能。

傳統的網頁,會向 web application server 要求打開一個 url 網址,server 會回傳整個網頁的 html 內容。後來為了在不轉向到新的 url 的條件下,並調整網頁的內容,就發生了 web service,server 會從某個網址回傳 XML 或 JSON,網頁透過 AJAX 方式提取資料更新網頁內容。SPA 是更進一步,可在不重新發出新的 url request 到 server 的條件下,更新網頁內容並增加 url 瀏覽歷程,也就是增加了單一網頁頁面的顯示狀態。

Vue router 實例:

<!DOCTYPE html>
<html lang="en">
<head>
  <!-- <script src="https://unpkg.com/vue@3.2.10"></script> -->
  <!-- <script src="https://unpkg.com/vue@3.2.10/dist/vue.global.js"></script> -->
  <script src="https://unpkg.com/vue@3.2.10/dist/vue.global.prod.js"></script>
  <!-- <script src="https://unpkg.com/vue-router@4.0.11"></script> -->
  <!-- <script src="https://unpkg.com/vue-router@4.0.11/dist/vue.global.js"></script> -->
  <script src="https://unpkg.com/vue-router@4.0.11/dist/vue-router.global.prod.js"></script>
<!--
  <script src="https://unpkg.com/vue/dist/vue.js"></script>
  <script src="https://unpkg.com/vue-router/dist/vue-router.js"></script> -->

</head>

<body>

<div id="app">
  <h1>Hello App!</h1>
  <p>
    <!-- use the router-link component for navigation. -->
    <!-- specify the link by passing the `to` prop. -->
    <!-- `<router-link>` will render an `<a>` tag with the correct `href` attribute -->
    <router-link to="/">Go to Home</router-link>
    <router-link to="/foo">Go to Foo</router-link>
    <router-link to="/bar">Go to Bar</router-link>
  </p>
  <!-- route outlet -->
  <!-- component matched by the route will render here -->
  <router-view></router-view>
</div>

<script>
// 1. Define route components.
// These can be imported from other files
const Home = { template: '<div>Home</div>' }
const Foo = { template: '<div>foo</div>' }
const Bar = { template: '<div>bar</div>' }

// 2. Define some routes
// Each route should map to a component.
// We'll talk about nested routes later.
const routes = [
  { path: '/', component: Home },
  { path: '/foo', component: Foo },
  { path: '/bar', component: Bar }
]

// 3. Create the router instance and pass the `routes` option
// You can pass in additional options here, but let's
// keep it simple for now.
const router = VueRouter.createRouter({
  // 4. Provide the history implementation to use. We are using the hash history for simplicity here.
  history: VueRouter.createWebHashHistory(),
  routes, // short for `routes: routes
})

// 5. Create and mount the root instance.
const app = Vue.createApp({})
// Make sure to _use_ the router instance to make the
// whole app router-aware.
app.use(router)

app.mount('#app')

// Now the app has started!
</script>
</body>

</html>

以下是點擊了 foo 以後,網頁的 DOM 產生的資料。 foo 的部分,會自動加上這兩個 css class class ="router-link-exact-active router-link-active"

<div id="app" data-v-app="">
   <h1>Hello App!</h1>
   <p>
     <a href="#/" class="">Go to Home</a>
     <a href="#/foo" class="router-link-active router-link-exact-active" aria-current="page">Go to Foo</a>
     <a href="#/bar" class="">Go to Bar</a>
   </p>
   <div>foo</div>
</div>

<router-link> 相關屬性

to

<!-- 直接填寫文字字串 -->
<router-link to="/home">Home</router-link>
<!-- 結果 -->
<a href="/home">Home</a>


<!-- 使用 v-bind,省略 path -->
<router-link v-bind:to="'/home'">Home</router-link>

<!-- 不寫 v-bind 也可以,就像綁定別的屬性一樣 -->
<router-link :to="'/home'">Home</router-link>

<!-- 同上 -->
<router-link :to="{ path: '/home' }">Home</router-link>

<!-- 命名的路由 -->
<router-link :to="{ name: 'user', params: { userId: 123 }}">User</router-link>

<!-- 帶查詢參數,下面的結果為 /register?plan=private -->
<router-link :to="{ path: '/register', query: { plan: 'private' }}">Register</router-link>

replace

如果不希望在 browser 留下 url history,可加上 replace

<router-link to="/home" replace>Home</router-link>

當點擊時,會呼叫 router.replace() 而不是 router.push()

active-class

設定當 link 啟用時,DOM 節點使用的 css class

<style>
   ._active{
      background-color : red;
   }
</style>
<p>
   <router-link v-bind:to = "{ path: '/route1'}" active-class = "_active">Router Link 1</router-link>
   <router-link v-bind:to = "{ path: '/route2'}">Router Link 2</router-link>
</p>

aria-current-value

預設為 "page",可能的值

'page' | 'step' | 'location' | 'date' | 'time' | 'true' | 'false' (string)

當 link 為 active 時,傳送給 aria-current 屬性的值

custom

預設為 "false"

決定 <router-link> 是不是"不要"產生到 <a> 裡面。如果使用 v-slot 產生 custom router link,預設要包裝在 <a> 裡面,如果增加 custom 屬性,就取消這個限制

<router-link to="/home" custom v-slot="{ navigate, href, route }">
  <a :href="href" @click="navigate">{{ route.fullPath }}</a>
</router-link>

會 render 為

<a href="/home">/home</a>
<router-link to="/home" v-slot="{ route }">
  <span>{{ route.fullPath }}</span>
</router-link>

會 render 為

<a href="/home"><span>/home</span></a>

exact-active-class

當 link 被精確匹配時,要啟用的 css class

<router-link> 的 v-slot

可產生自訂的 html tag,記得一定要加上 custom

ex:

<router-link
  to="/foo"
  custom
  v-slot="{ href, route, navigate, isActive, isExactActive }"
>
  <NavLink :active="isActive" :href="href" @click="navigate">
    {{ route.fullPath }}
  </NavLink>
</router-link>
  • href: resolved url,類似 a tag 的 href
  • route: resolved normalized location
  • navigate: 驅動 navigation 的 function,必要時,會自動 prevent events
  • isActive: 如果被 apply active class ,就會是 true
  • isExactActive: 如果被 apply exact active class,就會是 true

會 render 為

<navlink active="true" href="#/foo">/foo</navlink>

ex:

    <ul>
      <router-link
        to="/foo"
        custom
        v-slot="{ href, route, navigate, isActive, isExactActive }"
      >
        <li
          :class="[isActive && 'router-link-active', isExactActive && 'router-link-exact-active']"
        >
          <a :href="href" @click="navigate">{{ route.fullPath }}</a>
        </li>
      </router-link>
    </ul>

會 render 為

<ul>
  <li class="router-link-active router-link-exact-active"><a href="#/foo">/foo</a></li>
</ul>

Dynamic Route Matching

Vue 需要將某個 pattern 對應到一個 component 的方法,例如不同 userid 的 user 資料

$route.params 可用來協助對應 route 的 pattern 上的參數

const User = {
  template: '<div>User {{ $route.params.id }}</div>',
}

// these are passed to `createRouter`
const routes = [
  // dynamic segments start with a colon
  { path: '/users/:id', component: User },
]
pattern matching $route.params
/users/:id /users/john { id: 'john' }
/users/:id/posts/:postid /users/john/posts/123 { id: 'john', posted: '123' }

Reacting to Params Changes

因為 /users/john/users/mary 這兩個路徑會使用同一個 component,比較有效率的方法,是不重建 component,直接更新內容,但這樣也不會呼叫到 component 的 lifecycle hooks

const User = {
  template: '<div>User {{ $route.params.id }}</div>',
  created() {
    this.$watch(
      () => this.$route.params,
      (toParams, previousParams) => {
        // react to route changes...
        console.log("created toParams=", toParams, ", previousParams=",previousParams);
      }
    )
  },
  // navigation guard,可在這邊檢查並取消 navigation
  async beforeRouteUpdate(to, from) {
    // react to route changes...
    // this.userData = await fetchUser(to.params.id)
    console.log("beforeRouteUpdate to=", to, ", from=",from);
    this.userData = to.params.id
  },
}

Catch /404 Not Found Route

const routes = [
  // will match everything and put it under `$route.params.pathMatch`
  { path: '/:pathMatch(.*)*', name: 'NotFound', component: NotFound },
  // will match anything starting with `/user-` and put it under `$route.params.id`
  { path: '/user-:id(.*)', component: User },
]

如果直接在 brwoser 網址連結到

1-2-param.html#/not

就會是用 NotFound 這個 Component 處理

如果直接在 brwoser 網址連結到

1-2-param.html#/user-test/12345

會收到 $route.params.id 的值為 test/12345

Routes' Matching Syntax

大部分的 application 使用 static route 以及類似 /users/:userId 這樣的 route

custom regex

如果要在 url 分辨 orderId 及 productName,最簡單的方法就是加上 /o /p 靜態的部分用來區別

const routes = [
  // matches /o/3549
  { path: '/o/:orderId' },
  // matches /p/books
  { path: '/p/:productName' },
]

如果 orderId 跟 productName 可用數字/字串區分,可將 route 改為

const routes = [
  // /:orderId -> matches only numbers
  { path: '/:orderId(\\d+)' },
  // /:productName -> matches anything else
  { path: '/:productName' },
]

repeatable params

如果是 /first/second/third 這樣的 route

* 為 0 or more, + 為 1 or more

const routes = [
  // /:chapters -> matches /one, /one/two, /one/two/three, etc
  { path: '/:chapters+' },
  // /:chapters -> matches /, /one, /one/two, /one/two/three, etc
  { path: '/:chapters*' },
]

可用以下方式,將 array 參數轉換為 path

// given { path: '/:chapters*', name: 'chapters' },
router.resolve({ name: 'chapters', params: { chapters: [] } }).href
// produces /
router.resolve({ name: 'chapters', params: { chapters: ['a', 'b'] } }).href
// produces /a/b

// given { path: '/:chapters+', name: 'chapters' },
router.resolve({ name: 'chapters', params: { chapters: [] } }).href
// throws an Error because `chapters` is empty
const routes = [
  // only match numbers
  // matches /1, /1/2, etc
  { path: '/:chapters(\\d+)+' },
  // matches /, /1, /1/2, etc
  { path: '/:chapters(\\d+)*' },
]

optional param

? 代表 0 or 1

const routes = [
  // will match /users and /users/posva
  { path: '/users/:userId?' },
  // will match /users and /users/42
  { path: '/users/:userId(\\d+)?' },
]

Nested Routes

在 application 裡面常見到 nested components

ex:

/user/johnny/profile                  /user/johnny/posts
+------------------+                  +-----------------+
| User             |                  | User            |
| +--------------+ |                  | +-------------+ |
| | Profile      | |  +------------>  | | Posts       | |
| |              | |                  | |             | |
| +--------------+ |                  | +-------------+ |
+------------------+                  +-----------------+
<div id="app">
 <h1>Nested Views</h1>
  <p>
    <router-link to="/users/eduardo">/users/eduardo</router-link>
    <br />
    <router-link to="/users/eduardo/profile"
      >/users/eduardo/profile</router-link
    >
    <br />
    <router-link to="/users/eduardo/posts">/users/eduardo/posts</router-link>
  </p>
  <router-view></router-view>
</div>

<script>

const User = {
  template: '<h2>User {{ $route.params.username }}</h2><router-view></router-view>',
}
const UserHome = {
  template: '<div>Home</div>',
}
const UserProfile = {
  template: '<div>UserProfile</div>',
}
const UserPosts = {
  template: '<div>UserPosts</div>',
}

const routes = [
  {
    path: '/users/:username',
    component: User,
    children: [
      // UserHome will be rendered inside User's <router-view>
      // when /users/:username is matched
      { path: '', component: UserHome },

      // UserProfile will be rendered inside User's <router-view>
      // when /users/:username/profile is matched
      { path: 'profile', component: UserProfile },

      // UserPosts will be rendered inside User's <router-view>
      // when /users/:username/posts is matched
      { path: 'posts', component: UserPosts },
    ],
  }
]

const router = VueRouter.createRouter({
  history: VueRouter.createWebHashHistory(),
  routes,
})

const app = Vue.createApp({})
app.use(router)

app.mount('#app')

</script>

Programmatic Navigation

除了用 <router-link> 產生 url anchor tags 以外,也可以用程式處理

在 vue application 中,可用 $router 為 route instance,故要呼叫 this.$router.push

<router-link :to="..."> 就等同於 router.push(...)

// literal string path
router.push('/users/eduardo')

// object with path
router.push({ path: '/users/eduardo' })

// named route with params to let the router build the url
router.push({ name: 'user', params: { username: 'eduardo' } })

// 如果有 path,就會忽略 params
// with query, resulting in /register?plan=private
router.push({ path: '/register', query: { plan: 'private' } })

// with hash, resulting in /about#team
router.push({ path: '/about', hash: '#team' })

可用 uername 變數

const username = 'eduardo'
// we can manually build the url but we will have to handle the encoding ourselves
router.push(`/user/${username}`) // -> /user/eduardo
// same as
router.push({ path: `/user/${username}` }) // -> /user/eduardo
// if possible use `name` and `params` to benefit from automatic URL encoding
router.push({ name: 'user', params: { username } }) // -> /user/eduardo
// `params` cannot be used alongside `path`
router.push({ path: '/user', params: { username } }) // -> /user

replace current location

切換網址,但不會 push 到 history

<router-link :to="..." replace> 等同 router.replace(...)

router.push({ path: '/home', replace: true })
// equivalent to
router.replace({ path: '/home' })

history

// go forward by one record, the same as router.forward()
router.go(1)

// go back by one record, the same as router.back()
router.go(-1)

// go forward by 3 records
router.go(3)

// fails silently if there aren't that many records
router.go(-100)
router.go(100)

named route

為 route 命名,優點:

  • 沒有 hardcoded url
  • 可自動 encode/decode params
  • 填寫 url 不會發生 typo
  • bypass path ranking
const routes = [
  {
    path: '/user/:username',
    name: 'user',
    component: User
  }
]

用以下方式使用 named route

<router-link :to="{ name: 'user', params: { username: 'erina' }}">
  User
</router-link>

router.push({ name: 'user', params: { username: 'erina' } })

named views

有時候,需要一次顯示多個 views,但不是 nested view

/settings/emails                                       /settings/profile
+-----------------------------------+                  +------------------------------+
| UserSettings                      |                  | UserSettings                 |
| +-----+-------------------------+ |                  | +-----+--------------------+ |
| | Nav | UserEmailsSubscriptions | |  +------------>  | | Nav | UserProfile        | |
| |     +-------------------------+ |                  | |     +--------------------+ |
| |     |                         | |                  | |     | UserProfilePreview | |
| +-----+-------------------------+ |                  | +-----+--------------------+ |
+-----------------------------------+                  +------------------------------+
<div id="app">
  <h1>Nested Named Views</h1>
  <router-view></router-view>
</div>

<script>

const About = {
  template: '<h1>About</h1>',
}
const Home = {
  template: '<div>Home</div>',
}
const UserEmailsSubscriptions = {
  template: '<div><h3>Email Subscriptions</h3></div>',
}
const UserProfile = {
  template: '<div><h3>UserProfile</h3></div>',
}
const UserProfilePreview = {
  template: '<div><h3>UserProfilePreview</h3></div>',
}


const UserSettingsNavTemplate = `
  <div class="us__nav">
    <router-link to="/settings/emails">emails</router-link>
    <br />
    <router-link to="/settings/profile">profile</router-link>
  </div>
  `
// const UserSettingsNav = {
//   template: UserSettingsNavTemplate
// }

const UserSettingsTemplate = `
  <div class="us">
    <h2>User Settings</h2>
    <user-settings-nav />
    <router-view class="us__content" />
    <router-view name="helper" class="us__content us__content--helper" />
  </div>
  `
const UserSettings = {
  template: UserSettingsTemplate
}

const routes = [
    {
      path: '/settings',
      // You could also have named views at tho top
      component: UserSettings,
      children: [
        {
          path: 'emails',
          component: UserEmailsSubscriptions,
        },
        {
          path: 'profile',
          components: {
            default: UserProfile,
            helper: UserProfilePreview,
          },
        },
      ],
    },
  ]

const router = VueRouter.createRouter({
  history: VueRouter.createWebHashHistory(),
  routes,
})

const app = Vue.createApp({})
app.use(router)

app.component('user-settings-nav', {
  template: UserSettingsNavTemplate
})

app.mount('#app')

</script>

Redirect and Alias

直接在 routes 做 redirect

const routes = [{ path: '/home', redirect: '/' }]

const routes = [{ path: '/home', redirect: { name: 'homepage' } }]

用 redirect function 做 dynamic redirect

const routes = [
  {
    // /search/screens -> /search?q=screens
    path: '/search/:searchText',
    redirect: to => {
      // the function receives the target route as the argument
      // we return a redirect path/location here.
      return { path: '/search', query: { q: to.params.searchText } }
    },
  },
  {
    path: '/search',
    // ...
  },
]

可 redirect 到相對路徑

const routes = [
  {
    // will always redirect /users/123/posts to /users/123/profile
    path: '/users/:id/posts',
    redirect: to => {
      // the function receives the target route as the argument
      // a relative location doesn't start with `/`
      // or { path: 'profile'}
      return 'profile'
    },
  },
]

alias

/ alias 為 /home ,代表瀏覽 /home/ 都是一樣的 component

const routes = [{ path: '/', component: Homepage, alias: '/home' }]

在 nested view 也可以用

const routes = [
  {
    path: '/users',
    component: UsersLayout,
    children: [
      // this will render the UserList for these 3 URLs
      // - /users
      // - /users/list
      // - /people
      { path: '', component: UserList, alias: ['/people', 'list'] },
    ],
  },
]

如果有參數

const routes = [
  {
    path: '/users/:id',
    component: UsersByIdLayout,
    children: [
      // this will render the UserDetails for these 3 URLs
      // - /users/24
      // - /users/24/profile
      // - /24
      { path: 'profile', component: UserDetails, alias: ['/:id', ''] },
    ],
  },
]

Passing Props to Route Components

在 component 使用 $route 時,會跟 route 綁定在一起。可利用 propsoption

可將以下語法

const User = {
  template: '<div>User {{ $route.params.id }}</div>'
}
const routes = [{ path: '/user/:id', component: User }]

替換為

const User = {
  // make sure to add a prop named exactly like the route param
  props: ['id'],
  template: '<div>User {{ id }}</div>'
}
const routes = [{ path: '/user/:id', component: User, props: true }]

Boolean mode

props 設定為 true,就表示 route.params 會指定為 component props

Named views

可為每一個 named view 定義 props

const routes = [
  {
    path: '/user/:id',
    components: { default: User, sidebar: Sidebar },
    props: { default: true, sidebar: false }
  }
]

Object mode

const routes = [
  {
    path: '/promotion/from-newsletter',
    component: Promotion,
    props: { newsletterPopup: false }
  }
]

Function mode

const routes = [
  {
    path: '/search',
    component: SearchUser,
    props: route => ({ query: route.query.q })
  }
]

URL /search?q=vue 會將 {query: 'vue'} 以 props 傳給 SearchUser component


History Mode

Hash Mode

在網址後面加上 #,不利於 search engine

import { createRouter, createWebHashHistory } from 'vue-router'

const router = createRouter({
  history: createWebHashHistory(),
  routes: [
    //...
  ],
})

HTML5 Mode

import { createRouter, createWebHistory } from 'vue-router'

const router = createRouter({
  history: createWebHistory(),
  routes: [
    //...
  ],
})

在 url 會看到 https://example.com/user/id ,但實際上如果直接在 browser 對 server 發送 https://example.com/user/id 這個 request,會出現 404 Error

解決方式就是單純地將該網址用 index.html 服務

References

Vue router v4.x

Vue router v4.x API Reference

Vue.js 路由

Vue router 與前端路由管理

2022/3/21

Vue.js Essentials 3

Event Handling

Listening to Evnets

可使用 v-on directive (通常縮寫為 @)監聽 DOM events,並執行某些 js script

v-on:click="methodName"@click="methodName" 都可以

<div id="basic-event">
  <button @click="counter += 1">Add 1</button>
  <p>The button above has been clicked {{ counter }} times.</p>
</div>

<script>
Vue.createApp({
  data() {
    return {
      counter: 0
    }
  }
}).mount('#basic-event')
</script>

Method Event Handlers

如果 js logic 比較複雜,v-on 可改用 method 而不是 attribute

<div id="event-with-method">
  <!-- `greet` is the name of a method defined below -->
  <button @click="greet">Greet</button>
</div>

<script>
Vue.createApp({
  data() {
    return {
      name: 'Vue.js'
    }
  },
  methods: {
    greet(event) {
      // `this` inside methods points to the current active instance
      alert('Hello ' + this.name + '!')
      // `event` is the native DOM event
      if (event) {
        alert(event.target.tagName)
      }
    }
  }
}).mount('#event-with-method')
</script>

Methods in Inline Handlers

可在 inline js statement 使用 method

<div id="inline-handler">
  <button @click="say('hi')">Say hi</button>
  <button @click="say('what')">Say what</button>
</div>

<script>
Vue.createApp({
  methods: {
    say(message) {
      alert(message)
    }
  }
}).mount('#inline-handler')
</script>

如果需要使用原本的 DOM event,可用 $event 傳入

<button @click="warn('Form cannot be submitted yet.', $event)">
  Submit
</button>

<script>
Vue.createApp({
  methods: {
    warn(message, event) {
      // now we have access to the native event
      if (event) {
        event.preventDefault()
      }
      alert(message)
    }
  }
}).mount('#inline-handler')
</script>

Multiple Event Handlers

可用 , 區隔,同時使用多個 methods

<!-- both one() and two() will execute on button click -->
<button @click="one($event), two($event)">
  Submit
</button>

<script>
Vue.createApp({
  methods: {
    one(event) {
      // first handler logic...
    },
    two(event) {
      // second handler logic...
    }
  }
}).mount('#inline-handler')
</script>

Event Modifiers

在 event handler 裡面呼叫 event.preventDefault()event.stopPropagation() 很常見。vue 提供 v-on 使用的 event modifier

  • .stop
  • .prevent
  • .capture
  • .self
  • .once
  • .passive
<!-- the click event's propagation will be stopped -->
<a @click.stop="doThis"></a>

<!-- the submit event will no longer reload the page -->
<form @submit.prevent="onSubmit"></form>

<!-- modifiers can be chained -->
<a @click.stop.prevent="doThat"></a>

<!-- just the modifier -->
<form @submit.prevent></form>

<!-- use capture mode when adding the event listener -->
<!-- i.e. an event targeting an inner element is handled here before being handled by that element -->
<div @click.capture="doThis">...</div>

<!-- only trigger handler if event.target is the element itself -->
<!-- i.e. not from a child element -->
<div @click.self="doThat">...</div>

注意:順序很重要

@click.prevent.self 會停止所有 clicks

@click.self.prevent 只會停止 clicks on the element itself

<!-- the click event will be triggered at most once -->
<a @click.once="doThis"></a>

.once 可用在 component events,跟其他 modifier 不同。

vue 提供 .passive modifier,跟 addEventListenerpassive option 一樣

<!-- the scroll event's default behavior (scrolling) will happen -->
<!-- immediately, instead of waiting for `onScroll` to complete  -->
<!-- in case it contains `event.preventDefault()`                -->
<div @scroll.passive="onScroll">...</div>

.passive 在改善 mobile device 方面特別有用

注意:.passive.prevent 不能一起使用,因為 .prevent 會被忽略,造成 browser 發生 warning。 passive 會跟 browser 互動,不需要 prevent the event's default behavior

Key Modifiers

在監聽 keyboard events 時,常需要檢查 keys,vue 提供 v-on@ 使用 key modifier

<!-- only call `vm.submit()` when the `key` is `Enter` -->
<input @keyup.enter="submit" />

可使用 KeyboardEvent.key 定義的 key names,要轉為 kebab-case

<!-- 當 $event.key 為 PageDown 時,才會呼叫該 handler -->
<input @keyup.page-down="onPageDown" />

以下為常用的 key 的 aliases

  • .enter
  • .tab
  • .delete (captures both "Delete" and "Backspace" keys)
  • .esc
  • .space
  • .up
  • .down
  • .left
  • .right

System Modifier Keys

可限制某個 modifier key 被按下時,才會驅動 mouse/keyboard event listener

  • .ctrl
  • .alt
  • .shift
  • .meta 在 Mac 是 ⌘,在 Windows 是 ⊞,在 Sun Microsystems keyboard 是 ◆,在特殊的 MIT and Lisp machine keyboard (ex: Knight kryboard, space-cadetkeyboard) 是 META,在 Symbolics keyboards 是 META 或 Meta
<!-- Alt + Enter -->
<input @keyup.alt.enter="clear" />

<!-- Ctrl + Click -->
<div @click.ctrl="doSomething">Do something</div>

modifier keys 通常是用 keyup event,但 keyup.ctrl 只會在按下 ctrl 時被 trigger,不會在 release ctrl 時被 trigger

.exact modifier

.exact 可控制 system modifier 的 exact combination

<!-- this will fire even if Alt or Shift is also pressed -->
<button @click.ctrl="onClick">A</button>

<!-- this will only fire when Ctrl and no other keys are pressed -->
<button @click.ctrl.exact="onCtrlClick">A</button>

<!-- this will only fire when no system modifiers are pressed -->
<button @click.exact="onClick">A</button>

mouse button modifier

  • .left
  • .right
  • .middle

Why Listeners in HTML?

vue 的 event modifier 策略違反了傳統的 "separation of concerns" 規則,因為 handler function 與 expression 跟 ViewModel 綁定,這樣做的優點:

  1. 移除 HTML template 時,就移除了 handler function,很容易維護
  2. 因不需要在 js 手動綁定 event listener,ViewModel 的 code 可單純只有 logic 且為 DOM-free,很容易測試
  3. 當 ViewModel 被刪除時,所有 event listener 也自動被移除,不需要手動移除

Form Input Bindings

Basic Usage

可使用 v-model 在 form input, textarea, select 產生 two-way data binding,根據 input type 自動更新 element。v-model 是根據 user input event 更新 data + 特殊 edge case 的 syntax sugar

注意:v-model 會忽略 fome element 裡面初始的 value, checked, selected attributes,會使用 current active instance data 作為 source of truth,因此要在 js 的 data option 裡面宣告初始值。

v-model 會因為不同的 input element 使用不同的 properties,產生不同 events

  1. text, textarea 使用 value property 及 input event
  2. checkboxes, radiobuttons 使用 checked property 及 change event
  3. select 使用 value 為 prop 及 change event

注意:v-model 在 IME (Chinese, Japanese, Korean..) 語系中,在 IME composition 時,並不會讓 v-model 更新,如果需要處理輸入法的異動更新,要改用 input event listener 及 value binding

  • Text
<input v-model="message" placeholder="edit me" />
<p>Message is: {{ message }}</p>

<script>
Vue.createApp({
  data() {
    return {
      message: ''
    }
  }
}).mount('#v-model-basic')
</script>
  • Multiline Text
<span>Multiline message is:</span>
<p style="white-space: pre-line;">{{ message }}</p>
<br />
<textarea v-model="message" placeholder="add multiple lines"></textarea>

<script>
Vue.createApp({
  data() {
    return {
      message: ''
    }
  }
}).mount('#v-model-textarea')
</script>

textarea 不能用 interpolation

<!-- bad -->
<textarea>{{ text }}</textarea>

<!-- good -->
<textarea v-model="text"></textarea>
  • Checkbox
<input type="checkbox" id="checkbox" v-model="checked" />
<label for="checkbox">{{ checked }}</label>

<script>
Vue.createApp({
  data() {
    return {
      checked: false
    }
  }
}).mount('#v-model-checkbox')
</script>
<div id="v-model-multiple-checkboxes">
  <input type="checkbox" id="jack" value="Jack" v-model="checkedNames" />
  <label for="jack">Jack</label>
  <input type="checkbox" id="john" value="John" v-model="checkedNames" />
  <label for="john">John</label>
  <input type="checkbox" id="mike" value="Mike" v-model="checkedNames" />
  <label for="mike">Mike</label>
  <br />
  <span>Checked names: {{ checkedNames }}</span>
</div>

<script>
Vue.createApp({
  data() {
    return {
      checkedNames: []
    }
  }
}).mount('#v-model-multiple-checkboxes')
</script>
  • Radio
<div id="v-model-radiobutton">
  <input type="radio" id="one" value="One" v-model="picked" />
  <label for="one">One</label>
  <br />
  <input type="radio" id="two" value="Two" v-model="picked" />
  <label for="two">Two</label>
  <br />
  <span>Picked: {{ picked }}</span>
</div>

<script>
Vue.createApp({
  data() {
    return {
      picked: ''
    }
  }
}).mount('#v-model-radiobutton')
</script>
  • Select
<div id="v-model-select" class="demo">
  <select v-model="selected">
    <option disabled value="">Please select one</option>
    <option>A</option>
    <option>B</option>
    <option>C</option>
  </select>
  <span>Selected: {{ selected }}</span>
</div>

<script>
Vue.createApp({
  data() {
    return {
      selected: ''
    }
  }
}).mount('#v-model-select')
</script>

如果 v-model expression 的初始值跟 option 不吻合,<select> element 會以 "unselected" state 被 rendered。在 iOS 會造成 user 無法選擇第一個 element,因為 iOS 不會 fire a change event。

建議用 empty value 增加一個 disabled option,類似上面提供的例子一樣


multiple select

<select v-model="selected" multiple>
  <option>A</option>
  <option>B</option>
  <option>C</option>
</select>
<br />
<span>Selected: {{ selected }}</span>

<script>
Vue.createApp({
  data() {
    return {
      selected: ''
    }
  }
}).mount('#v-model-select')
</script>

v-for 實作dynamic options

<div id="v-model-select-dynamic" class="demo">
  <select v-model="selected">
    <option v-for="option in options" :value="option.value">
      {{ option.text }}
    </option>
  </select>
  <span>Selected: {{ selected }}</span>
</div>

<script>
Vue.createApp({
  data() {
    return {
      selected: 'A',
      options: [
        { text: 'One', value: 'A' },
        { text: 'Two', value: 'B' },
        { text: 'Three', value: 'C' }
      ]
    }
  }
}).mount('#v-model-select-dynamic')
</script>

Value Bindings

radio, checkbox, select option 中,v-model binding values 通常是 static string (checkbox 是 booleans)

<!-- `picked` is a string "a" when checked -->
<input type="radio" v-model="picked" value="a" />

<!-- `toggle` is either true or false -->
<input type="checkbox" v-model="toggle" />

<!-- `selected` is a string "abc" when the first option is selected -->
<select v-model="selected">
  <option value="abc">ABC</option>
</select>

如果要 dynamic property,可使用 v-bind

  • Checkbox

true-value, false-value 不會影響 input 的 value attribute

<input type="checkbox" v-model="toggle" true-value="yes" false-value="no" />
// when checked:
vm.toggle === 'yes'
// when unchecked:
vm.toggle === 'no'
  • Radio
<input type="radio" v-model="pick" v-bind:value="a" />
// when checked:
vm.pick === vm.a
  • Select Options
<select v-model="selected">
  <!-- inline object literal -->
  <option :value="{ number: 123 }">123</option>
</select>
// when selected:
typeof vm.selected // => 'object'
vm.selected.number // => 123

Modifiers

  • .lazy

v-model 預設會在每一次 input event 發生時,同步 input data,可增加 lazy modifier,修改為 change event 後同步資料

<!-- synced after "change" instead of "input" -->
<input v-model.lazy="msg" />
  • .number

如果想讓 user input 自動 typecast 為 number,可用 .number

<input v-model.number="age" type="number" />

如果 input value 無法被 parseFloat() parsing 時,會回傳原始 value

  • .trim

自動 trim space

<input v-model.trim="msg" />

v-model with Components

vue component 可產生 reusable inputs with customized behavior


Components Basics

以下為 vue component 的 example,通常在 vue application,會使用 Single File Component,而不是 string template。

Component 是 reusable instances with a name

<div id="components-demo">
  <button-counter></button-counter>
</div>

<script>
// Create a Vue application
const app = Vue.createApp({})

// Define a new global component called button-counter
app.component('button-counter', {
  data() {
    return {
      count: 0
    }
  },
  template: `
    <button v-on:click="count++">
      You clicked me {{ count }} times.
    </button>`
})

app.mount('#components-demo')
</script>

component 就是 reusable instance,故能夠使用data, computed, watch, methods, and lifecycle hooks

Reusing Components

每一個 component 都有各自的 instance,獨立的 count

<div id="components-demo">
  <button-counter></button-counter>
  <button-counter></button-counter>
  <button-counter></button-counter>
</div>

Organizing Components

在 app 裡面會使用 tree of nested components

例如會有 components for header, sidebar, content area

為了在 templates 裡面使用 component,必須要先向 Vue 註冊,有兩種註冊類型:global 與 local。

component method 是 global component

const app = Vue.createApp({})

// global component
app.component('my-component-name', {
  // ... options ...
})

Passing Data to Child Components with Props

props 是可以跟 component 註冊的 custom attribute

例如 blog post component,可用 props 提供 component 接受的 list of props

'title'變成該 component 的 property,然後就能在 template 裡面使用

<div id="blog-post-demo" class="demo">
  <blog-post title="My journey with Vue"></blog-post>
  <blog-post title="Blogging with Vue"></blog-post>
  <blog-post title="Why Vue is so fun"></blog-post>
</div>

<script>
const app = Vue.createApp({})

app.component('blog-post', {
  props: ['title'],
  template: `<h4>{{ title }}</h4>`
})

app.mount('#blog-post-demo')
</script>

<div id="blog-posts-demo">
  <blog-post
    v-for="post in posts"
    :key="post.id"
    :title="post.title"
  ></blog-post>
</div>

<script>
const App = {
  data() {
    return {
      posts: [
        { id: 1, title: 'My journey with Vue' },
        { id: 2, title: 'Blogging with Vue' },
        { id: 3, title: 'Why Vue is so fun' }
      ]
    }
  }
}

const app = Vue.createApp(App)

app.component('blog-post', {
  props: ['title'],
  template: `<h4>{{ title }}</h4>`
})

app.mount('#blog-posts-demo')
</script>

可使用 v-bind 做 dynamic pass props,在一開始不知道有多少 content 資料的時候很有用。

Listening to Child Components Events

ex: 要為 blogpost 增加 accessibility feature,把文字放大

增加 postFontSize data property

<div id="blog-posts-events-demo" class="demo">
  <div :style="{ fontSize: postFontSize + 'em' }">
    <blog-post
       v-for="post in posts"
       :key="post.id"
       :title="post.title"
       @enlarge-text="postFontSize += 0.1"
    ></blog-post>
  </div>
</div>

<script>
const app = Vue.createApp({
  data() {
    return {
      posts: [
        { id: 1, title: 'My journey with Vue'},
        { id: 2, title: 'Blogging with Vue'},
        { id: 3, title: 'Why Vue is so fun'}
      ],
      postFontSize: 1
    }
  }
})

app.component('blog-post', {
  props: ['title'],
  template: `
    <div class="blog-post">
      <h4>{{ title }}</h4>
      <button @click="$emit('enlargeText')">
        Enlarge text
      </button>
    </div>
  `
})

app.mount('#blog-posts-events-demo')
</script>

可用 emits option 檢查 all the events that a component emits

app.component('blog-post', {
  props: ['title'],
  emits: ['enlargeText']
})
  • Emitting a value with an Event

可在 $emit 增加第二個參數

<button @click="$emit('enlargeText', 0.1)">
  Enlarge text
</button>
<blog-post ... @enlarge-text="postFontSize += $event"></blog-post>

或是 event handler 為 method,可在第一個參數傳入 value

<blog-post ... @enlarge-text="onEnlargeText"></blog-post>
methods: {
  onEnlargeText(enlargeAmount) {
    this.postFontSize += enlargeAmount
  }
}
  • Using v-model on Components

custom events 可產生 custom inputs 跟 v-model 一起使用

<input v-model="searchText" />

跟上面一樣

<input :value="searchText" @input="searchText = $event.target.value" />

如果用在 component,就跟這個一樣

<custom-input
  :model-value="searchText"
  @update:model-value="searchText = $event"
></custom-input>

在 component 裡面的 <input> 必須滿足

  1. bind value property 到 modelValue prop
  2. input,新的 value 會產生 update:modelValue event
app.component('custom-input', {
  props: ['modelValue'],
  emits: ['update:modelValue'],
  template: `
    <input
      :value="modelValue"
      @input="$emit('update:modelValue', $event.target.value)"
    >
  `
})

現在就可以使用 v-model

<custom-input v-model="searchText"></custom-input>

另一個在 component 實作 v-model 的方法,是用 computed properties 定義 getter, setter,get 要回傳 modelValue property,set 要產生相關 event

app.component('custom-input', {
  props: ['modelValue'],
  emits: ['update:modelValue'],
  template: `
    <input v-model="value">
  `,
  computed: {
    value: {
      get() {
        return this.modelValue
      },
      set(value) {
        this.$emit('update:modelValue', value)
      }
    }
  }
})

Content Distribution with Slots

可傳送 content 給 component

<div id="slots-demo" class="demo">
  <alert-box>
    Something bad happened.
  </alert-box>
</div>

<script>
const app = Vue.createApp({})

app.component('alert-box', {
  template: `
    <div class="demo-alert-box">
      <strong>Error!</strong>
      <slot></slot>
    </div>
  `
})

app.mount('#slots-demo')
</script>

slot 裡面就放了 Something bad happened.

Dynamic Components

<div id="dynamic-component-demo" class="demo">
  <button
     v-for="tab in tabs"
     v-bind:key="tab"
     v-bind:class="['tab-button', { active: currentTab === tab }]"
     v-on:click="currentTab = tab"
   >
    {{ tab }}
  </button>

  <component v-bind:is="currentTabComponent" class="tab"></component>
</div>

<script>
const app = Vue.createApp({
  data() {
    return {
      currentTab: 'Home',
      tabs: ['Home', 'Posts', 'Archive']
    }
  },
  computed: {
    currentTabComponent() {
      return 'tab-' + this.currentTab.toLowerCase()
    }
  }
})

app.component('tab-home', {
  template: `<div class="demo-tab">Home component</div>`
})
app.component('tab-posts', {
  template: `<div class="demo-tab">Posts component</div>`
})
app.component('tab-archive', {
  template: `<div class="demo-tab">Archive component</div>`
})

app.mount('#dynamic-component-demo')
</script>

DOM Template Parsing Caveats

如果想直接在 DOM 撰寫 template,vue 會從 DOM 取得 template string,這樣可能會發生 browser 在 native HTML parsing 的警告

某些 html element 有限制裡面可以放的 element,ex: ul, ol, table, select

當這樣寫的時候,會產生警告

<table>
  <blog-post-row></blog-post-row>
</table>

解決方式,用 is ,裡面一定要用 "vue:" 為 prefix

<table>
  <tr is="vue:blog-post-row"></tr>
</table>

html attribute name 為 case-insensitive

如果在 in-DOM template 使用 camelCased prop name, event handler parameters,需要改為 kebab-cased (hyphen-delimited)

// camelCase in JavaScript

app.component('blog-post', {
  props: ['postTitle'],
  template: `
    <h3>{{ postTitle }}</h3>
  `
})
<!-- kebab-case in HTML -->

<blog-post post-title="hello!"></blog-post>

References

Vue Guide

重新認識 Vue.js