2019/7/29

NFL(No Free Lunch Theorems) 沒有免費的午餐定理


在認識或瞭解 machine learing 或 AI 的概念後,通常會想到,如果能有一個可以處理所有問題的 AI,那麼就可以解決所有問題,那就能省去大量人力,大家都不用工作了。這是一個尋找 AI 的通用演算法的問題,只要能有一個超強的演算法,那就能很快地製造出符合不同需求的 AI 機器人。


但是在尋找這個演算法以前,我們要先知道,已經有人用了數學的方法,證明了並不存在一個能一統天下的 AI 演算法模型,這就是 NFL(No Free Lunch Theorems) 沒有免費的午餐定理。


NFL 定理 www.no-free-lunch.org 有兩個,一個是 No Free Lunch for Supervised Machine Learning (WOLPERT, David H., 1996. The lack of a priori distinctions between learning algorithms. Neural Computation, 8(7), 1341–1390.),一個是 No Free Lunch for Search/Optimization (WOLPERT, David H., and William G. MACREADY, 1997. No free lunch theorems for optimization. IEEE Transactions on Evolutionary Computation, 1(1), 67–82.)。


實際上在了解到這個定理的概念後,我們要知道,在不考慮具體問題的情況下,沒有任何一個算法比另一個算法更優,甚至直接胡亂猜測還會更好。我們無法去討論哪一個演算法比較好,但如果針對某個具體的特定的問題,確實可找到表現比較好的機器學習演算法,但這個演算法,卻無法解決其他的問題。換句話說,不同的問題,就可以找到最適當的演算法,而每個演算法,都有各自適用的問題。


也可以說如果我們對要解決的問題一無所知,且並假設其分佈完全隨機且平等,那麼任何演算法的預期性能都是相似的。在某個領域、特定假設下表現卓越的演算法,不一定在另一個領域也能是最厲害的。正因如此,我們才需要研究和發明更多的機器學習算法來處理不同的假設和數據,也就是處理不同的問題。


華爾街漫步 是一本投資指南,其中廣為人知的「隨機漫步理論」研究,也就是說一隻矇著眼睛的猴子,對著眾多股票隨意擲飛鏢,所挑選出來的投資組合,也會跟專家挑的組合一樣好,猴子隨機選股大勝專業經理人。就像是 NFL 有著類似的概念,特定的演算法就像是經理人選擇的股票一樣,沒有任何演算法/選股組合可以證明,他的選股策略比較厲害。


NFL for Machine Learning 有兩條規則


  1. 沒有一個機器學習演算法,在所有可能的函數中,能夠比隨機猜測的結果更好。
  2. 每個機器學習演算法都必須包含一些數據之外的知識或者假設,才能夠將數據一般化。

要用什麼策略選擇一個適當的演算法?


想像一個由 n 個 solution(算法) 與 m 個 problem 構成的矩陣,每一個格子的值表示問題被解決的程度。


  1. Restarting


    重複運算相同的演算法,會產生不同的結果,得到多個 solution,然後分析某個演算法,看看是否為相對較優良的演算法。這種方式特別適合用於初始 & 過程隨機化的算法,因為這些演算法每次執行都會得到不完全一樣的結果。

  2. Ordinal Optimization + Softend Goals


    因為計算 n x m 矩陣實際上每個格子裡面的「值」,可能是很複雜的向量/矩陣等需要耗費大量資源來處理。為了簡化計算的負擔, Ordinal Optimization 只考慮 A 算法是否比 B 算法好,而不管兩者之間的差距有多大。


    Softened Goals 則是常見的取捨法則:放棄追求「最最最好」的解法,轉而追求「足夠好」的方式。

  3. Ensemble Learning


    透過多個演算法彼此獨立工作,最終以類似「投票」、「比稿」的方式來決定最終預測的結果值。


References


應該如何理解No Free Lunch Theorems for Optimization?


百度百科 no free lunch


機器學習裡不存在的免費午餐:NO FREE LUNCH THEOREMS


機器學習周志華--沒有免費的午餐定理


帶你瞭解機器學習(一): 機器學習中的“哲學”


No Free Lunch on Machine Learning

2019/7/21

Linux IO: select, poll, epoll


以下是 Linux 的 IO model 的說明,另外 select, poll 及 epoll 是 IO multiplexing 的三種方法。


Kernal Space, User Space


Linux 是多工作業系統,因此有可能會發生多個 process 競爭相同的記憶體位址的狀況,為了解決衝突的問題,由 kernel 進行資源分配,也可避免資源佔用的問題,也可避免異動了別的 process 的資源而造成系統 crash。


CPU 執行程式時,會在 user space 與 kernel space 之間來回切換,user space 的系統函式庫,會轉換為 kernel space 的 system call,並由 kernel 處理,當 system call 完成後,就會回到 user space 繼續下去。


32 bits 的 OS,定址空間是 2^32 也就是 4G。kernel space 限制為 1G (虛擬地址0xC0000000到0xFFFFFFFF),而 user space 為 3G (虛擬地址0x00000000到0xBFFFFFFF),由各 process 使用。


64 bits 的 OS,會將 virtual address 分成一半,第一個 bit 為 0 是 user space,第一個 bit 為 1 是 kernel space,理論上是 8EB+8EB。但目前 processors 只實作了 48 bits,也就是 128TB+128TB。


process context switching


為了控制讓多個 process 分享系統資源,kernel 必須能夠儲存目前在 CPU 運作的 process,載入並執行新的 process,這個切換方式稱為 context switching,時間長短由硬體運算能力決定。


context switching 有以下的步驟


1.儲存 CPU 的 context,包括program counter和其他 register
2.更新PCB (Process Control Block)
3.把進程的PCB移入相應的queue,如 ready/blocking 等隊列
4.選擇另一個進程執行,並更新其PCB
5.更新memory的資料結構
6.恢復 CPU context


FD: file descriptor


file descriptor 是指向檔案 reference 的抽象概念。他是非負整數的索引值,指向 kernel 為每一個 process 維護的開啟檔案的記錄表,當程式打開或建立一個檔案,kernel 就會產生一個 file descriptor 給 process。

每一個 linux process 都有三個標準的 POSIX file descriptor: stdin 0, stdout 1, stderr 2


Buffered I/O


大多數文件系統的默認I/O 操作都是 Buffered I/O,在 Linux 會將 IO 資料先暫存在 page cache 中,也就是先複製到 kernel 的 buffer,然後再由 kernel buffer 複製到 user space。


Buffered I/O 分離了 user space 及實際的儲存設備,可以減少 HD 的讀取次數,提高系統效能。


但也因為多次複製,可能會造成 CPU 及 cache buffer 的消耗,有些特殊的應用,會避開 kernel cache buffer,而直接由 user space 儲存到 HD,以獲取更高的效能。


IO model


因為資料會先複製到 kernel buffer 裡面,然後再複製到 user space,當對一個資料進行 read,會經歷兩個階段:


  1. waiting for data to be ready
  2. copying the data from the kernel to the process

因為兩階段的 IO,linux 產生了五種 IO model


  1. blocking IO
  2. nonblocking IO
  3. IO multiplexing
  4. signal driven IO (不常用)
  5. asynchronous IO

blocking IO


linux 預設大部分的 socket 都是使用 blocking IO,當 process 呼叫 recv_from,會進入 wait for data 階段,在這個階段的 process 會進入 blocking 狀態,直到 kernel 將資料複製到 user space,該 process 才會解除 blocking 狀態,重新運作。


blocking IO 就是兩個階段的 IO 都被 block


nonblocking IO


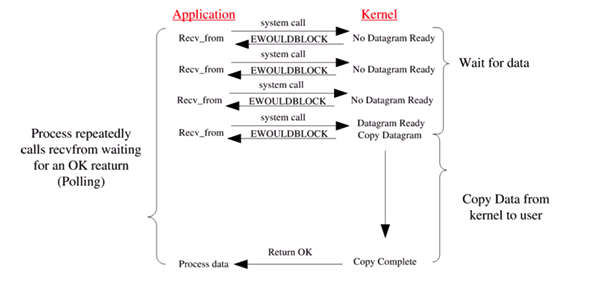
當 process 呼叫 recv_from 如果 kernel 還沒將資料準備好,他不會 block process,而是產生 error,直到 kernel 將資料準備好,就會複製到 user space,並完成該讀取的工作。


nonblocking 需要 process 不斷向 kernel 詢問,資料是否 ready。


IO multiplexing


這就是常見的 select, poll, epoll,也稱為 event driven IO。這個方式可讓單一 porcess 就可以處理多個 IO,他會不斷地 polling 多個 socket,當某個 socket 有收到資料,就會主動callback 通知 process。


如果是 select,當 process 呼叫了 select,該 process 就會被 block,同時 kernel 會監控所有 select 處理的 sockets,如果有資料,select 就會 return,然後再由 process 呼叫 read,將資料由 kernel 複製到 user space。


這個方法類似 blocking IO,但進行了兩個 system call (select 及 recv_from),但 select 可處理多個 sockets。


select/epoll 的優點是可以處理多個 sockets,而不是效能。一般在 IO multiplexing 中,socket 都是設定為 non-blocking 的,process 是在 select 被 block 而不是 recv_from。


signal driven


先通知 kernel 如果某個 socket 有資料時,就以 signal 通知 process,process 在第二個步驟,才會被 block。


asynchronous


當 process 進行 read,就可以處理別的事情,當 kernel 收到非同步 read,就會馬上 return,直到將資料複製到 user space,完成後,才會發送 signal 給 process,通知已經完成了 read。


Comparison


  • non-blocking 跟 asynchronous 是不同的

  • synchronous 跟 asynchronous 的差異是 IO operation 會不會 blocking process,因此前面四種 model 都屬於 synchronous IO

  • nonblocking IO 中,在複製資料到 user space 的步驟,還是會有 blocking 的狀態


IO Multiplexing: select, poll, epoll


IO Multiplexing 可讓單一 process 監視多個 fd,當某個 fd 有資料,就可通知 process 進行 IO 操作,select, poll, epoll 都是同步 IO,都需要自己進行讀寫,在讀寫的過程中,process 都是被 blocked。


  • select

int select (int n, fd_set *readfds, fd_set *writefds, fd_set *exceptfds, struct timeval *timeout);

select 可監視 writefd, readfd, 及 exceptfd。呼叫 select 後,該 process 會被 blocked,直到某個 fd ready 或是 timeout。當 select return 後,必須要 traverse 所有 fdset,來找到 ready 的 fd。


select 在所有平台都支援,缺點是監視的 fd 有數量上限,通常是 1024,但可修改 macro 或是重新編譯 kernel 增加這個上限。


  • poll

int poll (struct pollfd *fds, unsigned int nfds, int timeout);

struct pollfd {
    int fd; /* file descriptor */
    short events; /* requested events to watch */
    short revents; /* returned events witnessed */
};

poll 使用一個 pollfd pointer 表示 fd,該 pollfd 包含要監視的 event及發生的 event,pollfd 沒有數量上限。poll return 後,必須 traverse pollfd,找到 ready 的 fd。


  • epoll

這是在 linux kernel 2.6 以後提供的,epoll 將跟 process 有關的 fd 事件,存放在 event table 裡面。


// size 為監視的 fd 數量
int epoll_create(int size);
int epoll_ctl(int epfd, int op, int fd, struct epoll_event *event);
int epoll_wait(int epfd, struct epoll_event * events, int maxevents, int timeout);

  1. int epoll_create(int size);


    當產生了 epoll 後,會佔用一個 fd value,不同於 select 必須提供最大監視 fd 數量 +1,size 並不是該 epoll 能監視的 fd 數量上限,而是配置 kernel 內部資料的建議參數。

  2. int epoll_ctl(int epfd, int op, int fd, struct epoll_event *event);


    • epfd: 是 epoll_create 的 return value
    • op: 有三個 macro 表示 operation: EPOLLCTLADD, EPOLLCTLDEL, EPOLLCTLMOD,分別是新增、刪除、修改 fd 監視的 events
    • fd: 需要監視的 fd
    • epoll_event: 告訴 kernel 要監視什麼 event

    struct epoll_event {
      __uint32_t events;  /* Epoll events */
      epoll_data_t data;  /* User data variable */
    };
    
    //events 是以下幾個 macro 的集合:
    EPOLLIN:表示對應的文件描述符可以讀(包括對端SOCKET正常關閉)
    EPOLLOUT:表示對應的文件描述符可以寫
    EPOLLPRI:表示對應的文件描述符有緊急的資料可讀(這裡應該表示有外部資料到來)
    EPOLLERR:表示對應的文件描述符發生錯誤
    EPOLLHUP:表示對應的文件描述符被掛斷
    EPOLLET: 將EPOLL設為 Edge Triggered 模式,這是相對於水平觸發(Level Triggered)來說的
    EPOLLONESHOT:只監聽一次事件,當監聽完這次事件之後,如果還需要繼續監聽這個socket的話,需要再次把這個socket加入到EPOLL隊列
  3. int epoll_wait(int epfd, struct epoll_event * events, int maxevents, int timeout);


    等待 epfd 的 IO event,最多回傳 maxevents 個 events,events 是事件的集合,maxevents 不能超過 epoll_create 的size


    timeout 為 0 表示要馬上 return,如果回傳的事件數量為 0 表示發生了 timeout


epoll 對 fd 的操作有兩種模式: LT (Level Trigger) 及 ET (Edge Trigger)


  • LT: 當 epollwait 偵測到 fd 事件發生,將該事件通知 process,該 process 可不立刻處理該 event,當下次呼叫 epollwait 時,會再次通知 process 這個事件


    同時支援 blocking 與 non-blocking socket,可對該 ready 的 fd 進行 IO,如果不做,kernel 會持續通知 ready

  • ET: 當 epollwait 偵測到 fd 事件發生,將該事件通知 process,該 process 必須立刻處理該 event,如果沒有處理,當下次呼叫 epollwait 時,不會再次通知 process 這個事件


    這是高速運作方式,只支援 non-blocking socket


在 select/poll 中,process 必須呼叫某些 function,kernel 才會對該 fd 進行監視,而 epoll 事先利用 epollctl 註冊 fd,當某個 fd ready 後,會透過 callback 機制,啟動這個 fd,當 process 呼叫 epollwait 就可得到通知。


因為 epoll 去掉了 traverse fds 的步驟,因此可以快速處理 IO event。


epoll 監視的 fd 數量沒有限制,通常是可以打開的文件的數量,可查詢 cat /proce/sys/fs/file-max 得知。select 的缺點,是該 process 可打開的 fd 有數量上限。


如果沒有大量的 idle/dead connection,epoll 的效率不會比 select/poll 高很多。


References


Linux IO模式及 select、poll、epoll詳解


select、poll、epoll之間的區別總結


select,poll,epoll優缺點及比較


關於epoll和select的區別,哪些說法是正確的?


Select、Poll與Epoll比較


Linux 開發,使用多線程還是用 IO 復用 select/epoll?


Socket IO model of humor on the Linux

2019/7/15

Rust Programming Language


今年的 Stack Overflow 調查報告中,發現 Rust 是目前最受歡迎的程式語言。因此我們了解一下Rust 程式語言的定位是:一種撰寫可靠且有效率的軟體的程式語言。 A language empowering everyone to build reliable and efficient software. Rust 是 Mozilla 開發的程式語言,2010 年誕生,目前是 1.34.2 版,其設計目的是開發大型 server 端軟體,強調安全性、記憶體處理及並行處理。雖然效能比 C++ 稍差一點點,但提供了安全的保障。


調查9萬名程序員後,我們發現了一堆不為人知的秘密 Stack Overflow 的年度開發者調查是面向全球開發者的規模最大、最全面的調查,每年的調查內容會涵蓋開發人員最喜歡的技術以及工作偏好等內容。今年是 Stack Overflow 連續第九年進行開發者調查,吸引了將近 9w 名開發人員參加。今年的調查報告結果:Rust 是最受喜愛的編程語言,Python 則是增長最快的。今年 Python 超過 Java 在開發者最喜愛的編程語言榜中排名第二。


一般在討論 Rust 的時候,會跟 C++ 一起比較,通常會使用 C++ 是因為要開發貼近硬體,高速且穩定的系統程式,因為要接近 real time,就不能使用高階語言的 GC 機制,C/C++ 可以開發出高效率的軟體,但常會遇到有關記憶體的問題,也經常發生在底層 library 發生安全漏洞時,導致使用這些 library 的軟體一夕崩壞的問題。


C++ 的發展初期,為了跟 1972年誕生的 C 語言相容,保留了很多設計上的相容性,卻也留下很多問題。而 Rust 是一個沒有歷史包袱的程式語言,當然能吸收新的設計理念,解決安全性的問題,沒有 GC 機制,可直接編譯為machine code,可以直接跟 C 語言互通。


另一種討論,是將 Rust 跟 Golang 比較,Go 有 GC 機制,但 Rust 沒有。Rust 的語法比 Go 複雜,但 Go 更常發生執行期的 crash,Rust 支援泛型。Golang 的目標,應該是取代 Java, Python 在後端運算的地位,但 Rust 的目標,是 C/C++ 的環境,基本上,Rust 跟 Golang 的使用情境應該沒有衝突。


另外,Rust 最常被討論的,是學習曲線陡峭的問題,雖然 Rust 受到開發者的推崇,但實際上,使用 Rust 的開發者並不多,主要原因是 Rust 的用意是取代 C++,而 C++ 的學習曲線比 Rust 更陡峭,而 Rust 本身的困難點在於它接近作業系統,常常會遇到要跟 C/C++ 互通的狀況,還有 Rust 有著其他程式語言不存在的語言特性。


Installation


在 mac/linux 安裝測試環境


curl https://sh.rustup.rs -sSf | sh

他會將 rust 安裝在 $HOME/.rustup,將 cargo 安裝在 $HOME/.cargo,cargo是 rust 的套件管理工具。


另外會在 $HOME/.profile 增加 PATH 環境變數,裡面有常用的指令:rustc, cargo, and rustup


export PATH="$HOME/.cargo/bin:$PATH"

確認是否有安裝完成


$ rustc --version
rustc 1.34.2 (6c2484dc3 2019-05-13)

如果要移除就要


rustup self uninstall

官方網站提供的書本有兩本


The Rust Programming Language


Rust by example


Hello World


hello.rs


fn main() {
    println!("Hello, World!");
}

編譯後,就會產生執行檔


$ rustc hello.rs
$./hello
Hello, World!

另一種開發方式,是利用 cargo 產生專案


cargo new --bin hello
cd hello/

然後修改 main.rs 內容跟剛剛的 hello.rs 一樣,再利用 cargo 編譯 hello project


$ cargo run
   Compiling hello v0.1.0 (/Users/charley/Downloads/hello)
    Finished dev [unoptimized + debuginfo] target(s) in 1.44s
     Running `target/debug/hello`
Hello, world!

如果要產生 release 版,沒有 debug message 的 執行檔,就要加上 build --release 參數


cargo build --release

另外類似 Go 內建程式碼 format 工具,rust 提供 rustfmt 工具,可用 cargo 安裝這個套件


cargo install rustfmt

在 project 中,可用以下指令重排專案


cargo fmt

如果執行時發生下錯誤


$ cargo fmt
error: 'cargo-fmt' is not installed for the toolchain 'stable-x86_64-apple-darwin'
To install, run `rustup component add rustfmt --toolchain stable-x86_64-apple-darwin`

依照說明,再安裝 rustfmt component 即可


rustup component add rustfmt --toolchain stable-x86_64-apple-darwin

Multi Thread


use std::thread;

// 產生 10 個 concurrent thread
fn main() {
    // 因 greeting 是不可變的,可以安全地同時被多個線程使用
    let greeting = "Hello";

    let mut threads = Vec::new();
    // for 可處理任何實作 iterator 特型的類別
    for num in 0..10 {
        threads.push(thread::spawn(move || {
            println!("{} from thread number {}", greeting, num);
        }));
    }

    // 等待所有 thread 結束
    for thread in threads {
        thread.join().unwrap();
    }
}

執行結果


Hello from thread number 0
Hello from thread number 2
Hello from thread number 3
Hello from thread number 1
Hello from thread number 4
Hello from thread number 5
Hello from thread number 6
Hello from thread number 7
Hello from thread number 8
Hello from thread number 9

thead之間是透過 channel 傳遞訊息


use std::thread;
use std::sync::mpsc::channel;

fn main() {
    // 產生 channel,channel 有 tx, rx 兩端
    let (tx, rx) = channel();

    // spawn a new thread,在 thread 中持續使用 channel 的 rx 接收訊息
    let join_handle = thread::spawn(move || {
        // 在 loop 中持續接收訊息,直到 tx 被 dropped
        // recv() 是 blocking method
        while let Ok(n) = rx.recv() {
            println!("Received {}", n);
        }
    });

    // 因為 rx 已經被 thread 使用了,不能在這邊使用到 rx,如果用到就會產生 compile error
    // 透過 tx 發送 10 個訊息
    // 如果接收端 被 dropped,那麼呼叫 unwrap() 就會發生 crash
    for i in 0..10 {
        tx.send(i).unwrap(); // send() 不是 blocking call
    }

    // drop tx 時,會讓 rx.recv() 收到 Err(_)
    drop(tx);

    // 等待 thread 結束
    join_handle.join().unwrap();
}

執行結果


Received 0
Received 1
Received 2
Received 3
Received 4
Received 5
Received 6
Received 7
Received 8
Received 9

Web Framework


如果要開發 web project,參考這兩個網頁的資訊


What are the best web frameworks for Rust?


Rust web framework comparison


可選用Actix 或是 Rocket,其中 Actix 的支援範圍最廣,支援 https, http client, WebSocket, asynchronous


另外因為 Rust 可直接編譯為 WebAssembly,故可以在網頁上運作。


使用 Actix 開發的 web project,雖然看起來不適合開發大型動態網頁的資料,但應該會適合開發 microservice,提供網頁微服務。


References


Rust wiki


「Rust」可進行安全的系統程式設計


如何看待 Rust 的應用前景?


[Rust] 程式設計教學:基礎概念


【譯】Tokio 內部機制:從頭理解 Rust 非同步 I/O 框架


我們為什麼要選擇小眾語言 Rust 來實現 TiKV?


【譯】Rust vs. Go


明明很好很強大,Rust 卻還是那麼小眾


「RustConAsia 2019」如何高效學習Rust

2019/7/1

WebSocket Support in Jetty


WebSocket 是在 http protocol 進行雙向通訊傳輸的協定,可以用 UTF-8 Text 或 Binary format。message 沒有長度限制,但 framing 有限制長度。可發送無限個訊息。訊息必須依照順序傳送,無法支援 interleaved messages。


WebSocket connection state


有四種


State Description
Connecting 當 HTTP upgrade 到 Websocket
Open socket is open, ready to read/write
Closing 啟動 WebSocket Close Handshake
Closed websocket is closed

WebSocket Events


Event Description
on Connect 成功連線,會收到 org.eclipse.jetty.websocket.api.Session object reference,這是該 socket 的 session
on Close 會有 Status Code
on Error websocket 發生 error
on Message 代表收到完整的 message,可以是 UTF-8 Text 或是 raw BINARY message

Jetty 提供的 WebSocket Spec


  • RFC-6455

    目前支援 WebSocket Protocol version 13

  • JSR-356

    Java WebScoket API (javax.webscoket),這是處理 websocket 的標準 java API


目前還不穩定的功能


  • perframe-compression

    Per Frame Compression Extension


    這是 Google/Chromium team 提供的 frame compression,但還在 early draft,Jetty 支援 draft-04 spec,目前已經被 permessage-compression 取代

  • permessage-compression

    Per Message Compression Extension


    將壓縮改為整個 message,而不是每一個 frame


WebSocket Session


websocket Session 物件有以下的使用方式


  1. 檢查 connection state (opened or not)


    if(session.isOpen()) {
    }
  2. 檢查 secure


    if(session.isSecure()) {
      // connection is using 'wss://'
    }
  3. 有哪些在 Upgrade Request and Response


    UpgradeRequest req = session.getUpgradeRequest();
    String channelName = req.getParameterMap().get("channelName");
    
    UpgradeResponse resp = session.getUpgradeResponse();
    String subprotocol = resp.getAcceptedSubProtocol();
  4. 取得 Local and Remote Address


    InetSocketAddress remoteAddr = session.getRemoteAddress();
  5. 存取 idle timeout


    session.setIdleTimeout(2000); // 2 second timeout

Jetty WebSocket API


同時支援 server 及 client


要開發 Jetty Websocket 程式,首先要在 Maven POM 加上 library,因測試同時要支援 RFC-6455 及 JSR-356,故同時加上了兩種 library


<?xml version="1.0" encoding="UTF-8"?>
<project xmlns="http://maven.apache.org/POM/4.0.0"
         xmlns:xsi="http://www.w3.org/2001/XMLSchema-instance"
         xsi:schemaLocation="http://maven.apache.org/POM/4.0.0 http://maven.apache.org/xsd/maven-4.0.0.xsd">
    <modelVersion>4.0.0</modelVersion>

    <groupId>tw.com.maxkit</groupId>
    <artifactId>test</artifactId>
    <version>0.1</version>

    <properties>
        <jetty.version>9.4.12.v20180830</jetty.version>
    </properties>

    <build>
        <plugins>
            <plugin>
                <groupId>org.eclipse.jetty</groupId>
                <artifactId>jetty-maven-plugin</artifactId>
                <version>${jetty.version}</version>
                <configuration>
                    <scanIntervalSeconds>2</scanIntervalSeconds>
                </configuration>
            </plugin>
        </plugins>
    </build>

    <dependencies>
        <!--Jetty dependencies start here -->
        <dependency>
            <groupId>org.eclipse.jetty</groupId>
            <artifactId>jetty-server</artifactId>
            <version>${jetty.version}</version>
        </dependency>

        <dependency>
            <groupId>org.eclipse.jetty</groupId>
            <artifactId>jetty-servlet</artifactId>
            <version>${jetty.version}</version>
        </dependency>
        <!--Jetty dependencies end here -->

        <!--Jetty Websocket server side dependencies start here -->
        <!--Jetty JSR-356 Websocket server side dependency -->
        <dependency>
            <groupId>org.eclipse.jetty.websocket</groupId>
            <artifactId>javax-websocket-server-impl</artifactId>
            <version>${jetty.version}</version>
        </dependency>

        <!--Jetty Websocket API server side dependency -->
        <dependency>
            <groupId>org.eclipse.jetty.websocket</groupId>
            <artifactId>websocket-server</artifactId>
            <version>${jetty.version}</version>
        </dependency>
        <!--Jetty Websocket server dependencies end here -->


        <!--Jetty Websocket client side dependencies start here -->
        <!--JSR-356 Websocket client side depencency  -->
        <dependency>
            <groupId>org.eclipse.jetty.websocket</groupId>
            <artifactId>javax-websocket-client-impl</artifactId>
            <version>${jetty.version}</version>
        </dependency>

        <!--Jetty Websocket API client side dependency -->
        <dependency>
            <groupId>org.eclipse.jetty.websocket</groupId>
            <artifactId>websocket-client</artifactId>
            <version>${jetty.version}</version>
        </dependency>
        <!--Jetty Websocket client side  dependencies end here -->

    </dependencies>

</project>

RFC-6455 websocket Server

首先要將 Jetty path 透過 WebSocketServlet 跟 WebSocket class 綁定。


以下是 ToUpperWebSocketServlet 的 servlet,會處理 /toUpper 這個 url,因為在 IDE 裡面,通常會將 webapp 對應到某個 context,假設是 test,那麼 websocket 服務的 url,應該是 ws://localhost:8080/test/toUpper


ToUpperWebSocketServlet.java


package tw.com.maxkit.jetty.server;

import javax.servlet.annotation.WebServlet;

import org.eclipse.jetty.websocket.servlet.WebSocketServlet;
import org.eclipse.jetty.websocket.servlet.WebSocketServletFactory;

@WebServlet(name = "ToUpper WebSocket Servlet", urlPatterns="/toUpper")
public class ToUpperWebSocketServlet  extends WebSocketServlet{

    @Override
    public void configure(WebSocketServletFactory factory) {
        // set a 10 second timeout
        factory.getPolicy().setIdleTimeout(10000);

//      factory.register(ToUpperWebSocket.class);
//      factory.register(ToUpperWebSocketListener.class);
        factory.register(ToUpperWebSocketAdapter.class);
    }

}

程式裡面設定了 ide timeout 的時間為 10s,另外有三種真正實作 websocket 訊息的方式,如果要使用某一種實作方式,只要調整 register 的 implementation class 即可。


//      factory.register(ToUpperWebSocket.class);
//      factory.register(ToUpperWebSocketListener.class);
        factory.register(ToUpperWebSocketAdapter.class);

  • WebSocket annotation

annotation description
@WebSocket 將這個 POJO 標記為 WebSocket,class 不能是 abstract and public
@OnWebSocketClose (optional) 收到 onClose event
@OnWebSocketMessage (optional) 有兩個 method,分別是 TEXT 與 BINARY message
@OnWebSocketError (optional) 收到 error event
@OnWebSocketFrame (optional) 收到 frame event

ToUppderWebSocket.java


package tw.com.maxkit.jetty.server;

import java.io.IOException;

import org.eclipse.jetty.websocket.api.Session;
import org.eclipse.jetty.websocket.api.annotations.OnWebSocketClose;
import org.eclipse.jetty.websocket.api.annotations.OnWebSocketConnect;
import org.eclipse.jetty.websocket.api.annotations.OnWebSocketMessage;
import org.eclipse.jetty.websocket.api.annotations.WebSocket;

@WebSocket
public class ToUpperWebSocket {

    @OnWebSocketMessage
    public void onText(Session session, String message) throws IOException {
        System.out.println("ToUpperWebSocket received:" + message);
        if (session.isOpen()) {
            String response = message.toUpperCase();
            session.getRemote().sendString(response);
        }
    }

    @OnWebSocketConnect
    public void onConnect(Session session) throws IOException {
        System.out.println( session.getRemoteAddress().getHostName() + " connected!");
    }

    @OnWebSocketClose
    public void onClose(Session session, int status, String reason) {
        System.out.println(session.getRemoteAddress().getHostName() + " closed!");
    }

}

  • WebSocketListener

ToUpperWebSocketListener.java


package tw.com.maxkit.jetty.server;

import org.eclipse.jetty.websocket.api.Session;
import org.eclipse.jetty.websocket.api.WebSocketListener;

public class ToUpperWebSocketListener implements WebSocketListener {
    private Session outbound;

    public void onWebSocketBinary(byte[] payload, int offset, int len) {
        /* only interested in text messages */
    }

    public void onWebSocketClose(int statusCode, String reason) {
        this.outbound = null;
    }

    public void onWebSocketConnect(Session session) {
        this.outbound = session;
    }

    public void onWebSocketError(Throwable cause) {
        cause.printStackTrace(System.err);
    }

    public void onWebSocketText(String message) {
        if ((outbound != null) && (outbound.isOpen())) {
            System.out.printf("ToUpperWebSocketListener [%s]%n", message);
            // echo the message back
            outbound.getRemote().sendString(message.toUpperCase(), null);
        }
    }
}

  • WebSocketAdpapter

比 listener 簡單,提供檢查 session state 的 methods


ToUpperWebSocketAdapter.java


package tw.com.maxkit.jetty.server;


import org.eclipse.jetty.websocket.api.WebSocketAdapter;

import java.io.IOException;

public class ToUpperWebSocketAdapter extends WebSocketAdapter
{
    @Override
    public void onWebSocketText(String message)
    {
        if (isConnected())
        {
            try
            {
                System.out.printf("ToUpperWebSocketAdapter received: [%s]%n",message);
                // echo the message back
                getRemote().sendString(message.toUpperCase());
            }
            catch (IOException e)
            {
                e.printStackTrace(System.err);
            }
        }
    }
}

JSR-356 websocket Server

在網址 ws://localhost:8008/test/jsr356toUpper 提供服務


ToUpper356Socket.java


package tw.com.maxkit.jsr356.server;

import java.io.IOException;

import javax.websocket.CloseReason;
import javax.websocket.OnClose;
import javax.websocket.OnMessage;
import javax.websocket.OnOpen;
import javax.websocket.Session;
import javax.websocket.server.ServerEndpoint;

@ServerEndpoint("/jsr356toUpper")
public class ToUpper356Socket {

    @OnOpen
    public void onOpen(Session session) {
        System.out.println("WebSocket opened: " + session.getId());
    }
    @OnMessage
    public void onMessage(String txt, Session session) throws IOException {
        System.out.println("Message received: " + txt);
        session.getBasicRemote().sendText(txt.toUpperCase());
    }

    @OnClose
    public void onClose(CloseReason reason, Session session) {
        System.out.println("Closing a WebSocket due to " + reason.getReasonPhrase());

    }
}

測試網頁


websocketecho.html


<html>
<body>
    <div>
        <input type="text" id="input" />
    </div>
    <div>
        <input type="button" id="connectBtn" value="CONNECT"
            onclick="connect()" /> <input type="button" id="sendBtn"
            value="SEND" onclick="send()" disabled="true" />
    </div>
    <div id="output">
        <p>Output</p>
    </div>
</body>

<script type="text/javascript">
    var webSocket;
    var output = document.getElementById("output");
    var connectBtn = document.getElementById("connectBtn");
    var sendBtn = document.getElementById("sendBtn");

    function connect() {
        // oprn the connection if one does not exist
        if (webSocket !== undefined
                && webSocket.readyState !== WebSocket.CLOSED) {
            return;
        }
        // Create a websocket
        webSocket = new WebSocket("ws://localhost:8080/test/toUpper");

        webSocket.onopen = function(event) {
            updateOutput("Connected!");
            connectBtn.disabled = true;
            sendBtn.disabled = false;

        };

        webSocket.onmessage = function(event) {
            updateOutput(event.data);
        };

        webSocket.onclose = function(event) {
            updateOutput("Connection Closed");
            connectBtn.disabled = false;
            sendBtn.disabled = true;
        };
    }

    function send() {
        var text = document.getElementById("input").value;
        webSocket.send(text);
    }

    function closeSocket() {
        webSocket.close();
    }

    function updateOutput(text) {
        output.innerHTML += "<br/>" + text;
    }
</script>
</html>

WebSocket Client


client 同樣分 RFC-6455 與 JSR-356 兩種


RFC-6455

WebSocketClientMain.java


package tw.com.maxkit.jetty.client;

import java.net.URI;

import org.eclipse.jetty.websocket.client.ClientUpgradeRequest;
import org.eclipse.jetty.websocket.client.WebSocketClient;

public class WebSocketClientMain {

    public static void main(String[] args) {
        String dest = "ws://localhost:8080/test/toUpper";
        WebSocketClient client = new WebSocketClient();
        try {
            
            ToUpperClientSocket socket = new ToUpperClientSocket();
            client.start();
            URI echoUri = new URI(dest);
            ClientUpgradeRequest request = new ClientUpgradeRequest();
            client.connect(socket, echoUri, request);
            socket.getLatch().await();
            socket.sendMessage("echo");
            socket.sendMessage("test");
            Thread.sleep(10000l);

        } catch (Throwable t) {
            t.printStackTrace();
        } finally {
            try {
                client.stop();
            } catch (Exception e) {
                e.printStackTrace();
            }
        }
    }
}

ToUpperClientSocket.java


package tw.com.maxkit.jetty.client;

import java.io.IOException;
import java.util.concurrent.CountDownLatch;

import org.eclipse.jetty.websocket.api.Session;
import org.eclipse.jetty.websocket.api.annotations.OnWebSocketConnect;
import org.eclipse.jetty.websocket.api.annotations.OnWebSocketMessage;
import org.eclipse.jetty.websocket.api.annotations.WebSocket;

@WebSocket
public class ToUpperClientSocket {

    private Session session;
    
    CountDownLatch latch= new CountDownLatch(1);

    @OnWebSocketMessage
    public void onText(Session session, String message) throws IOException {
        System.out.println("Message received from server:" + message);
    }

    @OnWebSocketConnect
    public void onConnect(Session session) {
        System.out.println("Connected to server");
        this.session=session;
        latch.countDown();
    }
    
    public void sendMessage(String str) {
        try {
            session.getRemote().sendString(str);
        } catch (IOException e) {
            // TODO Auto-generated catch block
            e.printStackTrace();
        }
    }
    
    public CountDownLatch getLatch() {
        return latch;
    }

}

JSR-356 Client

WebSocket356ClientMain.java


package tw.com.maxkit.jsr356.client;

import java.net.URI;

import javax.websocket.ContainerProvider;
import javax.websocket.WebSocketContainer;

public class WebSocket356ClientMain {

    public static void main(String[] args) {
    
        try {

            String dest = "ws://localhost:8080/test/jsr356toUpper";
            ToUpper356ClientSocket socket = new ToUpper356ClientSocket();
            WebSocketContainer container = ContainerProvider.getWebSocketContainer();
            container.connectToServer(socket, new URI(dest));

            socket.getLatch().await();
            socket.sendMessage("echo356");
            socket.sendMessage("test356");
            Thread.sleep(10000l);

        } catch (Throwable t) {
            t.printStackTrace();
        }
    }
}

ToUpper356ClientSocket.java


package tw.com.maxkit.jsr356.client;

import java.io.IOException;
import java.util.concurrent.CountDownLatch;

import javax.websocket.ClientEndpoint;
import javax.websocket.CloseReason;
import javax.websocket.OnClose;
import javax.websocket.OnMessage;
import javax.websocket.OnOpen;
import javax.websocket.Session;

@ClientEndpoint
public class ToUpper356ClientSocket {

    CountDownLatch latch = new CountDownLatch(1);
    private Session session;

    @OnOpen
    public void onOpen(Session session) {
        System.out.println("Connected to server");
        this.session = session;
        latch.countDown();
    }

    @OnMessage
    public void onText(String message, Session session) {
        System.out.println("Message received from server:" + message);
    }

    @OnClose
    public void onClose(CloseReason reason, Session session) {
        System.out.println("Closing a WebSocket due to " + reason.getReasonPhrase());
    }

    public CountDownLatch getLatch() {
        return latch;
    }

    public void sendMessage(String str) {
        try {
            session.getBasicRemote().sendText(str);
        } catch (IOException e) {

            e.printStackTrace();
        }
    }
}


Sending Message to Remote Endpoint


發送訊息有幾種方式


Blocking Send Message

在完成訊息發送後,該 method 才會 return


這是發送 binary message


RemoteEndpoint remote = session.getRemote();

// Blocking Send of a BINARY message to remote endpoint
ByteBuffer buf = ByteBuffer.wrap(new byte[] { 0x11, 0x22, 0x33, 0x44 });
try
{
    remote.sendBytes(buf);
}
catch (IOException e)
{
    e.printStackTrace(System.err);
}

這是發送 text message


RemoteEndpoint remote = session.getRemote();

// Blocking Send of a TEXT message to remote endpoint
try
{
    remote.sendString("Hello World");
}
catch (IOException e)
{
    e.printStackTrace(System.err);
}

發送 Partial Message

如果有個大訊息,希望切割成多個部分,可利用 partial message sending methods,最後一個的 isLast == true


binary message


RemoteEndpoint remote = session.getRemote();

// Blocking Send of a BINARY message to remote endpoint
// Part 1
ByteBuffer buf1 = ByteBuffer.wrap(new byte[] { 0x11, 0x22 });
// Part 2 (last part)
ByteBuffer buf2 = ByteBuffer.wrap(new byte[] { 0x33, 0x44 });
try
{
    remote.sendPartialBytes(buf1,false);
    remote.sendPartialBytes(buf2,true); // isLast is true
}
catch (IOException e)
{
    e.printStackTrace(System.err);
}

text message


RemoteEndpoint remote = session.getRemote();

// Blocking Send of a TEXT message to remote endpoint
String part1 = "Hello";
String part2 = " World";
try
{
    remote.sendPartialString(part1,false);
    remote.sendPartialString(part2,true); // last part
}
catch (IOException e)
{
    e.printStackTrace(System.err);
}

發送 Ping / Pong Control Frame

PING


RemoteEndpoint remote = session.getRemote();

// Blocking Send of a PING to remote endpoint
String data = "You There?";
ByteBuffer payload = ByteBuffer.wrap(data.getBytes());
try
{
    remote.sendPing(payload);
}
catch (IOException e)
{
    e.printStackTrace(System.err);
}

PONG


RemoteEndpoint remote = session.getRemote();

// Blocking Send of a PONG to remote endpoint
String data = "Yup, I'm here";
ByteBuffer payload = ByteBuffer.wrap(data.getBytes());
try
{
    remote.sendPong(payload);
}
catch (IOException e)
{
    e.printStackTrace(System.err);
}

發非同步訊息發送

有兩個 async send message methods


  • RemoteEndpoint.sendBytesByFuture(ByteBuffer message)
  • RemoteEndpoint.sendStringByFuture(String message)

會回傳 java.util.concurrent.Future,可用來測試是否有發送成功


binary


RemoteEndpoint remote = session.getRemote();

// Async Send of a BINARY message to remote endpoint
ByteBuffer buf = ByteBuffer.wrap(new byte[] { 0x11, 0x22, 0x33, 0x44 });
remote.sendBytesByFuture(buf);

可利用 get 等待發送是否完成


RemoteEndpoint remote = session.getRemote();

// Async Send of a BINARY message to remote endpoint
ByteBuffer buf = ByteBuffer.wrap(new byte[] { 0x11, 0x22, 0x33, 0x44 });
try
{
    Future<Void> fut = remote.sendBytesByFuture(buf);
    // wait for completion (forever)
    fut.get();
}
catch (ExecutionException | InterruptedException e)
{
    // Send failed
    e.printStackTrace();
}

可在 get 加上 timeout 時間


RemoteEndpoint remote = session.getRemote();

// Async Send of a BINARY message to remote endpoint
ByteBuffer buf = ByteBuffer.wrap(new byte[] { 0x11, 0x22, 0x33, 0x44 });
Future<Void> fut = null;
try
{
    fut = remote.sendBytesByFuture(buf);
    // wait for completion (timeout)
    fut.get(2,TimeUnit.SECONDS);
}
catch (ExecutionException | InterruptedException e)
{
    // Send failed
    e.printStackTrace();
}
catch (TimeoutException e)
{
    // timeout
    e.printStackTrace();
    if (fut != null)
    {
        // cancel the message
        fut.cancel(true);
    }
}

text 訊息跟 binary 類似,只是將 sendBytesByFuture 換成 sendStringByFuture


References


Jetty WebSocket Example


Chapter 27. Jetty Websocket API