顯示具有 web 標籤的文章。 顯示所有文章

2025/9/8

Open Street Map Local Server

Switch2OSM

https://switch2osm.org/

因為 Open Street Map 的免費公用特性,所以我們可以複製這些地圖資料到自己的地圖 server,Switch2OSM 是一個推廣 OSM 的專案,我們可以透過這個專案,建置自己的 Map Server

PBF format

.pbf空間數據詳解

PBF 就是 Protocolbuffer Binary Format 這是基於 ProtoBuffer 的一種 binary data format,這是一種比 XML, GeoJSON 等等地圖格式還要精簡的檔案格式。

在 OSM 通常是以 *.osm.pbf 這個 file extension 代表 OSM PBF file

Open Street Map 在 PBF Format - OpenStreetMap Wiki 有說明該檔案格式的定義。

Taiwan OSM

Geofabrik Download Server Taiwan 這個網站,有固定更新從 Open Street Map 下載的 Taiwan 離線地圖,我們可以到這個網站下載 taiwan-latest.osm.pbf

取得 osm PBF 檔案以後,就可以匯入 switch2osm local map server

docker

參考 Using a Docker container – Switch2OSM 的說明,最簡單的方式就是透過 container 建置 switch2osm

以下以 Redhat 系列的 podman 進行測試

匯入 osm.pbf 檔案

podman volume create osm-data

podman run  --name osmtile-import -v /root/download/osm/taiwan-latest.osm.pbf:/data/region.osm.pbf  -v osm-data:/data/database/  overv/openstreetmap-tile-server  import

tile server

podman volume create osm-tiles
# 啟動 tile server
podman run --name osmtile -p 8081:80 -v osm-data:/data/database/ -v osm-tiles:/data/tiles -d overv/openstreetmap-tile-server run

啟動後就可以在 http://localhost:8081/tile/ 看到透過 Leaflet 取得的 OSM 地圖

2024/7/29

CORS

同源政策 Same-origin policy 是在Web瀏覽器中,允許某個網頁指令碼也就是 javascript 訪問另一個網頁的資料的前提是,這兩個網頁必須有相同的URI、主機名和埠號,一旦兩個網站滿足上述條件,這兩個網站就被認定為具有相同來源。在 same origin policy 的限制下,能限制瀏覽器防止某個網頁上的惡意指令碼通過該頁面的文件物件模型存取另一網頁上的敏感資料。

滿足同源的條件有三個

  1. 使用相同的通訊協定 http/https

  2. 有相同的網域 domain

  3. 有相同的 port

跨來源請求 cross-origin http request,就是在非同源的情況下,發生的 http request,在發生這種狀況時,必須要遵守 CORS (Cross-Origin Resource Sharing) 的規範

定義

CORS 就是針對非同源的 http request 制定的規範,當 javascript 存取非同源的資源時, server 必須明確告知瀏覽器,是否允許這樣的 request,只有 server 允許的 request 能夠被瀏覽器發送,否則就會失敗

CORS 的跨來源請求有兩種:「簡單」與「非簡單」

跨來源請求

「簡單」跨來源請求有兩個條件

  1. 只能使用 GET, POST, HEAD method

  2. http reques header 只能有 AcceptAccept-LanguageContent-Language 或 Content-Type,且 Content-Type 只能是 application/x-www-form-urlencodedmultipart/form-data 或 text/plain

只要不是「簡單」跨來源請求,就是「非簡單」跨來源請求

簡單請求 simple requests 不會觸發 CORS 預檢 preflighted

sample

以下是一個 cross-origin request/response,可發現在 request 裡面,會有一個 Origin http header

Origin 標記,這是來自 http://foo.example 的 cross-orign request

GET /resources/public-data/ HTTP/1.1
Host: bar.other
User-Agent: Mozilla/5.0 (Macintosh; U; Intel Mac OS X 10.5; en-US; rv:1.9.1b3pre) Gecko/20081130 Minefield/3.1b3pre
Accept: text/html,application/xhtml+xml,application/xml;q=0.9,*/*;q=0.8
Accept-Language: en-us,en;q=0.5
Accept-Encoding: gzip,deflate
Accept-Charset: ISO-8859-1,utf-8;q=0.7,*;q=0.7
Connection: keep-alive
Referer: http://foo.example/examples/access-control/simpleXSInvocation.html
Origin: http://foo.example


HTTP/1.1 200 OK
Date: Mon, 01 Dec 2008 00:23:53 GMT
Server: Apache/2.0.61
Access-Control-Allow-Origin: *
Keep-Alive: timeout=2, max=100
Connection: Keep-Alive
Transfer-Encoding: chunked
Content-Type: application/xml

[XML Data]

下面的 response 有 Access-Control-Allow-Origin 這個 header,* 表示server 允許來自任意 origin 的 http request

預檢 preflighted request

「非簡單」request,在瀏覽器真正發送 request 之前,會先發送一個 preflight request,用途是詢問 server 是否允許這樣的 request

preflighted request 是用 http OPTIONS method 產生的

在 request 會有這兩個 header

  1. Access-Control-Request-Method:該 request 是哪一個 http method

  2. Access-Control-Request-Headers:該 request 裡面待有哪些非簡單的 http header

OPTIONS /resources/post-here/ HTTP/1.1
Host: bar.other
User-Agent: Mozilla/5.0 (Macintosh; U; Intel Mac OS X 10.5; en-US; rv:1.9.1b3pre) Gecko/20081130 Minefield/3.1b3pre
Accept: text/html,application/xhtml+xml,application/xml;q=0.9,*/*;q=0.8
Accept-Language: en-us,en;q=0.5
Accept-Encoding: gzip,deflate
Accept-Charset: ISO-8859-1,utf-8;q=0.7,*;q=0.7
Connection: keep-alive
Origin: http://foo.example
Access-Control-Request-Method: POST
Access-Control-Request-Headers: X-PINGOTHER, Content-Type


HTTP/1.1 200 OK
Date: Mon, 01 Dec 2008 01:15:39 GMT
Server: Apache/2.0.61 (Unix)
Access-Control-Allow-Origin: http://foo.example
Access-Control-Allow-Methods: POST, GET, OPTIONS
Access-Control-Allow-Headers: X-PINGOTHER, Content-Type
Access-Control-Max-Age: 86400
Vary: Accept-Encoding, Origin
Content-Encoding: gzip
Content-Length: 0
Keep-Alive: timeout=2, max=100
Connection: Keep-Alive
Content-Type: text/plain

response 有以下重點

  1. Access-Control-Allow-Origin:允許的 origin

  2. Access-Control-Allow-Methods:允許的跨 origin http method

  3. Access-Control-Allow-Headers:允許使用的 http header

  4. Access-Control-Max-Age:本次預檢請求回應所可以快取的秒數,代表 browser 可 cache 這個 response 多久

cookie

通常 CORS 不允許使用 cookie,也不支援 redirect

如果真的還是要使用 cookie

fetch API 要加上 credentials

fetch('https://othersite.com/data', {
  credentials: 'include'
})

XMLHttpRequest 要加上 withCredentials = true

const xhr = new XMLHttpRequest();
xhr.withCredentials = true;
xhr.open('POST', 'https://othersite.com/data');

server 端也要增加一個 response header

Access-Control-Allow-Credentials: true

使用 cookie 時,Access-Control-Allow-Origin 不能直接填寫 *

必須明確標示哪些 origin 可以使用 cookie

References

跨來源資源共用(CORS) - HTTP | MDN

[教學] 深入了解 CORS (跨來源資源共用): 如何正確設定 CORS?

2024/7/1

WebAuthn

WebAuthn 是 Web 與 Authentication 結合的縮寫,也就是 Web Authentication,用在網頁身份認證。這個規格是由 W3C 與 FIDO (Fast IDentity Online) 提出,該正式API 規格,透過瀏覽器的支援,可透過 Public Key Cryptography 機制註冊並認證使用者,取代傳統密碼形式的認證方式。

最傳統的身份認證機制是用密碼,但因為密碼太多了,又因為資安政策需要常常修改密碼,正常人應該已經沒辦法記得很清楚,哪個網站是用哪一個密碼。

WebAuthn 是  FIDO2 framework 的部分,透過 server, browser, authenticator 的搭配,提供一種 passwordless 無密碼的認證方式。

Demo

webauthn.io 是一個單純的網頁 demo。demo 時分兩個步驟,Register 與 Authenticate。

Register 就是註冊帳號,使用者向 browser 要求要註冊一個新帳號,browser 透過 authenticator 的搭配輔助,產生一組 public key,然後完成註冊的步驟。 authenticator 可能是本機的指紋 scanner,也可以是 USB key,或是目前最容易取得的每一個人的手機,並搭配手機的 FaceID 或是指紋 scanner 輔助做身份認證。

註冊完成後,會取得註冊的 id,然後在透過認證 API,進行使用者身份認證。

Javascript demo

註冊

// should generate from server
const challenge = new Uint8Array(32);
window.crypto.getRandomValues(challenge);

const userID = '5d157c55-ea8b-45ca-870a-da877a9c9916';

const utf8EncodeText = new TextEncoder();
const id = utf8EncodeText.encode(userID);

const publicKeyCredentialCreationOptions = {
    challenge,
    rp: {
        name: "Maxkit RP",
        // 這邊只是 demo,沒有放到某個 https 網站測試,如果是網站,就要改成該網站的 domain name
        //id: "maxkit.com.tw",
    },
    user: {
        id,
        name: "test",
        displayName: "Test",
    },
    pubKeyCredParams: [{alg: -7, type: "public-key"}],
    authenticatorSelection: {
        authenticatorAttachment: "cross-platform",
    },
    timeout: 60000,
    attestation: "direct"
};

const credential = await navigator.credentials.create({
    publicKey: publicKeyCredentialCreationOptions
});

把上面這一部分的 js code 直接貼到 chrome console 執行。主要就是透過 navigator.credentials.create 註冊產生 public key

challenge 欄位是由 server 產生,最終會由 authenticator 以私鑰簽章後,在 credential response 裡面傳回來,讓 server 能夠檢查確認 authenticator

rp.id 應該要填網域 domain name,這邊只是本機測試,不填寫

authenticatorAttachment: "cross-platform" 的意思是,可搭配使用外部認證工具,例如在 NB 瀏覽認證網頁時,可使用手機作為認證工具進行認證。

在 NB 提示認證時,會看到這個畫面

這時候,就用自己的手機相機,拍 QR code,手機上會出現以下畫面

確認後,會在手機的密碼部分,儲存一個專屬的密碼。iOS 手機選單在 "設定 -> 密碼"

在 console 列印 credential 的內容

// print credential
console.log(credential)
PublicKeyCredential {rawId: ArrayBuffer(20), response: AuthenticatorAttestationResponse, authenticatorAttachment: 'cross-platform', id: 'ku22CGGrZdYlkr9cCXL4IWtyYLc', type: 'public-key'}

正常狀況應該把 credential 傳送到 server,檢查並 decode 得到使用者的 id, public key。這邊僅是測試 demo,不做處理。

response.attestationObject 裡面有 public key 跟其他 metadata,是用 CBOR Concise Binary Object Representation 編碼後的 binary data。

認證

以下是認證的 demo code,從剛剛的 credential.id 欄位取得 id,通常應該是儲存在 server,從 server 傳到網頁得到這個資料

const credentialIdStr = credential.id;
const credentialId = Uint8Array.from(window.atob(credentialIdStr), c=>c.charCodeAt(0));

const challenge2 = new Uint8Array(32);
window.crypto.getRandomValues(challenge2);

const publicKeyCredentialRequestOptions = {
    challenge: challenge2,
    //rpId: "maxkit.com.tw",
    allowCredentials: [{
        id: credentialId, // from registration
        type: 'public-key',
        transports: ['usb', 'ble', 'nfc', 'hybrid'],
    }],
    timeout: 60000,
}

const assertion = await navigator.credentials.get({
    publicKey: publicKeyCredentialRequestOptions
});

transports 是可以認證的方式

網頁同樣會出現 QR code,等待 authenticator,這邊我們用剛剛註冊的手機掃描

手機掃描時,會出現一個提示

點"使用通行密鑰登入"

繼續透過 FaceID 認證,認證完成,同樣可取得 response

console.log(assertion)

CTAP

Client-to-Authenticator Protocol,這是在瀏覽器打開註冊/認證網頁後,authnticator 跟瀏覽器之間傳輸的協定,也就是 WebAuthn API 跟外部硬體認證機制溝通的規格

References

WebAuthn guide

什么是WebAuthn:在Web上使用Touch ID和Windows Hello登录_webauthn 网站登录-CSDN博客

你可能不知道的WebAuthN(FIDO) | 又LAG隨性筆記

初探 WebAuthn UAF 的無密碼 Passwordless 登入技術 – 要改的地方太多了,那就改天吧

一起來了解 Web Authentication

CredentialsContainer - Web APIs | MDN

2024/2/26

Well-known URI

well-known URI 是網站上以 /.well-known/ 開始的網頁路徑,例如 https://www.example.com/.well-known/ 這樣的路徑。Well-known URI 是在 RFC 8615 定義,目的是在不同 http server 之間,提供該 http server 相關的一些資訊。

目前最常見的使用方式有兩種,第一種是在申請 http server SSL 憑證的時候,憑證中心會發送一個檔案給申請者,請申請者將該檔案放到 .well-known 的某個路徑下,讓憑證中心可以檢查確認憑證申請者確實有服務該網域的 http server 的所有權。

例如 Let's Encrypt 就是將驗證的檔案放在這個路徑下面 /.well-known/acme-challenge/,這是給 ACME (Automatic Certificate Management Environment) 使用的

第二種是給 Android iOS 手機使用的

  • /.well-known/assetlinks.json 是 Digital Asset Links,可告訴Android browser,要使用什麼 APP 打開

  • /.well-known/apple-app-site-association Universal Links,是 iOS 使用的

GitHub - moul/awesome-well-known: A curated list of well-known URIs, resources, guides and tools (RFC 5785) 這個網頁提供了 .well-known 網址的使用列表

References

Well-known URI - Wikipedia

2024/1/15

webcam 即時影像

有一種特殊的 MIME 類型,稱為 multipart/x-mixed-replace,這是由 Netscape 在1995年引入的。當伺服器想向客戶端持續發送資料時,瀏覽器可以在一個 http 通道中,持續接收這些改變的資料。它可以用於串流傳輸圖像的 webcam。

通常 http protocol 會需要 content-length 這個 header,讓接收資料的一端,明確知道這個 http 封包的資料有多少,但 multipart/x-mixed-replace 刻意在 client 打開一個 http 連線後,不回傳 response 的 content length,反而是直接用 multipart 的格式,持續對 client 發送資料。browser 在收到這些 content 時,可用來持續更新畫面。

最常見的應用是 webcam,在高速公路、氣象局的網頁,有即時影像的區塊,就是用這種方式實作的。

response 的資料可以是這種格式,這是持續發送圖片

HTTP/1.1 200 OK
Content-Type: multipart/x-mixed-replace; boundary=frame

--frame
Content-Type: image/jpeg

<1.jpg>

--frame
Content-Type: image/jpeg

<2.jpg>

--frame
Content-Type: image/jpeg

<3.jpg>

也可以是這種格式

HTTP/1.1 200 OK
Content-Type: multipart/x-mixed-replace; boundary=frame

--frame
Content-Type: text/html

<html><body>0</body></html>

--frame
Content-Type: text/html

<html><body>1</body></html>

--frame
Content-Type: text/html

<html><body>2</body></html>

每個 multipart 區塊,可以定義告知 content-type

在氣象局的即時影像網頁,每一次取得影像,都會在 30s 以後,關閉這個連線,使用者必須要重新點一次,才會再取得一次 webcam 資料。

References

使用 multipart/x-mixed-replace 实现 http 实时视频流

Albert 的筆記本: 高速公路路況即時影像的作法

iT 邦幫忙::一起幫忙解決難題,拯救 IT 人的一天

推播技術 - 維基百科,自由的百科全書

2024/1/8

HSTS(HTTP Strict Transport Security)

RFC 6797 規定了網際網路瀏覽安全機制 HSTS(HTTP Strict Transport Security) ,宣告瀏覽器與伺服器之間通訊方式必須強制採用 TLS/SSL。

只要從伺服器端送出一個 Strict-Transport-Security 標頭 (Header) 給瀏覽器,即可告知瀏覽器於未來的某段時間內一律使用 SSL 來和該網站連接。一旦發生憑證失效情況,使用者將無法再瀏覽該網站,如此一來便可大幅減少中間人攻擊的問題發生。

換句話說:HSTS Header 就是負責將 http 強制轉為 https。

設定方式是 Server 回傳的 html response,必須要有 Strict-Transport-Security header,內容為

Strict-Transport-Security: max-age=<expire-time>
Strict-Transport-Security: max-age=<expire-time>; includeSubDomains
Strict-Transport-Security: max-age=<expire-time>; preload

max-age 是讓 browser 儲存該設定多久的時間,以秒為單位,通常是設定 31536000 (1年) 以上

includeSubDomains 是套用到所有子網域

preload 不是標準的規格的設定值,是 Preloading Strict Transport Security 的意思,不一定要寫

所以設定值為

Strict-Transport-Security: max-age=31536000; includeSubDomains

維持 HSTS 設定一年,且包含子網域

References

經得起原始碼資安弱點掃描的程式設計習慣培養(五)_Missing HSTS Header

HSTS設定 - iT 邦幫忙::一起幫忙解決難題,拯救 IT 人的一天

2021/10/4

RTCDataChannel Sample

Transmit text

Transmit text

單獨一個網頁,自己產生 local 及 remote peer connection,然後兩個產生 data channel 直接互相連接

    <div id="buttons">
        <button id="startButton">Start</button>
        <button id="sendButton" disabled>Send</button>
        <button id="closeButton" disabled>Stop</button>
    </div>

    <div id="sendReceive">
        <div id="send">
            <h2>Send</h2>
            <textarea id="dataChannelSend" disabled
                      placeholder="Press Start, enter some text, then press Send."></textarea>
        </div>
        <div id="receive">
            <h2>Receive</h2>
            <textarea id="dataChannelReceive" disabled></textarea>
        </div>
    </div>
/*
 *  Copyright (c) 2015 The WebRTC project authors. All Rights Reserved.
 *
 *  Use of this source code is governed by a BSD-style license
 *  that can be found in the LICENSE file in the root of the source
 *  tree.
 */

'use strict';

let localConnection;
let remoteConnection;
let sendChannel;
let receiveChannel;
const dataChannelSend = document.querySelector('textarea#dataChannelSend');
const dataChannelReceive = document.querySelector('textarea#dataChannelReceive');
const startButton = document.querySelector('button#startButton');
const sendButton = document.querySelector('button#sendButton');
const closeButton = document.querySelector('button#closeButton');

startButton.onclick = createConnection;
sendButton.onclick = sendData;
closeButton.onclick = closeDataChannels;

function enableStartButton() {
  startButton.disabled = false;
}

function disableSendButton() {
  sendButton.disabled = true;
}

function createConnection() {
  dataChannelSend.placeholder = '';
  const servers = null;

  // 產生 local peer connection
  window.localConnection = localConnection = new RTCPeerConnection(servers);
  console.log('Created local peer connection object localConnection');

  // 由 localConnection 產生 DataChannel
  sendChannel = localConnection.createDataChannel('sendDataChannel');
  console.log('Created send data channel');

  // 2個 callback function: onIceCandidate, onSendChannelStateChange
  localConnection.onicecandidate = e => {
    onIceCandidate(localConnection, e);
  };
  sendChannel.onopen = onSendChannelStateChange;
  sendChannel.onclose = onSendChannelStateChange;


  //////////////
  // remote peer connection
  window.remoteConnection = remoteConnection = new RTCPeerConnection(servers);
  console.log('Created remote peer connection object remoteConnection');

  // 2 個 callback function: onIceCandidate, receiveChannelCallback
  remoteConnection.onicecandidate = e => {
    onIceCandidate(remoteConnection, e);
  };
  remoteConnection.ondatachannel = receiveChannelCallback;

  ///////////
  // 由 localConnection 產生 offer -> setLocalDescription
  localConnection.createOffer().then(
      gotDescription1,
      onCreateSessionDescriptionError
  );
  startButton.disabled = true;
  closeButton.disabled = false;
}

function onCreateSessionDescriptionError(error) {
  console.log('Failed to create session description: ' + error.toString());
}

function sendData() {
  // 透過 send data channel 發送訊息
  const data = dataChannelSend.value;
  sendChannel.send(data);
  console.log('Sent Data: ' + data);
}

function closeDataChannels() {
  console.log('Closing data channels');
  sendChannel.close();
  console.log('Closed data channel with label: ' + sendChannel.label);
  receiveChannel.close();
  console.log('Closed data channel with label: ' + receiveChannel.label);
  localConnection.close();
  remoteConnection.close();
  localConnection = null;
  remoteConnection = null;
  console.log('Closed peer connections');
  startButton.disabled = false;
  sendButton.disabled = true;
  closeButton.disabled = true;
  dataChannelSend.value = '';
  dataChannelReceive.value = '';
  dataChannelSend.disabled = true;
  disableSendButton();
  enableStartButton();
}

function gotDescription1(desc) {
  // 設定 local connection 的 local description
  localConnection.setLocalDescription(desc);
  console.log(`Offer from localConnection\n${desc.sdp}`);

  // 將 local description 直接設定給 remote connection 的 remote description
  remoteConnection.setRemoteDescription(desc);
  // 由 remote connection 產生 answer, 呼叫 gotDescription2
  remoteConnection.createAnswer().then(
      gotDescription2,
      onCreateSessionDescriptionError
  );
}

function gotDescription2(desc) {
  // 設定 remote connection 的 local description
  remoteConnection.setLocalDescription(desc);
  console.log(`Answer from remoteConnection\n${desc.sdp}`);

  // 設定 local connection 的 remote description
  localConnection.setRemoteDescription(desc);
}


//////////////////
function getOtherPc(pc) {
  return (pc === localConnection) ? remoteConnection : localConnection;
}

function getName(pc) {
  return (pc === localConnection) ? 'localPeerConnection' : 'remotePeerConnection';
}

function onIceCandidate(pc, event) {
  // 取得 local connection 的 ice candidate, 指定給 remote connection 的 addIceCandidate
  // 取得 remote connection 的 ice candidate, 指定給 local connection 的 addIceCandidate

  getOtherPc(pc)
      .addIceCandidate(event.candidate)
      .then(
          onAddIceCandidateSuccess,
          onAddIceCandidateError
      );
  console.log(`${getName(pc)} ICE candidate: ${event.candidate ? event.candidate.candidate : '(null)'}`);
}

function onAddIceCandidateSuccess() {
  console.log('AddIceCandidate success.');
}

function onAddIceCandidateError(error) {
  console.log(`Failed to add Ice Candidate: ${error.toString()}`);
}

function receiveChannelCallback(event) {
  // 產生 receive data channel
  console.log('Receive Channel Callback');
  receiveChannel = event.channel;
  receiveChannel.onmessage = onReceiveMessageCallback;
  receiveChannel.onopen = onReceiveChannelStateChange;
  receiveChannel.onclose = onReceiveChannelStateChange;
}

function onReceiveMessageCallback(event) {
  // 收到訊息
  console.log('Received Message');
  dataChannelReceive.value = event.data;
}

function onSendChannelStateChange() {
  const readyState = sendChannel.readyState;
  console.log('Send channel state is: ' + readyState);
  if (readyState === 'open') {
    // 當 local connection 的 data channel 為 open 時, 改變 UI 元件的狀態
    dataChannelSend.disabled = false;
    dataChannelSend.focus();
    sendButton.disabled = false;
    closeButton.disabled = false;
  } else {
    dataChannelSend.disabled = true;
    sendButton.disabled = true;
    closeButton.disabled = true;
  }
}

function onReceiveChannelStateChange() {
  //
  const readyState = receiveChannel.readyState;
  console.log(`Receive channel state is: ${readyState}`);
}

Transfer a file

    <section>
      <div >
        <form id="fileInfo">
          <input type="file" id="fileInput" name="files"/>
        </form>
        <button disabled id="sendFile">Send</button>
        <button disabled id="abortButton">Abort</button>
      </div>

      <div class="progress">
        <div class="label">Send progress: </div>
        <progress id="sendProgress" max="0" value="0"></progress>
      </div>

      <div class="progress">
        <div class="label">Receive progress: </div>
        <progress id="receiveProgress" max="0" value="0"></progress>
      </div>

      <div id="bitrate"></div>
      <a id="download"></a>
      <span id="status"></span>

    </section>
/* eslint no-unused-expressions: 0 */
/*
 *  Copyright (c) 2015 The WebRTC project authors. All Rights Reserved.
 *
 *  Use of this source code is governed by a BSD-style license
 *  that can be found in the LICENSE file in the root of the source
 *  tree.
 */
'use strict';

let localConnection;
let remoteConnection;
let sendChannel;
let receiveChannel;
let fileReader;
const bitrateDiv = document.querySelector('div#bitrate');
const fileInput = document.querySelector('input#fileInput');
const abortButton = document.querySelector('button#abortButton');
const downloadAnchor = document.querySelector('a#download');
const sendProgress = document.querySelector('progress#sendProgress');
const receiveProgress = document.querySelector('progress#receiveProgress');
const statusMessage = document.querySelector('span#status');
const sendFileButton = document.querySelector('button#sendFile');

let receiveBuffer = [];
let receivedSize = 0;

let bytesPrev = 0;
let timestampPrev = 0;
let timestampStart;
let statsInterval = null;
let bitrateMax = 0;

sendFileButton.addEventListener('click', () => createConnection());
fileInput.addEventListener('change', handleFileInputChange, false);
abortButton.addEventListener('click', () => {
  // 取消 fileReader
  if (fileReader && fileReader.readyState === 1) {
    console.log('Abort read!');
    fileReader.abort();
  }
});

async function handleFileInputChange() {
  // 選擇新的檔案
  const file = fileInput.files[0];
  if (!file) {
    console.log('No file chosen');
  } else {
    sendFileButton.disabled = false;
  }
}

async function createConnection() {
  // 發送檔案按鈕 -> 產生連線
  abortButton.disabled = false;
  sendFileButton.disabled = true;

  // local peer connection
  localConnection = new RTCPeerConnection();
  console.log('Created local peer connection object localConnection');

  // send data channel
  sendChannel = localConnection.createDataChannel('sendDataChannel');
  sendChannel.binaryType = 'arraybuffer';
  console.log('Created send data channel');

  // onSendChannelStateChange
  sendChannel.addEventListener('open', onSendChannelStateChange);
  sendChannel.addEventListener('close', onSendChannelStateChange);
  sendChannel.addEventListener('error', onError);

  // icecandidate
  localConnection.addEventListener('icecandidate', async event => {
    console.log('Local ICE candidate: ', event.candidate);
    // 直接將 local connection 的 icecandidate 加入 remote connection
    await remoteConnection.addIceCandidate(event.candidate);
  });


  //////////////
  // remote peer connection
  remoteConnection = new RTCPeerConnection();
  console.log('Created remote peer connection object remoteConnection');

  // icecandidate
  remoteConnection.addEventListener('icecandidate', async event => {
    console.log('Remote ICE candidate: ', event.candidate);
    // 直接將 remote connection 的 icecandidate 加入 local connection
    await localConnection.addIceCandidate(event.candidate);
  });
  remoteConnection.addEventListener('datachannel', receiveChannelCallback);


  // 由 local connection 產生 offer, 取得 sdp description
  try {
    const offer = await localConnection.createOffer();
    await gotLocalDescription(offer);
  } catch (e) {
    console.log('Failed to create session description: ', e);
  }

  fileInput.disabled = true;
}

function sendData() {
  const file = fileInput.files[0];
  console.log(`File is ${[file.name, file.size, file.type, file.lastModified].join(' ')}`);

  // Handle 0 size files.
  statusMessage.textContent = '';
  downloadAnchor.textContent = '';
  if (file.size === 0) {
    bitrateDiv.innerHTML = '';
    statusMessage.textContent = 'File is empty, please select a non-empty file';
    closeDataChannels();
    return;
  }
  sendProgress.max = file.size;
  receiveProgress.max = file.size;

  // chunkSize  16 kB = 16 * 1024
  const chunkSize = 16384;
  fileReader = new FileReader();
  let offset = 0;
  fileReader.addEventListener('error', error => console.error('Error reading file:', error));
  fileReader.addEventListener('abort', event => console.log('File reading aborted:', event));
  fileReader.addEventListener('load', e => {
    console.log('FileRead.onload ', e);

    // 透過 sendChannel 發送 fileReader 讀取到的 array buffer
    sendChannel.send(e.target.result);
    offset += e.target.result.byteLength;
    sendProgress.value = offset;
    if (offset < file.size) {
      // 當 offset 小於 file.size,就持續一直做 readSlice
      readSlice(offset);
    }
  });
  const readSlice = o => {
    console.log('readSlice ', o);
    // 以 file.slice 取得 file 的 某個區塊
    const slice = file.slice(offset, o + chunkSize);
    fileReader.readAsArrayBuffer(slice);
  };

  // 讀取 第 0 個 bytes, 每一次讀 chunkSize 16k bytes
  readSlice(0);
}

function closeDataChannels() {
  console.log('Closing data channels');
  sendChannel.close();
  console.log(`Closed data channel with label: ${sendChannel.label}`);
  sendChannel = null;
  if (receiveChannel) {
    receiveChannel.close();
    console.log(`Closed data channel with label: ${receiveChannel.label}`);
    receiveChannel = null;
  }
  localConnection.close();
  remoteConnection.close();
  localConnection = null;
  remoteConnection = null;
  console.log('Closed peer connections');

  // re-enable the file select
  fileInput.disabled = false;
  abortButton.disabled = true;
  sendFileButton.disabled = false;
}

async function gotLocalDescription(desc) {
  // local connection 的 desription 設定給 local description 以及 remote connection 的 remote description
  await localConnection.setLocalDescription(desc);
  console.log(`Offer from localConnection\n ${desc.sdp}`);
  await remoteConnection.setRemoteDescription(desc);
  try {

    // 產生 answer
    const answer = await remoteConnection.createAnswer();
    await gotRemoteDescription(answer);
  } catch (e) {
    console.log('Failed to create session description: ', e);
  }
}

async function gotRemoteDescription(desc) {
  // remote connection 的 description 設定為 local description,以及 local connection 的 remote description
  await remoteConnection.setLocalDescription(desc);
  console.log(`Answer from remoteConnection\n ${desc.sdp}`);
  await localConnection.setRemoteDescription(desc);
}

function receiveChannelCallback(event) {
  console.log('Receive Channel Callback');
  receiveChannel = event.channel;
  receiveChannel.binaryType = 'arraybuffer';
  receiveChannel.onmessage = onReceiveMessageCallback;
  receiveChannel.onopen = onReceiveChannelStateChange;
  receiveChannel.onclose = onReceiveChannelStateChange;

  receivedSize = 0;
  bitrateMax = 0;
  downloadAnchor.textContent = '';
  downloadAnchor.removeAttribute('download');
  if (downloadAnchor.href) {
    URL.revokeObjectURL(downloadAnchor.href);
    downloadAnchor.removeAttribute('href');
  }
}

function onReceiveMessageCallback(event) {
  // receive data channel 收到 16kB 資料
  console.log(`Received Message ${event.data.byteLength}`);

  // 把資料 push 到 receiveBuffer
  receiveBuffer.push(event.data);
  receivedSize += event.data.byteLength;
  receiveProgress.value = receivedSize;

  // we are assuming that our signaling protocol told
  // about the expected file size (and name, hash, etc).
  // 假設是透過 signaling protocol 取得 filename, size
  const file = fileInput.files[0];

  // 當接收到的 size 等於 file size
  if (receivedSize === file.size) {
    // 由 receiveBuffer 產生 Blob
    const received = new Blob(receiveBuffer);
    receiveBuffer = [];

    downloadAnchor.href = URL.createObjectURL(received);
    downloadAnchor.download = file.name;
    downloadAnchor.textContent =
      `Click to download '${file.name}' (${file.size} bytes)`;
    downloadAnchor.style.display = 'block';

    const bitrate = Math.round(receivedSize * 8 /
      ((new Date()).getTime() - timestampStart));
    bitrateDiv.innerHTML =
      `<strong>Average Bitrate:</strong> ${bitrate} kbits/sec (max: ${bitrateMax} kbits/sec)`;

    if (statsInterval) {
      // 清除 statsInterval
      clearInterval(statsInterval);
      statsInterval = null;
    }

    // 關閉 data channels
    closeDataChannels();
  }
}

function onSendChannelStateChange() {
  if (sendChannel) {
    const {readyState} = sendChannel;
    console.log(`Send channel state is: ${readyState}`);
    if (readyState === 'open') {

      // 當 sendChannel 的狀態改變為 open 時,就開始 sendData
      sendData();
    }
  }
}

function onError(error) {
  if (sendChannel) {
    console.error('Error in sendChannel:', error);
    return;
  }
  console.log('Error in sendChannel which is already closed:', error);
}

async function onReceiveChannelStateChange() {
  if (receiveChannel) {
    const readyState = receiveChannel.readyState;
    console.log(`Receive channel state is: ${readyState}`);
    if (readyState === 'open') {
      timestampStart = (new Date()).getTime();
      timestampPrev = timestampStart;
      statsInterval = setInterval(displayStats, 500);

      // 當 receive data channel 為 open 時,每 500ms 呼叫一次 displayStats
      await displayStats();
    }
  }
}

// display bitrate statistics.
async function displayStats() {
  if (remoteConnection && remoteConnection.iceConnectionState === 'connected') {
    // 如果 remoteConnection 還在連線中,取得 getStats
    const stats = await remoteConnection.getStats();
    let activeCandidatePair;
    stats.forEach(report => {
      if (report.type === 'transport') {
        activeCandidatePair = stats.get(report.selectedCandidatePairId);
      }
    });
    if (activeCandidatePair) {
      if (timestampPrev === activeCandidatePair.timestamp) {
        return;
      }
      // calculate current bitrate
      const bytesNow = activeCandidatePair.bytesReceived;
      const bitrate = Math.round((bytesNow - bytesPrev) * 8 /
        (activeCandidatePair.timestamp - timestampPrev));
      bitrateDiv.innerHTML = `<strong>Current Bitrate:</strong> ${bitrate} kbits/sec`;
      timestampPrev = activeCandidatePair.timestamp;
      bytesPrev = bytesNow;
      if (bitrate > bitrateMax) {
        bitrateMax = bitrate;
      }
    }
  }
}

Transfer data


    <section>
        <div id="button">
            <button id="sendTheData" type="button">Generate and send data</button>
        </div>
        <div class="input">
            <input type="number" id="megsToSend" min="1" name="megs" value="16"/>
            <label for="megsToSend">MB <b>(warning: very large values will potentially cause memory problems)</b></label>
            <div id="errorMsg"></div>
        </div>
        <div class="input">
            <input type="checkbox" id="ordered" checked>
            <label for="ordered">Ordered mode</label>
        </div>
        <div class="progress">
            <div class="label">Send progress:</div>
            <progress id="sendProgress" max="0" value="0"></progress>
        </div>

        <div class="progress">
            <div class="label">Receive progress:</div>
            <progress id="receiveProgress" max="0" value="0"></progress>
        </div>

        <div>
            <span id="transferStatus"></span>
        </div>
    </section>
/*
 *  Copyright (c) 2015 The WebRTC project authors. All Rights Reserved.
 *
 *  Use of this source code is governed by a BSD-style license
 *  that can be found in the LICENSE file in the root of the source
 *  tree.
 */

'use strict';
// 256k = 256 * 1024
const MAX_CHUNK_SIZE = 262144;

let localConnection;
let remoteConnection;
let sendChannel;
let receiveChannel;
// chunkSize = Math.min(localConnection.sctp.maxMessageSize, MAX_CHUNK_SIZE);
let chunkSize;
// lowWaterMark = chunkSize; // A single chunk
let lowWaterMark;
let highWaterMark;
let dataString;
let timeoutHandle = null;
const megsToSend = document.querySelector('input#megsToSend');
const sendButton = document.querySelector('button#sendTheData');
const orderedCheckbox = document.querySelector('input#ordered');
const sendProgress = document.querySelector('progress#sendProgress');
const receiveProgress = document.querySelector('progress#receiveProgress');
const errorMessage = document.querySelector('div#errorMsg');
const transferStatus = document.querySelector('span#transferStatus');

let bytesToSend = 0;
let totalTimeUsedInSend = 0;
let numberOfSendCalls = 0;
let maxTimeUsedInSend = 0;
let sendStartTime = 0;
let currentThroughput = 0;

sendButton.addEventListener('click', createConnection);

// Prevent data sent to be set to 0.
megsToSend.addEventListener('change', function() {
  const number = this.value;
  if (Number.isNaN(number)) {
    errorMessage.innerHTML = `Invalid value for MB to send: ${number}`;
  } else if (number <= 0) {
    sendButton.disabled = true;
    errorMessage.innerHTML = '<p>Please enter a number greater than zero.</p>';
  } else if (number > 64) {
    // 限制小於 64 MB
    sendButton.disabled = true;
    errorMessage.innerHTML = '<p>Please enter a number lower or equal than 64.</p>';
  } else {
    errorMessage.innerHTML = '';
    sendButton.disabled = false;
  }
});

async function createConnection() {
  sendButton.disabled = true;
  megsToSend.disabled = true;

  const servers = null;

  // 計算要發送的資料量
  const number = Number.parseInt(megsToSend.value);
  bytesToSend = number * 1024 * 1024;

  // 產生 local peer connection
  localConnection = new RTCPeerConnection(servers);

  // 產生 local send data channel, 且設定 ordered 參數
  // Let's make a data channel!
  const dataChannelParams = {ordered: false};
  if (orderedCheckbox.checked) {
    dataChannelParams.ordered = true;
  }
  sendChannel = localConnection.createDataChannel('sendDataChannel', dataChannelParams);
  sendChannel.addEventListener('open', onSendChannelOpen);
  sendChannel.addEventListener('close', onSendChannelClosed);
  console.log('Created send data channel: ', sendChannel);

  console.log('Created local peer connection object localConnection: ', localConnection);

  // icecandidate callback
  localConnection.addEventListener('icecandidate', e => onIceCandidate(localConnection, e));

  /////////
  // remote peer connection
  remoteConnection = new RTCPeerConnection(servers);
  remoteConnection.addEventListener('icecandidate', e => onIceCandidate(remoteConnection, e));
  remoteConnection.addEventListener('datachannel', receiveChannelCallback);

  /////////
  try {
    // local peer connection 產生 offer
    const localOffer = await localConnection.createOffer();
    await handleLocalDescription(localOffer);
  } catch (e) {
    console.error('Failed to create session description: ', e);
  }

  transferStatus.innerHTML = 'Peer connection setup complete.';
}

function sendData() {
  // Stop scheduled timer if any (part of the workaround introduced below)
  if (timeoutHandle !== null) {
    clearTimeout(timeoutHandle);
    timeoutHandle = null;
  }

  let bufferedAmount = sendChannel.bufferedAmount;
  while (sendProgress.value < sendProgress.max) {
    transferStatus.innerText = 'Sending data...';
    const timeBefore = performance.now();

    sendChannel.send(dataString);

    const timeUsed = performance.now() - timeBefore;
    if (timeUsed > maxTimeUsedInSend) {
      maxTimeUsedInSend = timeUsed;
      totalTimeUsedInSend += timeUsed;
    }
    numberOfSendCalls += 1;
    bufferedAmount += chunkSize;
    sendProgress.value += chunkSize;

    // Pause sending if we reach the high water mark
    if (bufferedAmount >= highWaterMark) {
      // This is a workaround due to the bug that all browsers are incorrectly calculating the
      // amount of buffered data. Therefore, the 'bufferedamountlow' event would not fire.
      if (sendChannel.bufferedAmount < lowWaterMark) {
        timeoutHandle = setTimeout(() => sendData(), 0);
      }
      console.log(`Paused sending, buffered amount: ${bufferedAmount} (announced: ${sendChannel.bufferedAmount})`);
      break;
    }
  }

  if (sendProgress.value === sendProgress.max) {
    transferStatus.innerHTML = 'Data transfer completed successfully!';
  }
}

function startSendingData() {
  // 開始發送 data
  transferStatus.innerHTML = 'Start sending data.';
  sendProgress.max = bytesToSend;
  receiveProgress.max = sendProgress.max;
  sendProgress.value = 0;
  receiveProgress.value = 0;
  sendStartTime = performance.now();
  maxTimeUsedInSend = 0;
  totalTimeUsedInSend = 0;
  numberOfSendCalls = 0;
  sendData();
}

function maybeReset() {
  if (localConnection === null && remoteConnection === null) {
    sendButton.disabled = false;
    megsToSend.disabled = false;
  }
}

async function handleLocalDescription(desc) {
  // 處理 local peer connection 的 sdp description
  localConnection.setLocalDescription(desc);
  console.log('Offer from localConnection:\n', desc.sdp);
  remoteConnection.setRemoteDescription(desc);
  try {
    // 產生 answer
    const remoteAnswer = await remoteConnection.createAnswer();
    handleRemoteAnswer(remoteAnswer);
  } catch (e) {
    console.error('Error when creating remote answer: ', e);
  }
}

function handleRemoteAnswer(desc) {
  remoteConnection.setLocalDescription(desc);
  console.log('Answer from remoteConnection:\n', desc.sdp);
  localConnection.setRemoteDescription(desc);
}

function getOtherPc(pc) {
  return (pc === localConnection) ? remoteConnection : localConnection;
}

async function onIceCandidate(pc, event) {
  const candidate = event.candidate;
  if (candidate === null) {
    return;
  } // Ignore null candidates
  try {
    await getOtherPc(pc).addIceCandidate(candidate);
    console.log('AddIceCandidate successful: ', candidate);
  } catch (e) {
    console.error('Failed to add Ice Candidate: ', e);
  }
}

function receiveChannelCallback(event) {
  console.log('Receive Channel Callback');
  receiveChannel = event.channel;
  receiveChannel.binaryType = 'arraybuffer';
  receiveChannel.addEventListener('close', onReceiveChannelClosed);
  receiveChannel.addEventListener('message', onReceiveMessageCallback);
}

function onReceiveMessageCallback(event) {
  // 在 receiveChannel 收到 message
  receiveProgress.value += event.data.length;
  currentThroughput = receiveProgress.value / (performance.now() - sendStartTime);
  console.log('Current Throughput is:', currentThroughput, 'bytes/sec');

  // Workaround for a bug in Chrome which prevents the closing event from being raised by the
  // remote side. Also a workaround for Firefox which does not send all pending data when closing
  // the channel.
  if (receiveProgress.value === receiveProgress.max) {
    sendChannel.close();
    receiveChannel.close();
  }
}

function onSendChannelOpen() {
  // sendChannel 成功 open
  console.log('Send channel is open');

  chunkSize = Math.min(localConnection.sctp.maxMessageSize, MAX_CHUNK_SIZE);
  console.log('Determined chunk size: ', chunkSize);
  dataString = new Array(chunkSize).fill('X').join('');
  lowWaterMark = chunkSize; // A single chunk
  highWaterMark = Math.max(chunkSize * 8, 1048576); // 8 chunks or at least 1 MiB
  console.log('Send buffer low water threshold: ', lowWaterMark);
  console.log('Send buffer high water threshold: ', highWaterMark);
  sendChannel.bufferedAmountLowThreshold = lowWaterMark;

  sendChannel.addEventListener('bufferedamountlow', (e) => {
    console.log('BufferedAmountLow event:', e);
    sendData();
  });

  startSendingData();
}

function onSendChannelClosed() {
  console.log('Send channel is closed');
  localConnection.close();
  localConnection = null;
  console.log('Closed local peer connection');
  maybeReset();
  console.log('Average time spent in send() (ms): ' +
              totalTimeUsedInSend / numberOfSendCalls);
  console.log('Max time spent in send() (ms): ' + maxTimeUsedInSend);
  const spentTime = performance.now() - sendStartTime;
  console.log('Total time spent: ' + spentTime);
  console.log('MBytes/Sec: ' + (bytesToSend / 1000) / spentTime);
}

function onReceiveChannelClosed() {
  console.log('Receive channel is closed');
  remoteConnection.close();
  remoteConnection = null;
  console.log('Closed remote peer connection');
  maybeReset();
}

Trickle ICE

Trickle ICE

如果是 stun server,candidate 必須要取得 srflx

如果是 turn server,candidate 必須要取得 relay

Time Component Type Foundation Protocol Address Port Priority
0.004 rtp host 3868393361 udp 192.168.1.157 54299 126 | 32542 | 255
0.008 rtp srflx 1742403877 udp 220.132.127.162 64347 100 | 32542 | 255
0.064 rtp relay 2774939105 udp 211.72.214.206 41556 2 | 32542 | 255
0.107 rtp host 2819687265 tcp 192.168.1.157 9 90 | 32542 | 255
0.107 Done
0.109

References

WebRTC samples

2021/9/27

WebRTC API

Web Real-Time Communication API 是提供網頁進行視訊或語音串流通訊的技術,可以直接使用瀏覽器進行資料交換。WebRTC 可提供瀏覽器在不需要安裝外掛程式或第三方軟體下,分享應用程式的資料和進行電話會議。

因為 WebRTC 還在發展當中,各 browser 有不同程度的 codec 支援以及 WebRTC 功能。故建議使用 adapter ,這是 Google 提供,減少跨瀏覽器差異的 library。

browser compatability matrix 是不同瀏覽器的相容表。

WebRTC 有多種功能,包含 audio, video conferencing,檔案交換,screen sharing,identity management,支援傳統交換機的 DTMF signals,兩端點之間的連線不需要特殊的 drivers/plugins,也可不需要中間 server。

兩個 peers 之間是以 RTCPeerConnection 產生連線,當連線建立後,就能夠使用 MediaStream 或 RTCDataChannel。

MediaStream 包含了數個 media information tracks,是由 MediaStreamTrack 介面表示的物件,可包含多種 media data: audio, video, text,大部分的 streams 包含至少一條 audio track,一條 video track,可用來傳送 live media,或將 media 存檔。

也可以用 RTCDataChannel 介面在兩端之間,傳遞任意的 binray data,這邊可用來傳送 channel-information, 交換 metadata,game status, file transfer。

WebRTC References

Connection setup and management

Interfaces

Interfaces Description
RTCPeerConnection local 與 remote peer 之間的 WebRTC connection
RTCDataChannel connection 的兩個 peers 之間的 bi-directional data channel
RTCDataChannelEvent 將 RTCDataChannel 接到 RTCPerrConnection 的 event
RTCSessionDescription session 的參數,裡面包含了 description type,代表它所描述的部分 offer/answer negotiation process 以及該 seesion的 SDP descriptor
RTCStatsReport connection 或是 tack on connection 的統計資訊。以 RTCPeerConnection.getStats() 取得。使用 WebRTC 的統計資料有另外的 WebRTC Statistics API
RTCIceCandidate 代表一個可用來建立 RTCPeerConnection 的 candidate ICE server
RTCIceTransport ICE transport 的資訊
RTCPeerConnectionIceEvent 在 RTCPeerConnection 中,有關 ICE candidates 的相關 events。event 是使用 type: icecandidate
RTCRtpSender 在 RTCPeerConnection 裡面的 MediaStreamTrack,用來encoding 傳輸資料
RTCRtpReceiver 在 RTCPeerConnection 裡面的 MediaStreamTrack,用來decoding 傳輸資料
RTCTrackEvent track event 介面。通常是 RTCRtpReceiver 接到 RTCPeerConnection 時發生,代表 RTCPeerConenction 產生了新的 MediaStreamTrack
RTCSctpTransport SCTP transport 的資訊,可在 RTCPeerConnection 的 data channel 收送資料時,透過 SCTP packets,存取Datagram Transport Layer Security(DTLS)

Dictionaries

Dictionaries Description
RTCConfiguration RTCPeerConnection 的 conifguration options
RTCIceServer 定義如何連接 ICE Sever,例如 Stun or Turn server
RTCRtpContributingSource 有關 contributing source (SCRC) 的資訊,包含該 source 被播放了一個最新的 packet 的 most recent time

ex:

var configuration = { iceServers: [{
                          urls: "stun:stun.services.mozilla.com",
                          username: "louis@mozilla.com",
                          credential: "webrtcdemo"
                      }, {
                          urls: ["stun:stun.example.com", "stun:stun-1.example.com"]
                      }]
};

var pc = new RTCPeerConnection(configuration);

Events

Events Description
bufferedamountlow data channel 目前 buffered 的資料量,也就是 bufferedAmount property 已經低於 bufferedAmountLowThreshold 這個 minimum buffered data size
close data channel 已結束 process,進入 closed state,data transport 已經完全 closed,在沒有完全 closed 的時候,會發送 closing event
closing RTCDataChannel 已轉換到 closing state,如果完全停止則是 close event
connectionstatechange 連線狀態(connectionState) 改變
datachannel 有新的 RTCDataChannel 可以使用,事件類別為 RTCDataChannelEvent
error data channel 發生錯誤 RTCErrorEvent
error RTCDtlsTransport 發生錯誤 RTCErrorEvent,可能是 dtls-failure 或是 fingerprint-failure
gatheringstatechange RTCIceTransport 的 gathering state 已改變
icecandidate RTCPeerConnectonIceEvent
當 local device 識別到一個新的 ICE candidate,並需要 local peer 去呼叫 setLocalDescription() 時,會產生此 event
icecandidateerror RTCPeerConnectionIceErrorEvent
在 gathering ICE candidates 發生錯誤時
iceconnectionstatechange 當 ICE gathering state (屬性 icegatheringstate) 改變時,會發送給 RTCPeerConnection
message data channel 收到一個訊息,event type 為 MessageEvent
negotiationneeded 通知 RTCPeerconnection 需要處理 session negotiation,可在 setLocalDescription() 後,呼叫 createOffer()
open RTCDataChannel 的 data transport 已經 opened 或 re-opened
selectedcandidatepairchane RTCIceTransport 目前選用的 ICE candidates 改變
track 當新的 track 在成功協調 media streaming 後,會產生 RTCTrackevent 發送給 RTCPeerConnection
signalingstatechange 當 signalingstate 改變時,送給 peer connection。這會發生在呼叫 setLocalDescription() 或 setRemoteDescription() 之後
statechange RTCDtlsTransport 的狀態改變
statechange RTCIceTransport 的狀態改變
statechange RTCSctpTransport 的狀態改變

Types

Types Description
RTCSctpTransport.state 代表 RTCSctpTrnasport instance 的 state
RTCSessionDescriptionCallback 當要求 create offers 或 answers 時,RTCSessionDescriptionCallback 會傳給 RTCPeerConnection

Identity and security

管理 identity and security,用在連線的認證

identity Description
RTCIdentityProvider user agent,可要求處理 identity assertion
RTCIdentityAssertion 代表 current connection 的 identity of the remote peer。如果目前沒有 peer,就會回傳 null,一但被設定,就不能被修改
RTCIdentityProviderRegistrar Registers and identity provider (idP)
RTCIdentityEvent 代表 identity provider (idP) 產生了 identity assertion。event type 為 identityresult
RTCIdentityErrorEvent 代表 identity provider (idP) 產生了 error。event type 為 idpassertionerror 或 idpvalidationerror
RTCertificate RTCPeerConnection 用來認證的 certificate

Telephony

PSTN 使用的 dialing tone

Interfaces

Interfaces Description
RTCDTMFSender 發送 DTMF signaling
RTCDTMFToneChangeEvent tonechange event 用來表示 DTMF 開始或結束

Events

Events Description
tonechange 當connection 開始播放 DTMF tone,或是 RTCDTMFSender 的 toneBuffer 已經送完時,會產生 event type: RTCDTMFToneChangeEvent

WebRTC Connectivity

Signaling

WebRTC 必須搭配 signaling service 才能使用。用來交換 SDP 資訊,也就是 offer/answer 資料

  • Peer A init connection 產生 Offer
  • 透過 signal channel 發送 Offer 給 Peer B
  • Peer B 接收 Offer,產生 Answer
  • 透過 signal channel 回送 Answer

Session Descriptions

configuration of an endpoint on a WebRTC connection 就稱為 session description

以 SDP 描述,裡面包含 media type, format, transfer protocol, endpoint's IP/Port, 其他資訊

media data exchange 是以 Interactive Connectivity Establishment (ICE) 處理,該協定可讓兩個在 NAT 下的 devices 使用 intermediary 交換 offers, answers

每個 peer 都留存兩個 description:localdescription 及 remote description

當建立 call 或是 某一端要修改 configuration 時,就會透過 offer/answer process 處理,以下是基本的 steps

  1. caller 透過 MediaDevices.getUserMedia 取得 local Media
  2. caller 產生 RTCPeerConnection,呼叫 RTCPeerConnection.addTrack()
  3. caller 呼叫 RTCPeerConnection.createOffer() 產生 offer
  4. caller 呼叫 RTCPeerConnection.setLocalDescription() 發送 offer 到 local description
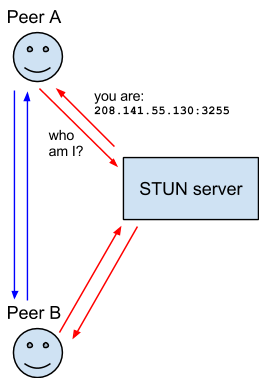
  5. caller 詢問 STUN servers 用以產生 ice candidates
  6. caller 使用 signaling server 傳送 offer 給 receiver
  7. receiver 接收 offer,呼叫 RTCPeerConnection.setRemoteDescription() 作為 remote description
  8. receiver 設定 call
    • capture local media
    • 呼叫 RTCPeerConnection.addTrack()
  9. receiver 透過 RTCPeerConnection.createAnswer() 產生 answer
  10. receiver 呼叫 RTCPeerConnection.setLocalDescription(),傳入 answer,也就是將 answer 設定為 local description
  11. receiver 使用 signaling server 發送 answer 給 caller
  12. caller 收到 answer
  13. caller 呼叫 RTCPeerConnection.setRemoteDescription() 將 answer 設定為 remote description
  14. 然後就能開始互傳 media

Pending and Current Descriptions

在處理 localDescription 與 remoteDescription 時,可能會因為格式不相容而被 reject,因此需要一個機制能夠 propose a new format,直到另一端接受

current description:由 RTCPeerConnection.currentLocalDescription 及 RTCPeerConenction.currentRemoteDescription 回傳,這也是目前雙方同意使用的 description。

pending description:由 RTCPeerConnection.pendingLocalDescription 及 RTCPeerConnection.pendingRemoteDescription 回傳,代表 setLocalDesciption() 或 setRemoteDescription() 目前考慮中的 description

RTCPeerConnection.localDescription 與 RTCPeerConnection.remoteDescription 回傳的 description,如果在 pending description 狀態,就是回傳 pending description,否則就回傳 current description

呼叫 setLocalDescription() 或 setRemoteDescription() 時,description 會先設定為 pending description,然後 WebRTC layer 開始評估要不要接受,一但 proposed description 被接受,current description 就會改成 pending description 的值,pending description 被改為 null

pendingLocalDescription 包含 offer or answer,還有 local ICE candidates

pendingRemoteDescription 包含 remote ICE candidates,可呼叫 RTCPeerconnection.addIceCandidate() 提供資訊

ICE Candidates

除了交換 media information,還需要交換 network connection 的 informations,也就是 ICE candidate 以及 peer 能夠通訊的方法 (directly or through a TURN server)

通常每個 peer 會先 propose 最佳的 candidates,理想狀態要使用 UDP (速度快,且容易 recover 中斷),但 ICE 標準也允許使用 TCP (當無法使用 UDP 時),另外不是所有瀏覽器都支援 ICE over TCP

UDP candidate types

  • host:實體 IP,可直接連線

  • srflx:Server Reflexive and Relayed Candidates

    host 因為經過 NAT,透過 Stun/Turn server 產生的 candidate。connection 最初要求來自 STUN server 的 candidate,並將 request 傳給 remote peer

  • prflx: Peer Reflexive Candidates

    來自 symmetric NAT,通常是 trickle ICE (也就是 additional candidate 交換,發生在 primary signaling 之後,在 verification 結束以前) 的 additional candidate

    是直接發送給 peer host 產生的 candidate

  • relay

    類似 srflx,但是由 Turn Server 產生的中繼 candidate IP:Port

tcp 有三種:active, passive, so

  • active

    會打開 outbound connection,且不接受 incoming connection request。這是最常見的類型

  • passive

    只會接受 incoming connection

  • so

    會嘗試同時在兩個終端直接打開連線

Choosing a candidate pair

ICE layer 會選擇兩個 peers 中的某一個當作 controlling agent。ICE Agent 會決定 connection 最後使用的 candidate pair,另一個 peer 就稱為 controlled agent。可透過 RTCIceCandidate.transport.role 查詢

controlling agent 除了決定 candidate pair 以外,還會透過 STUN,signaling 選用的 controlled agent,更新 offer。controlled agent 只會等待通知使用哪一個 candidate pair

ICE session 可能會讓 controlling agent 選擇多個 candidate pair,每次分享資訊給 controlled agent 時,兩端會重新設定 connection 使用的 candidate pair

一但 ICE session 完成,configuration 就固定了,除非發生 ICE reset

在每個 candidate generation 結束時,會以 RTCIceCandidate 格式發送 end-of-candidates notification,也就是 candidate 屬性為空字串。這個 candidate 還是要呼叫 addIceCandidate() 加入 connection,以便通知 remote peer

如果在 negotiation 時,沒有其他的 candidates,就會發送 end-of-candidates notification,發送 candidate 屬性為 null 的 RTCIceCandidate。這個訊息不需要傳給 remote peer。這是 legacy notification of a state,可用 icegatheringstatechange event 偵測得知

ICE rollbacks

如果不像掛斷既有的 call,可作 renegotiation

ICE rollback 會 restore 上次連線中 signalingState 為 stable 的 SDP offer

發送 description 其 type 為 rollback,就可以 init rollback,該 description 的其他 properties 都會被忽略

當 peer 已經有先前產生的 offer 時,ICE agent 會自動產生 rollback。如果 local peer 的狀態為 have-local-offer,也就是 local pper 有發送過 offer

呼叫 setRemoteDescription() 可收到 received offer triggers rollback

完整的 exchange


Signaling and video calling

Signaling and video calling

discovery 與 negotiation process 用以產生 conenction,稱為 signaling

WebRTC 需要兩個不同網路的端點,能夠互相找到對方,並協調 media format,需要透過第三方 server 處理 signaling

signaling server

兩個 devices 之間的 WebRTC 連線需要先透過 signaling server 協調兩端

WebRTC 不指定 transport mechanism,可使用 WebSocket 或是 XMLHttpRequest

server 不需要了解或是處理 signaling data content (SDP),只需要傳遞。ICE subsystem 要如何傳送 singaling data 給另一個 peer 是比較重要的問題。

準備給 signaling 使用的 chat server

chat server 透過 WebSocket 傳送 JSON string

可用類似方法,做 signaling 與 ICE negotiation

# 將訊息傳送給特定 target 的 function
function sendToOneUser(target, msgString) {
  var isUnique = true;
  var i;

  for (i=0; i < connectionArray.length; i++) {
    if (connectionArray[i].username === target) {
      connectionArray[i].send(msgString);
      break;
    }
  }
}

Designing the signaling protocol

需要一個 protocol 交換 message,以下利用 JSON object 作為範例

Exchange session descriptions

在開始 singaling process 時,user init call 並產生 offer,裡面包含 session description (SDP 格式),該資料要傳給 callee,callee 會以 answer 回應

設計用 video-offer video-answer 分別代表 offer, answer

JSON 欄位 說明
type message type, video-offer or video-answer
name sender's name
target callee's name
sdp SDP string

兩端可知道 codecs, codec parameters,但還不知道如何傳遞 media data。透過 ICE candidates 處理

Exchange ICE candidates

兩端需要交換 ICE candidates 協調真正的 connection,每個 ICE candidate 都會描述一個可使用的溝通管道。peer 會持續發送找到的 candidates,不管 streaming 是否已經開始了。

icecandidate event 會送給 RTCPeerConenction,並以 pc.setLocalDescription(offer) 完成 process

如果有更好的 candidate,stream 可修改 formats

欄位 說明
type new-ice-candidate
target callee's name
candidate SDP candidate string
不需要處理訊息內容,只需要傳給 remote peer

每個 ICE message 會提供 TCP/UDP, IP address, port, connection type (說明是 peer IP 或是 relay server),包含 NAT 資訊

note: 當收到 onicecandidate 時,要將 candidate 透過 signaling connection 傳給另一個 peer。收到 ICE candidate message 時,就呼叫 RTCPeerConnection.addIceCandidate()。建議不要嘗試修改 SDP

note: onicecandidate event 與 createAnswer() 都是 async call,注意 signaling 不要修改處理順序。setRemoteDescription() 後,才能呼叫 addIceCandidate()

Signaling transaction flow

  • Each user's client running within a web browser
  • Each user's web browser
  • The signaling server
  • The web server hosting the chat service
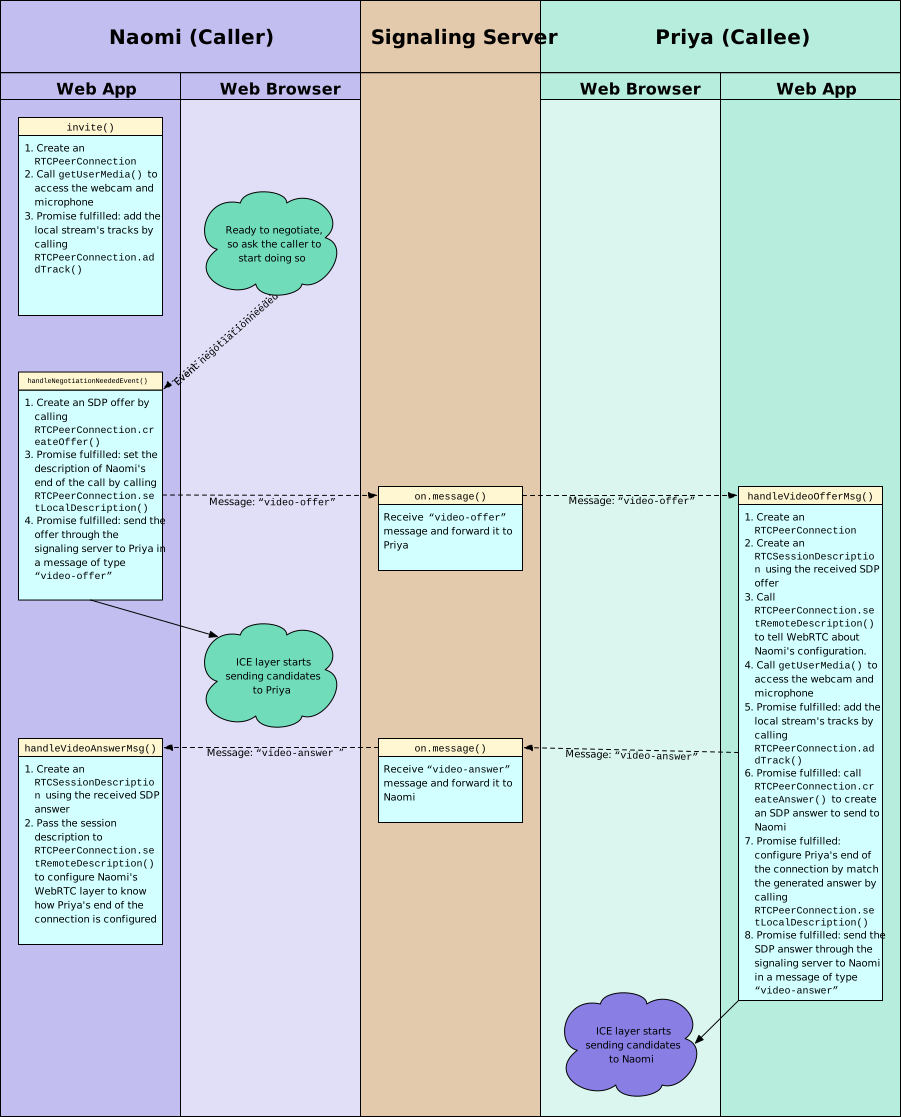
ICE candidate exchange process

在 local ICE layer 收到的 candidate,各自發送給另一端,當兩端同意使用某個 candidate,就會開始傳遞 media

當網路狀況有異動,peer 可能會建議切換到不同 media resolution 或 不同 codec,就會啟動新的 exchange of candidates

client application

兩個 video elements,一個 hangup 按鈕

<div class="flexChild" id="camera-container">
  <div class="camera-box">
    <video id="received_video" autoplay></video>
    <video id="local_video" autoplay muted></video>
    <button id="hangup-button" onclick="hangUpCall();" disabled>
      Hang Up
    </button>
  </div>
</div>
// 透過 WebSocket 發送訊息給 signaling server
function sendToServer(msg) {
  var msgJSON = JSON.stringify(msg);

  connection.send(msgJSON);
}
// users: 每個連線的 user 的 usernames
function handleUserlistMsg(msg) {
  var i;
  var listElem = document.querySelector(".userlistbox");

  while (listElem.firstChild) {
    listElem.removeChild(listElem.firstChild);
  }

  msg.users.forEach(function(username) {
    var item = document.createElement("li");
    item.appendChild(document.createTextNode(username));
    item.addEventListener("click", invite, false);

    listElem.appendChild(item);
  });
}
// 當 user click 某個想要呼叫的 username,就呼叫 inivte
var mediaConstraints = {
  audio: true, // We want an audio track
  video: true // ...and we want a video track
};

function invite(evt) {
  if (myPeerConnection) {
    alert("You can't start a call because you already have one open!");
  } else {
    var clickedUsername = evt.target.textContent;

    if (clickedUsername === myUsername) {
      alert("I'm afraid I can't let you talk to yourself. That would be weird.");
      return;
    }

    targetUsername = clickedUsername;
    createPeerConnection();

    navigator.mediaDevices.getUserMedia(mediaConstraints)
    .then(function(localStream) {
      document.getElementById("local_video").srcObject = localStream;
      localStream.getTracks().forEach(track => myPeerConnection.addTrack(track, localStream));
    })
    .catch(handleGetUserMediaError);
  }
}
// 如果 getUserMedia 發生 error 的錯誤處理
function handleGetUserMediaError(e) {
  switch(e.name) {
    case "NotFoundError":
      alert("Unable to open your call because no camera and/or microphone" +
            "were found.");
      break;
    case "SecurityError":
    case "PermissionDeniedError":
      // Do nothing; this is the same as the user canceling the call.
      break;
    default:
      alert("Error opening your camera and/or microphone: " + e.message);
      break;
  }

  closeVideoCall();
}
// 建立 PeerConnection
function createPeerConnection() {
  myPeerConnection = new RTCPeerConnection({
      iceServers: [     // Information about ICE servers - Use your own!
        {
          urls: "stun:stun.stunprotocol.org"
        }
      ]
  });

  myPeerConnection.onicecandidate = handleICECandidateEvent;
  myPeerConnection.ontrack = handleTrackEvent;
  myPeerConnection.onnegotiationneeded = handleNegotiationNeededEvent;
  myPeerConnection.onremovetrack = handleRemoveTrackEvent;
  myPeerConnection.oniceconnectionstatechange = handleICEConnectionStateChangeEvent;
  myPeerConnection.onicegatheringstatechange = handleICEGatheringStateChangeEvent;
  myPeerConnection.onsignalingstatechange = handleSignalingStateChangeEvent;
}
  • Starting negotiation
// 處理 negotiationneeded event
function handleNegotiationNeededEvent() {
  myPeerConnection.createOffer().then(function(offer) {
    return myPeerConnection.setLocalDescription(offer);
  })
  .then(function() {
    sendToServer({
      name: myUsername,
      target: targetUsername,
      type: "video-offer",
      sdp: myPeerConnection.localDescription
    });
  })
  .catch(reportError);
}
  • session negotiation
    • Handling the invitation
function handleVideoOfferMsg(msg) {
  var localStream = null;

  targetUsername = msg.name;
  createPeerConnection();

  var desc = new RTCSessionDescription(msg.sdp);

  myPeerConnection.setRemoteDescription(desc).then(function () {
    return navigator.mediaDevices.getUserMedia(mediaConstraints);
  })
  .then(function(stream) {
    localStream = stream;
    document.getElementById("local_video").srcObject = localStream;

    localStream.getTracks().forEach(track => myPeerConnection.addTrack(track, localStream));
  })
  .then(function() {
    return myPeerConnection.createAnswer();
  })
  .then(function(answer) {
    return myPeerConnection.setLocalDescription(answer);
  })
  .then(function() {
    var msg = {
      name: myUsername,
      target: targetUsername,
      type: "video-answer",
      sdp: myPeerConnection.localDescription
    };

    sendToServer(msg);
  })
  .catch(handleGetUserMediaError);
}
  • sending ICE candidates
function handleICECandidateEvent(event) {
  if (event.candidate) {
    sendToServer({
      type: "new-ice-candidate",
      target: targetUsername,
      candidate: event.candidate
    });
  }
}
  • receiving ICE candidates
function handleNewICECandidateMsg(msg) {
  var candidate = new RTCIceCandidate(msg.candidate);

  myPeerConnection.addIceCandidate(candidate)
    .catch(reportError);
}
  • receiving new streams
function handleTrackEvent(event) {
  document.getElementById("received_video").srcObject = event.streams[0];
  document.getElementById("hangup-button").disabled = false;
}
  • handling the removal of tracks
function handleRemoveTrackEvent(event) {
  var stream = document.getElementById("received_video").srcObject;
  var trackList = stream.getTracks();

  if (trackList.length == 0) {
    closeVideoCall();
  }
}
  • hangup
function hangUpCall() {
  closeVideoCall();
  sendToServer({
    name: myUsername,
    target: targetUsername,
    type: "hang-up"
  });
}
  • end call
function closeVideoCall() {
  var remoteVideo = document.getElementById("received_video");
  var localVideo = document.getElementById("local_video");

  if (myPeerConnection) {
    myPeerConnection.ontrack = null;
    myPeerConnection.onremovetrack = null;
    myPeerConnection.onremovestream = null;
    myPeerConnection.onicecandidate = null;
    myPeerConnection.oniceconnectionstatechange = null;
    myPeerConnection.onsignalingstatechange = null;
    myPeerConnection.onicegatheringstatechange = null;
    myPeerConnection.onnegotiationneeded = null;

    if (remoteVideo.srcObject) {
      remoteVideo.srcObject.getTracks().forEach(track => track.stop());
    }

    if (localVideo.srcObject) {
      localVideo.srcObject.getTracks().forEach(track => track.stop());
    }

    myPeerConnection.close();
    myPeerConnection = null;
  }

  remoteVideo.removeAttribute("src");
  remoteVideo.removeAttribute("srcObject");
  localVideo.removeAttribute("src");
  remoteVideo.removeAttribute("srcObject");

  document.getElementById("hangup-button").disabled = true;
  targetUsername = null;
}

ICE connection state

function handleICEConnectionStateChangeEvent(event) {
  switch(myPeerConnection.iceConnectionState) {
    case "closed":
    case "failed":
      closeVideoCall();
      break;
  }
}

ICE signaling state

function handleSignalingStateChangeEvent(event) {
  switch(myPeerConnection.signalingState) {
    case "closed":
      closeVideoCall();
      break;
  }
};

ICE gathering state

function handleICEGatheringStateChangeEvent(event) {
  // Our sample just logs information to console here,
  // but you can do whatever you need.
}

WebRTC Data Channel

Using WebRTC Data Cahnnel

建立 RTCPeerConnection 後,就能收送 media data,也可以使用 data channel,可安全地交換任何資料

因所有 WebRTC components 都要求加密,RTCDataChannel 會自動使用 Datagram Transport Layer Security (DTLS)

產生 data channel

RTCDataChannel 使用的 data transport 可用兩種方法產生

  • 以 WebRTC 產生 transport,並宣告為 remote peer (會收到 datachannel event),這種方法比較簡單且常用,但比較沒有彈性
  • 自己寫 code 協調 data transport,自己 signal 到另一端 peer,且要連接到 new channel

Automatic negotiation

通常可讓 peer connection 協調處理 RTCDataChannel connection

呼叫 createDataChannel() 且不設定 negotiated 屬性,或是設定為 false。就會讓 RTCPeerConnection 自動處理 RTCDataChannel

可透過傳給 RTCDataChannel 的 open event 判斷是否有成功連線

let dataChannel = pc.createDataChannel("MyApp Channel");

dataChannel.addEventListener("open", (event) => {
  beginTransmission(dataChannel);
});

Manual negotiation

先用 RTCPeerConnection.createDataChannel() 產生一個新的 RTCDataChannel,設定 negotiated 為 true

使用 webserver or others,要能 signal to the remote peer,並讓他產生自己的 RTCDataChannel,且 negotiated 為 true

let dataChannel = pc.createDataChannel("MyApp Channel", {
  negotiated: true
});

dataChannel.addEventListener("open", (event) => {
  beginTransmission(dataChannel);
});

requestRemoteChannel(dataChannel.id);

上面的 requestRemoteChannel 就是用來 trigger negotiation,產生 remote channel with the same ID as the local channel

Buffering

WebRTC data channel 支援 outbound data 的 buffering,會自動處理,且無法控制 buffer size。

使用 bufferedAmount, bufferedAmountLowThreshold, onbufferedamountlow, and bufferedamountlow

了解 message size limits

網路傳輸的封包有 size 限制

Firefox, Chrome 使用 usrsctp library 實作 SCTP,但兩個使用方法不同,firefox 會用多個 SCTP message 傳送 large message (deprecated),chrome 是用 series of messages

少於 16 kB 的訊息不需要考慮此問題

Concerns

目前不適合使用 RTCDataChannel 傳送超過 64kB 的 message,因為 SCTP 最初用在 signaling protocol,這邊假設 message 都很小,要支援超過網路 MTU 的 message 是後來增加的功能。這個技術需要訊息編上有順序的號碼,要依序傳送。

因為有越多越多 application 傳送大 message,造成重要的 signaling message 阻塞的問題。

目前 browser 利用 end-of-record (EOR) flag 支援 larger message,這表示 message 是 last one in a series。在支援 EOR 的狀況下,RTCDataChannel 可傳送大 message (可超過 256 kB,firefox 實作可傳送 1GB),在 256 kB 的狀況下,會發生 noticeable delays。

要解決此問題,新的 stream scheduler (SCTP ndata specification) 可 interleave 在不同 stream 傳送的 message,proposal 目前還在 IETF draft,如果實作,理論上可傳送任意大小的 message

firefox 在 bug 1381145 支援 ndata

chrome 在 bug 5696

Security

透過 WebRTC 傳送的資料都會被加密,RTCDataChannel 是用 Datagram Transport Layer Security (DTLS) 加密,based on TLS (https)

WebRTC 在兩個 agents 之間做 peer-to-peer conenction,資料不會傳給 web/application server

SCTP NAT

解决iptables nat sctp协议无效的问题

A----->B-----C

IP如下:

A:1.1.1.1

B:1.1.1.2; 2.2.2.1

C:2.2.2.2

需求為,A 需要使用sctp連通C

在B機器上添加iptables規則為:

iptables -t nat -I PREROUTING -d 1.1.1.2 -p sctp --dport 11111 -j DNAT --to-destination  2.2.2.2:11111

就是把A發出的目的地址:Port 由1.1.1.2:11111轉變為2.2.2.2:11111

同時在C的接口上使用tcpdump抓包,發現並沒有接收到sctp message,為檢驗網絡是否正常(包括路由等配置),僅將上述規則中的sctp改為tcp進行tcp的連通測試

iptables -t nat -I PREROUTING -d 1.1.1.1 -p tcp --dport 11111 -j DNAT --to-destination  2.2.2.2:11111

發現C機器上可以抓到tcp報文,說明網絡沒有問題,iptables的規則也沒有問題。

因為tcpdump抓包解包並不需要系統支持特定的協議,懷疑可能是iptables規則因為某種原因沒有生效,借助google發現瞭解決辦法:iptables-nat-not-work-for-sctp

載入nfconntrackproto_sctp即可,該模塊用來對sctp進行連接跟蹤

modprobe nf_conntrack_proto_sctp

連接跟蹤模塊可以參見:nf_conntrack連接跟蹤模塊

Why is SCTP not much used/known

  • NAT: Doesn't cross NAT very well/at all (less than 1% internet home & enterprise routers do NAT on SCTP).

sctp over udp encapsulation does not work under NAT network


ORTC

Object Real-Time Communication 是新的規格,提供開發 WebRTC application 高階 API,ORTC 不使用 SDP,也不支援 Offer/Answer state machine。ORTC 使用 "sender", "receiver", "transport" 物件及設定參數,用以描述該物件的功能。"Tracks" 是由 sender 編碼,透過 transport 傳送,在 receiver 解碼。而 "data channels"是直接透過 transport 傳送。

ORTC 最初由 MS Edge 實作支援,但目前 ORTC 很多的物件定義,已經被吸收進入 WebRTC 1.0 核心標準中。
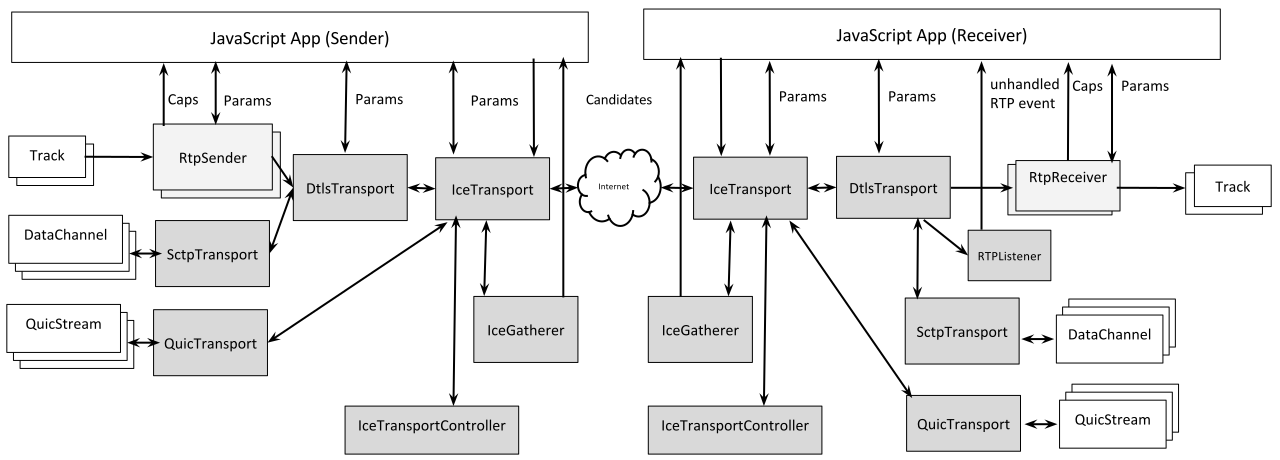
WebRTC, ORTC difference

ref: ORTC draft spec

ref: WebRTC的现状和未来(上)

References

WebRTC API

samples

WebRTC wiki

30-26之 WebRTC 的 P2P 即時通信與小範例

2021/9/13

ICE: Interactive Connectivity Establishment

ICE 是以 P2P 連線為前提的一種協調方法,主要是 VOIP、P2P視訊在使用。因為現在的網路終端,通常都在 Firewall 裡面,透過 NAT 上網,導致 P2P 連線的困難度大增,因此 ICE 透過 Stun 的技術,判讀 NAT 類型,當遇到特殊的 NAT 類型,無法處理 P2P 時,就搭配 Turn Server 為兩個終端進行資料中繼傳輸。

ICE

ref: Introduction to WebRTC protocols

主要用在 UDP 多媒體 session,為了解決 NAT 的問題,ICE 可嘗試找到多個 candidates,取得最佳的連線方法。

ICE 透過 stun server 查詢 NAT 類型,以及取得自己對外的 IP:Port。

如果無法直接 p2p 連線,就會改用 Turn Server 中繼,互相傳遞資料。

SDP

P2P通訊標準協議ICE

RFC4566 SDP 是用來協調 session 傳輸所要交換的資訊,內容可能會有這些

會話描述:
     v=  (protocol version)
     o=  (originator and session identifier)
     s=  (session name)
     i=* (session information)
     u=* (URI of description)
     e=* (email address)
     p=* (phone number)
     c=* (connection information -- not required if included in
          all media)
     b=* (zero or more bandwidth information lines)
     One or more time descriptions ("t=" and "r=" lines; see below)
     z=* (time zone adjustments)
     k=* (encryption key)
     a=* (zero or more session attribute lines)
     Zero or more media descriptions

時間資訊描述:
     t=  (time the session is active)
     r=* (zero or more repeat times)

多媒體資訊描述(如果有的話):
     m=  (media name and transport address)
     i=* (media title)
     c=* (connection information -- optional if included at
          session level)
     b=* (zero or more bandwidth information lines)
     k=* (encryption key)
     a=* (zero or more media attribute lines)

ex:

      v=0
      o=jdoe 2890844526 2890842807 IN IP4 10.47.16.5
      s=SDP Seminar
      i=A Seminar on the session description protocol
      u=http://www.example.com/seminars/sdp.pdf
      e=j.doe@example.com (Jane Doe)
      c=IN IP4 224.2.17.12/127
      t=2873397496 2873404696
      a=recvonly
      m=audio 49170 RTP/AVP 0
      m=video 51372 RTP/AVP 99
      a=rtpmap:99 h263-1998/90000

NAT

依據 NAT的限制方式,可分為四種:

  • Full Cone NAT(one-to-one)

    • 只是單純的做位址轉換,並未對進出的封包設限
  • Address-Restricted Cone NAT

    • 從內部送出之封包的目的地 IP 位址會被記住。只有這些曾經收過這些封包的位址可以送封包進入內部 IP。由其他位址送進來的封包,都會被拒絕。
  • Port-Restricted cone NAT

    • 封包進出比 Restricted Cone 增加了一個限制, 從內部送出之封包的目的地的IP 位址及 Port Number 會被記住。 由外部送進來的封包,除了由那些接收過內部所送出的封包的IP 位址及 Port Number 所送來的封包之外,都會被拒絕。
  • Symmetric NAT

    • 前三種NAT在做位址轉換時,無論封包是送往哪裡, NAT內部同一內部位址都對應到同一個外部位址:Port,但 Symmetric NAT 內則每一內部位址對於不同的目的地,會對應到不同的外部 IP address:Port。
    • Symmetric NAT只允許先由私有網域內的機器,發送封包到網際網路中的接收端可以回傳封包

判斷方法

NAT Test 提供一種方式,可以判斷是否為 Symmetric NAT,因為 Understanding Different NAT Types and Hole-Punching 的說明,只要有一端為 Symmetric NAT,就無法直接 p2p 連線。

判斷的方法是利用 RTCPeerConnection 對 google stun server 建立連線,由 onicecandidate 判讀, port 跟 rport 是否一樣。

// JScript File

function parseCandidate(line) {
    console.log("parseCandidate="+line);
    // candidate:842163049 1 udp 1677729535 220.132.127.162 42280 typ srflx raddr 0.0.0.0 rport 0 generation 0 ufrag 1cTw network-cost 999

    var parts;
    // Parse both variants.
    // 兩種:a=candidate:  or  candidate:
    if (line.indexOf('a=candidate:') === 0) {
        parts = line.substring(12).split(' ');
    } else {
        parts = line.substring(10).split(' ');
    }

    var candidate = {
        foundation: parts[0],
        component: parts[1],
        protocol: parts[2].toLowerCase(),
        priority: parseInt(parts[3], 10),
        ip: parts[4],
        port: parseInt(parts[5], 10),
        // skip parts[6] == 'typ'
        type: parts[7]
    };

    for (var i = 8; i < parts.length; i += 2) {
        switch (parts[i]) {
            case 'raddr':
                candidate.relatedAddress = parts[i + 1];
                break;
            case 'rport':
                candidate.relatedPort = parseInt(parts[i + 1], 10);
                break;
            case 'tcptype':
                candidate.tcpType = parts[i + 1];
                break;
            default: // Unknown extensions are silently ignored.
                break;
        }
    }

    console.log("candidate=",candidate);
    // {
    //     "foundation": "842163049",
    //     "component": "1",
    //     "protocol": "udp",
    //     "priority": 1677729535,
    //     "ip": "220.132.127.162",
    //     "port": 42280,
    //     "type": "srflx",
    //     "relatedAddress": "0.0.0.0",
    //     "relatedPort": 0
    // }
    return candidate;
};

function testNat() {
    //reset lblResult
    document.getElementById("MainContent_lblResult").style.color = "#696969";
    document.getElementById("MainContent_lblResult").innerHTML = "Test started " + new Date().toLocaleString() + "<br>";

    var candidates = {};
    var pc = new RTCPeerConnection({
        iceServers: [
            { urls: 'stun:stun1.l.google.com:19302' },
            { urls: 'stun:stun2.l.google.com:19302' }
        ]
    });
    document.getElementById("MainContent_lblResult").innerHTML += "Create data channel to Google STUN servers<br>";
    pc.createDataChannel("foo");
    document.getElementById("MainContent_lblResult").innerHTML += "Testing...Please Wait...<br>";
    pc.onicecandidate = function (e) {
        console.log(e);

        if (e.candidate && e.candidate.candidate.indexOf('srflx') !== -1) {
            console.log("e.candidate.candidate="+e.candidate.candidate);

            var cand = parseCandidate(e.candidate.candidate);

            // console.log("candidates[cand.relatedPort]=",candidates[cand.relatedPort]);
            if (!candidates[cand.relatedPort]) candidates[cand.relatedPort] = [];
            // console.log("candidates[cand.relatedPort]=",candidates[cand.relatedPort]);
            candidates[cand.relatedPort].push(cand.port);
            // console.log("candidates[cand.relatedPort]=",candidates[cand.relatedPort]);

        } else if (!e.candidate) {
            // All ICE candidates have been sent
            console.log("candidates=",candidates);
            // {
            //     "0": [
            //         42280
            //     ]
            // }
            if (Object.keys(candidates).length === 1) {
                var ports = candidates[Object.keys(candidates)[0]];
                console.log("ports", ports);

                //window.alert(ports.length === 1 ? 'normal nat' : 'symmetric nat');
                if (ports.length === 1) {
                    document.getElementById("MainContent_lblResult2").innerHTML = "Completed: Normal NAT";
                } else {
                    document.getElementById("MainContent_lblResult2").innerHTML = "Completed: Symmetric NAT";
                }
                document.getElementById("MainContent_lblResult2").style.color = "green";
            }
        }
    };
    pc.createOffer()
        .then(offer => pc.setLocalDescription(offer))

};

另一個判斷的 TypeScript: isNormalNat.ts

ICE协议下NAT穿越的实现(STUN&TURN) 這邊有說明,stun server 是如何判斷 NAT 類型的

candidate type

ref: RFC 5245

ref: WebRTC connectivity

udp 有四種:host, srflx, prflx, relay

  • host:實體 IP,可直接連線

  • srflx:Server Reflexive and Relayed Candidates

    host 因為經過 NAT,透過 Stun/Turn server 產生的 candidate

  • prflx: Peer Reflexive Candidates

    其中一端來自 symmetric NAT

  • relay

    由 Turn Server 產生的中繼 IP:Port

tcp 有三種:active, passive, so

  • active

    會打開 outbound connection,且不接受 incoming connection request。這是最常見的類型

  • passive

    只會接受 incoming connection

  • so

    會嘗試同時在兩個終端直接打開連線

References

互動式連接建立

P2P通訊標準協議ICE

ICE (Interactive Connectivity Establishment)

你需要知道关于ICE的三件事

30-29之 WebRTC 的 P2P 打洞術 ( ICE )

[知識篇]WebRTC - ICE(STUN/TURN)

Peer-to-Peer Communication Across Network Address Translators

about 82% of the NATs tested support hole punching for UDP, and about 64% support hole punching for TCP streams

Trickle ICE

RFC 5389 - STUN 協定介紹

[筆記] WebRTC 網路影音-通訊協定篇(protocol of media, video and audio)

NAT 及防火牆之來源

Understanding Different NAT Types and Hole-Punching

30-28之 WebRTC 連線前傳 - 為什麼 P2P 連線很麻煩 ? ( NAT )

NAT -- 基本概念

WebRTC ICE 狀態與提名處理

測試 NAT 類型

SIP穿越NAT的rport機制

WebRTC ICE candidate里面的raddr和rport表示什么?

Network Configuration for VoIP Providers

ICE介绍 (RFC 5245)

rfc 5245 笔记

C ICE implementation library

libice

libnice

WebRtc音视频实时通信--libnice库介绍

How to play libnice-ly with your NAT

libnice for iOS and Android.

libjuice

2021/5/17

如何在 Postman 記錄 Cookie

Postman 是用來測試一些 Server Http API 的工具。但在遇到 Server 需要登入後,才能使用的 http request,這時候需要做一些額外的設定。

我們是使用 Java Server,通常在這樣的 Server,會使用 JSESSIONID 這個 Cookie,用來對應 HTTP Server Session ID

首先做一個 Login 的 Request,然後在 Test 頁籤,填入以下的 code。

var a = pm.cookies.get("JSESSIONID");
pm.globals.set("JSESSIONID", a);

執行該 Login 後,可在 Environment 變數中,看到 JSESSIONID 的值

接下來就可以在需要登入後,才能使用的 API 裡面,增加 JSESSIONID 的 Cookie Value

{{JSESSIONID}}

2018/1/8

ECMAScript 6, ES6


ECMAScript 是由 ECMA 組織通過的 ECMA-262 標準化的腳本式程式語言,在瀏覽器上被廣泛使用的 JavaScript 就是 ECMAScript 的其中一種實作的成品。換句話說,ECMAScript 是語言的標準規格,而比較常聽到的 JavaScript 是一這個語言標準的其中一種實作。


一般初學者學習的 JavaScript 是 ECMAScript 3.0 的語法,目前最新的標準 ECMAScript 6 (ES6) ,是在 2015年6月 發布,其後因標準每年6月固定的更新機制,2015, 2016, 2017 這三年都有發表新版的 ES6,所以後來就標記為 ES2015, ES2016, ES2017。


ECMAScript 和 JavaScript 的關係


1995/6 Sun 與 Netscape 合作發表了 JavaScript,1996/3 Netscape 發表支援 JavaScript 的網頁瀏覽器 Netscape Navigator 2.0,因為該語言的成功,1996/8 MS IE 3.0 支援了 JavaScript。


1996/11 Netscape 將 JavaScript 交給 ECMA 進行標準化,但由於 Java 是 Sun 的商標,JavaScript 是 Netscape 的商標,所以改名為 ECMAScript,也讓該規範更具有開放及中立性。


ECMAScript 是語言的標準規格,而比較常聽到的 JavaScript 是一這個語言標準的其中一種實作,還有其他實作的語言,包含 Adobe ActionScript, TypeScript 等等。


花了 15 年的 ES6 標準


1997/6 ECMA 發佈了 ECMAScript 1.0 後,1998/6 及 1999/12 分別發表了 ECMAScript 2.0 及 3.0,3.0 是非常成功也是最普及的版本。


2000年開始,開始制訂ES4,直到 2007/10 發表了 ES4 草案。但 ECMA Technical Committee 39 (TC39) 的部分成員因 ES4 太過激進,不願意通過這個版本。


2008/7 開會決定中止 ES4 的規格,將其中以小部分放到 ECMAScript 3.1 發佈,將專案代號改為 Harmony,後來ECMAScript 3.1 改為 ECMAScript 5。


2011/6 發表 ECMAScript 5.1,同時是 ISO/IEC 16262:2011 標準。


2013/2 發表了 ECMAScript 6 草案


2015/6 正式通過 ECMAScript 6


ES2015, ES2016, ES2017


2015 通過的 ES6 就是 ECMA2015,這是 ES6 的第一個正式版本。因 ECMA 委員會認為,ES6 的規範已經成熟了,後續會有微幅的修訂,為了讓這個修訂過程標準化,決定每年 6 月就發布一次該年度的最新正式版本。


所以在 2016/6 及 2017/6 都有新版本的 ES2016 及 ES2017,但其實都是 ES6 的標準。


ES6 可說是新一代JavaScript 語言的代名詞。


ECMAScript 6 compatibility table


Mozilla 給開發者的網頁技術文件 JavaScript


ES6 - Quick Guide


References


ECMAScript 6 簡介


ECMAScript wiki