Grafana 是個 metrics 資料的分析、告警及視覺化圖表的工具平台,最常用來作 Time Series Data 的圖表,也能用在收集 sensor 資料、home automation、天氣及 process control 這些領域。
安裝
參考 download Grafana 這個網頁。
在 CentOS 可用以下程序安裝
wget https://s3-us-west-2.amazonaws.com/grafana-releases/release/grafana-4.5.2-1.x86_64.rpm
sudo yum install -y initscripts fontconfig urw-fonts
sudo rpm -Uvh grafana-4.5.2-1.x86_64.rpm
軟體包含以下這幾個部分
/usr/sbin/grafana-server
/etc/init.d/grafana-server
init.d script
/etc/sysconfig/grafana-server
default file (environment vars)
/etc/grafana/grafana.ini
configuration file
grafana-server.service
systemd service (if systemd is available)
/var/log/grafana/grafana.log
default configuration uses a log file
/var/lib/grafana/grafana.db
default configuration specifies an sqlite3 database
啟動
sudo systemctl daemon-reload
sudo systemctl enable grafana-server.service
### start grafana-server
sudo systemctl start grafana-server.service
使用
網址為 http://localhost:3000
預設帳號/密碼為 admin/admin
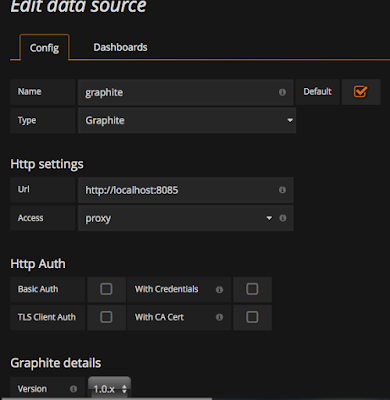
登入後,首先要設定 DataSource,我們設定使用 graphite,Url 的部分就連到 Graphite-web 的網址
下一步是建立 DashBoard,參考 Using Graphite in Grafana 的說明,另外也可以到 Garfana Labs Dashboards 尋找適當的 template。
以 Graphite Server Metrics 為例,我們先到 Graphite Dashboard Tempates 右邊下載 JSON: graphite-server-carbon-metrics_rev1.json。
然後直接在 Grafana 網頁的 DashBoard 功能上,直接以 import 方式將剛剛的 json 匯入,就可以直接看到下面的圖表畫面。
CollectD Server Metrics
Graphite Dashboard Templates 裡面有關 CollectD Metrics 有四個,但下載後都沒辦法直接看到 CollectD 的資料圖表。
我們還是先載入一個 Template,再修改圖表的 metrics。
修改 collectd.conf,並重新啟動 collectd,主要是要增加 CPU 部分的 aggregation 計算,另外再多載入一些 Plugins。
Hostname "testserver"

FQDNLookup false
Interval 1
#Timeout 2
ReadThreads 5

LoadPlugin cpu
LoadPlugin df
LoadPlugin load
LoadPlugin memory
LoadPlugin disk
LoadPlugin interface
LoadPlugin uptime
LoadPlugin swap
LoadPlugin write_graphite
LoadPlugin processes
LoadPlugin aggregation
LoadPlugin match_regex
LoadPlugin syslog
LoadPlugin logfile

<Plugin logfile>
  LogLevel info
  # File STDOUT
  File "/var/log/collectd/collectd.log"
  Timestamp true
  PrintSeverity false
</Plugin>

<Plugin df>
  # expose host's mounts into container using -v /:/host:ro  (location inside container does not matter much)
  # ignore rootfs; else, the root file-system would appear twice, causing
  # one of the updates to fail and spam the log
  FSType rootfs
  # ignore the usual virtual / temporary file-systems
  FSType sysfs
  FSType proc
  FSType devtmpfs
  FSType devpts
  FSType tmpfs
  FSType fusectl
  FSType cgroup
  FSType overlay
  FSType debugfs
  FSType pstore
  FSType securityfs
  FSType hugetlbfs
  FSType squashfs
  FSType mqueue
  MountPoint "/"
  IgnoreSelected true
  ReportByDevice false
  ReportReserved true
  ReportInodes true
  ValuesAbsolute true
  ValuesPercentage true
  ReportInodes true
</Plugin>

<Plugin "disk">
  Disk "/^[hs]d[a-z]/"
  IgnoreSelected false
</Plugin>

<Plugin interface>
  Interface "lo"
  Interface "/^eth.*/"
  Interface "/^docker.*/"
  IgnoreSelected false
  ReportInactive true
  UniqueName false
</Plugin>

<Plugin memory>
  ValuesAbsolute true
  ValuesPercentage false
</Plugin>

<Plugin "aggregation">
  <Aggregation>
    Plugin "cpu"
    Type "cpu"
    GroupBy "Host"
    GroupBy "TypeInstance"
    CalculateAverage true
  </Aggregation>
</Plugin>

<Chain "PostCache">
  <Rule>
    <Match regex>
      Plugin "^cpu$"
      PluginInstance "^[0-9]+$"
    </Match>
    <Target write>
      Plugin "aggregation"
    </Target>
    Target stop
  </Rule>
  Target "write"
</Chain>

<Plugin write_graphite>
 <Node "example">
   Host "localhost"
   Port "2003"
   Protocol "tcp"
   ReconnectInterval 0
   LogSendErrors true
   Prefix "collectd."
   # Postfix "collectd"
   StoreRates true
   AlwaysAppendDS false
   EscapeCharacter "_"
   SeparateInstances false
   PreserveSeparator false
   DropDuplicateFields false
 </Node>
</Plugin>
在 CollectD DashBoard 的第一個 CPU Average 圖表上,點擊編輯會出現以下的畫面
Metrics #A 的部分,是原本 Template 提供的寫法,用類似的方式,加入 #B 及 #C 的部分,查看 cpu-user 及 cpu-idle 的資料,其他部分就不需要修改。
用類似的方式,修改其他 metrics 圖表,最後的結果為
Metric Editor
Using Graphite in Grafana Metrics Editor 有比較完整的 Metric 圖表功能的說明。
Select metric
因為 graphite 的樹狀 metrics 資料結構,這邊的 metric 也是一層一層選擇的
Functions
在選到 metrics 數值後,按下 + ,就可以選用某一個 graphite 的 function
以 collectd 的 loading 為例,他是使用 graphite 提供的 aliasByNode 的函數,搭配第一個參數是 metric 資料,第二個參數是階層的數字,也就是 "shortterm"
aliasByNode($prefix.$server.load.load.shortterm, 4)
如果是下面這樣, legend 就會變成 "shortterm.load"
aliasByNode($prefix.$server.load.load.shortterm, 4, -2)Nested Queries
以這個為例,在使用 sumSeries 時,可參考到 #A 的 metrics,因為 #A 已經有四個 memory-{used,cached,free,buffered} 數值,sumSeries 會直接加總。
Point consolidation
Graphite 在傳給 Grafana 前,會先進行 consolidate,減少傳送的資料點數量,預設是用 avg 這個 function 處理,也可以利用 consolidateBy 處理。
Query variable
在 Dashboard 上面,增加一些可以調整的參數,在圖表中,以 $varname 或是 [[varname]] 的方式,參考到這些參數,就像是 DashBoard 的參數一樣。
Graphite Templated Dashboard 中就用到了 $app, $server, $interval 三個參數。
Alert 告警
首先參考 Configuration 的內容,修改 smtp server 那個部分的設定。
vi /etc/grafana/grafana.ini
[smtp]
enabled = true
host = smtp.gmail.com:465
user = user@maxkit.com.tw
password = password
;cert_file =
;key_file =
;skip_verify = false
from_address = user@maxkit.com.tw
重新啟動 grafana
systemctl restart grafana-server參考 Alert Rules 的說明
到 Grafana 網頁新增一個 Notification Channel
然後到 DashBoard 的圖表上,編輯某一個想要監控的指標,切換到 Alert 頁籤,設定告警的規則,這裡可以用 AND 或 OR 疊加多個 metric 規則,但 metric 不能有 Template Variables,這是比較麻煩的地方,前面都是用 variable 的方式設定 metric。
回到 metric 設定的部分,要把 variable 移除。
在檢查點,由正常狀態 變成 告警狀態時,會發送一次 email,而由告警狀態 變成 正常狀態時,會再發送一次 email。
References
新監控系統技術選型 Telegraf + Influxdb + Grafana + 二次開發
使用Grafana+Diamond+Graphite構造完美監控面板
使用StatsD, Graphite, Grafana, Kamon搭建可用於JVM項目的可視化性能監控系統
利用 collectd + InfluxDB + Grafana 監測系統效能


沒有留言:
張貼留言