2020/11/30

數位訊號雜訊 in python

雜訊生成

\(y[n]=x[n]+η[n]\) 其中 η[n] 稱為雜訊 Noise

DSP 中,如果資料分布情形或統計參數(例如標準差、平均值),不會隨著時間改變,則該訊號為平穩訊號 Stationary Signals,反之稱為非平穩訊號。例如馬達產生的聲音是平穩訊號,一般語音是非平穩訊號

均勻雜訊 Uniform Noise

以 uniform distribution function 產生隨機亂數資料,因為是均勻分佈,平均值 𝜇 為 0,雜訊連續樣本之間互相獨立,沒有相關。在 DSP 這種雜訊稱為 White Noise

均勻分佈函數:

給定隨機變數 random variable z,Uniform Distribution Function 定義為

\(p(z) = \left\{ \begin{array}{ll} 1/2 & \mbox{if -1≤z≤1} \\ 0 & \mbox{otherwise} \end{array} \right.\) ,其中 z 介於 -1~1 之間

均勻分佈的機率密度函數,必須滿足總機率值 (積分) 為 1。曲線下的面積為 1

\(\int_{-∞}^{∞} p(z) {\rm d}z = 1\)

高斯雜訊 Gaussian Noise

高斯分佈函數定義

\(p(z) = \frac{1}{\sqrt{2 \pi σ^2}} e^{(z-μ)^2/(2σ^2)}\)

其中 μ 為平均,σ 是標準差

噪音的隨機亂數資料以高斯分佈函數也就是常態分佈函數 Normal Distribution Function 產生,其平均值 𝜇 為 0,標準差 𝜎 為 1,且滿足 \(\int_{-∞}^{∞}p(z)dz = 1\),就是函數曲線下的面積總和為 1(所有機率的總和為 1)

雜訊連續樣本之間互相獨立,沒有自相關 autocorrelation。在 DSP 這種雜訊稱為 Gaussian White Noise

布朗尼雜訊 Brownian Noise

根據布朗尼運動 Brownian Motion 產生的亂數資料,也稱為 Random Walk Noise

Brownian Noise 也稱為 Brown Noise,因為 Brownian Motion 的發現者 Robert Brown 而這樣命名。

Brownian Noise 的每個 sample,取自先前所有 samples 的總和(積分)。

程式中產生 Brownian Noise 後,會再針對數值做正規化 Normalization,讓結果介於 -1~1 之間

Brownian Noise 的變動幅度比均勻雜訊緩慢,連續的 samples 之間有相關性,結果會造成數位訊號的振幅微幅改變的狀況,也就是發生訊號飄移的狀況

脈衝雜訊 Impulse Noise

瞬間的脈衝產生的雜訊,當訊號受到電磁干擾、或是唱片(CD)有刮痕,會產生 Impulse Noise。可用振幅 Amplitude 與發生機率 Probability 來模擬產生 Impulse Noise

以 python 程式碼產生 noise

需要的套件

pip install numpy
pip install scipy

程式裡面有以下這些雜訊的產生方式

import numpy as np
import scipy.signal as signal
import wave
import struct
import sys

class WavFileParams:
    def __init__(self, filename, amplitude, frequency, duration, fs, num_channels, sampwidth, comptype, compname):
        self.filename = filename
        self.amplitude = amplitude                      # 振幅
        self.frequency = frequency                      # 頻率(Hz)
        self.duration = duration                        # 時間長度(秒)
        self.fs = fs                                    # 取樣頻率(Hz)
        self.num_samples = self.duration * self.fs      # 樣本數

        self.num_channels = num_channels                # 通道數
        self.sampwidth = sampwidth                      # 樣本寬度
        self.num_frames = self.num_samples              # 音框數 = 樣本數
        self.comptype = comptype                        # 壓縮型態
        self.compname = compname                        # 壓縮名稱

def write_wav_file(wav_params, digital_signel_points):
    wav_file = wave.open( wav_params.filename, 'w' )
    wav_file.setparams(( wav_params.num_channels, wav_params.sampwidth, wav_params.fs, wav_params.num_frames, wav_params.comptype, wav_params.compname ))

    for s in digital_signel_points :
        # 以 struct.pack 將 int 資料轉換為 16 bits
        wav_file.writeframes( struct.pack( 'h', int ( s ) ) )

    wav_file.close( )

def uniform_noise():
    wav_params = WavFileParams(
        filename = "uniform_noise.wav",     # 檔案名稱

        amplitude = 30000,          # 振幅
        frequency = 100,            # 頻率(Hz)
        duration = 1,               # 時間長度(秒)
        fs = 44100,                 # 取樣頻率(Hz)
        # num_samples = duration * fs,  # 樣本數

        num_channels = 1,           # 通道數
        sampwidth = 2,              # 樣本寬度
        # num_frames = num_samples, # 音框數 = 樣本數
        comptype = "NONE",          # 壓縮型態
        compname = "not compressed" # 無壓縮
    )

    t = np.linspace( 0, wav_params.duration, wav_params.num_samples, endpoint = False );
    # 原始訊號
    x = wav_params.amplitude * np.cos( 2 * np.pi * wav_params.frequency * t );
    # uniform noise, 在 -1000 ~ 1000 之間
    noise = np.random.uniform( -1000, 1000, wav_params.num_samples )
    y = x + noise

    write_wav_file(wav_params, y);

def gaussian_noise():
    wav_params = WavFileParams(
        filename = "gaussian_noise.wav",        # 檔案名稱

        amplitude = 30000,          # 振幅
        frequency = 100,            # 頻率(Hz)
        duration = 1,               # 時間長度(秒)
        fs = 44100,                 # 取樣頻率(Hz)
        # num_samples = duration * fs,  # 樣本數

        num_channels = 1,           # 通道數
        sampwidth = 2,              # 樣本寬度
        # num_frames = num_samples, # 音框數 = 樣本數
        comptype = "NONE",          # 壓縮型態
        compname = "not compressed" # 無壓縮
    )

    t = np.linspace( 0, wav_params.duration, wav_params.num_samples, endpoint = False );
    # 原始訊號
    x = wav_params.amplitude * np.cos( 2 * np.pi * wav_params.frequency * t );
    # 雜訊(高斯分佈), 在 0 ~ 1000 之間
    noise = np.random.normal( 0, 1000, wav_params.num_samples )
    y = x + noise

    # 為避免相加後超過 16 bits 資料長度的值,選擇使用比較小的振幅,且在相加後,用 np.clip 抑制數值範圍
    y_clip = np.clip(y, -32768, 32767)

    write_wav_file(wav_params, y_clip);

def brownian_noise():
    wav_params = WavFileParams(
        filename = "brownian_noise.wav",        # 檔案名稱

        amplitude = 30000,          # 振幅
        frequency = 100,            # 頻率(Hz)
        duration = 1,               # 時間長度(秒)
        fs = 44100,                 # 取樣頻率(Hz)
        # num_samples = duration * fs,  # 樣本數

        num_channels = 1,           # 通道數
        sampwidth = 2,              # 樣本寬度
        # num_frames = num_samples, # 音框數 = 樣本數
        comptype = "NONE",          # 壓縮型態
        compname = "not compressed" # 無壓縮
    )

    t = np.linspace( 0, wav_params.duration, wav_params.num_samples, endpoint = False );
    # 原始訊號
    x = wav_params.amplitude * np.cos( 2 * np.pi * wav_params.frequency * t );

    # 布朗尼雜訊 brownian_noise, 在 -1 ~ 1 之間
    n1 = np.random.uniform( -1, 1, wav_params.num_samples )
    # 累加
    ns = np.cumsum( n1 )
    # 正規化
    mean = np.mean( ns )
    max = np.max( np.absolute( ns - mean ) )
    noise = (( ns - mean ) / max)
    # 把最後正規化的數值,放大 10000 倍,強化 noise
    noise = noise * 10000.0

    y = x + noise

    # 為避免相加後超過 16 bits 資料長度的值,選擇使用比較小的振幅,且在相加後,用 np.clip 抑制數值範圍
    y_clip = np.clip(y, -32768, 32767)

    write_wav_file(wav_params, y_clip);

def impulse_noise():
    wav_params = WavFileParams(
        filename = "impulse_noise.wav",     # 檔案名稱

        amplitude = 30000,          # 振幅
        frequency = 100,            # 頻率(Hz)
        duration = 1,               # 時間長度(秒)
        fs = 44100,                 # 取樣頻率(Hz)
        # num_samples = duration * fs,  # 樣本數

        num_channels = 1,           # 通道數
        sampwidth = 2,              # 樣本寬度
        # num_frames = num_samples, # 音框數 = 樣本數
        comptype = "NONE",          # 壓縮型態
        compname = "not compressed" # 無壓縮
    )

    # impulse noise 發生機率 (%)
    probability = 5

    t = np.linspace( 0, wav_params.duration, wav_params.num_samples, endpoint = False );
    # 原始訊號
    x = wav_params.amplitude * np.cos( 2 * np.pi * wav_params.frequency * t );

    noise = np.zeros( x.size )                          # 脈衝雜訊
    for i in range( x.size ):
        p1 = np.random.uniform( 0, 1 )
        if p1 < probability / 100:
            p2 = np.random.uniform( 0, 1 )
            if p2 < 0.5:
                noise[i] = wav_params.amplitude
            else:
                noise[i] = -wav_params.amplitude

    y = x + noise

    # 為避免相加後超過 16 bits 資料長度的值,選擇使用比較小的振幅,且在相加後,用 np.clip 抑制數值範圍
    y_clip = np.clip(y, -32768, 32767)

    write_wav_file(wav_params, y_clip);

def main():
    uniform_noise()
    gaussian_noise()
    brownian_noise()
    impulse_noise()

if __name__ == "__main__":
    sys.exit(main())

以下分別是產生出來的 wav 的波形,第三個 Brownian Noise 可看出有上下飄移的狀況

訊號雜訊比

Signal-to-Noise Ratio 也就是 SNR 定義為

\( SNR = \frac{P_{signal}}{P_{noise}} \) ,\(P_{signal}\) 是訊號功率,\(P_{noise}\) 是雜訊功率

SNR 也可以定義為

\( SNR = (\frac{A_{signal}}{A_{noise}})^2 \) ,\(A_{signal}\) 是訊號振幅,\(A_{noise}\) 是雜訊振幅

SNR 通常用分貝 Decibels dB 為單位,故定義為

\( SNR = 10log_{10}(\frac{P_{signal}}{P_{noise}}) dB\) 或

\( SNR = 10log_{10}(\frac{A_{signal}}{A_{noise}})^2 dB = 20log_{10}(\frac{A_{signal}}{A_{noise}}) dB \)

如果 SNR 值越高,表示訊號的品質越好, SNR 越低則訊號受到雜訊干擾越嚴重

References

數位訊號處理:Python程式實作(附範例光碟)(第二版)

2020/11/23

數位訊號生成 in python

週期性訊號

\(x(t)=x(t+T)\) ,其中 T 為週期,是固定值

弦波 Sinusoids

\(x[n] = x(nT_s) = A cos(2 \pi f nT_s)= A cos(2 \pi fn/f_s)\)

ex: \(x(t)=cos(2 \pi \cdot 5 t)\) 其中 A=1, f=5Hz, 時間 0~1s

import numpy as np
import matplotlib.pyplot as plt

t = np.linspace( 0, 1, 1000, endpoint = False ) # 定義時間陣列
x = np.cos( 2 * np.pi * 5 * t )                 # 產生弦波

plt.plot( t, x )                                # 繪圖
plt.xlabel( 't (second)' )
plt.ylabel( 'Amplitude' )
plt.axis( [ 0, 1, -1.2, 1.2 ] )

plt.show( )

方波 Square

\(x(t) = A \cdot sgn(sin(ωt))\) 或 \(x(t)=A \cdot sgn(sin(2 \pi ft))\)

其中 A 為振幅,ω 是角頻率 Angular Frequency,f 為頻率 frequency

sgn 是符號函數 \(sgn(x) = \left\{ \begin{array}{ll} 1 & \mbox{if x>0} \\ 0 & \mbox{if x = 0} \\ -1 & \mbox{if x<0} \end{array} \right.\)

可用 SciPy 的 signal.square 產生方波

ex: A =1, f=5Hz, t=0~1 的方波

import numpy as np
import scipy.signal as signal
import matplotlib.pyplot as plt

t = np.linspace( 0, 1, 1000 )           # 定義時間陣列
x = signal.square( 2 * np.pi * 5 * t )  # 產生方波

plt.plot( t, x )                        # 繪圖
plt.xlabel( 't (second)' )
plt.ylabel( 'Amplitude' )
plt.axis( [ 0, 1, -1.2, 1.2 ] )

plt.show( )

鋸齒波 Sawtooh Wave

A = 1, f=5Hz, t=0~1s 的鋸齒波

import numpy as np
import scipy.signal as signal
import matplotlib.pyplot as plt

t = np.linspace( 0, 1, 1000 )            # 定義時間陣列
x = signal.sawtooth( 2 * np.pi * 5 * t ) # 產生鋸齒波

plt.plot( t, x )                         # 繪圖
plt.xlabel( 't (second)' )
plt.ylabel( 'Amplitude' )
plt.axis( [ 0, 1, -1.2, 1.2 ] )

plt.show( )

三角波 Triangle Wave

A = 1, f=5Hz, t=0~1s

import numpy as np
import scipy.signal as signal
import matplotlib.pyplot as plt

t = np.linspace( 0, 1, 1000 )                 # 定義時間陣列
x = signal.sawtooth( 2 * np.pi * 5 * t, 0.5 ) # 產生三角波

plt.plot( t, x )                              # 繪圖
plt.xlabel( 't (second)' )
plt.ylabel( 'Amplitude' )
plt.axis( [ 0, 1, -1.2, 1.2 ] )

plt.show( )

諧波 Harmonic

兩個以上的弦波組成

\(x(t) = \sum_{k=1}^{N}A_k cos(2 \pi f_k t)\)

\(A_k\) 是第 k 個弦波的振幅,\(f_1\) 稱為基礎頻率 Fundamental Frequency (基頻), \(f_k\) 是第 k 個弦波的頻率,是 \(f_1\)的整數倍。第一個弦波稱為基礎弦波 Fundamental Sinusoid

ex:

\(x_1(t) = cos(2 \pi 2 t)\)

\(x_2(t) = cos(2 \pi 4 t)\)

諧波 \(x(t) = x_1(t)+x_2(t)\)

import numpy as np
import matplotlib.pyplot as plt

t = np.linspace( 0, 1, 1000, endpoint = False ) # 定義時間陣列

f1 = 2                                          # 定義基礎頻率
x1 = np.cos( 2 * np.pi * f1 * t )               # 產生第1個弦波
x2 = np.cos( 2 * np.pi * 2 * f1 * t )           # 產生第2個弦波
x = x1 + x2                                     # 產生諧波

plt.subplot(131)
plt.plot( t, x1 )
plt.xlabel( 't (second)' )
plt.ylabel( 'Amplitude' )
plt.axis( [ 0, 1, -2, 2 ] )

plt.subplot(132)
plt.plot( t, x2 )
plt.xlabel( 't (second)' )
plt.ylabel( 'Amplitude' )
plt.axis( [ 0, 1, -2, 2 ] )

plt.subplot(133)
plt.plot( t, x )
plt.xlabel( 't (second)' )
plt.ylabel( 'Amplitude' )
plt.axis( [ 0, 1, -2, 2 ] )

plt.show( )

節拍波 beat

兩個不同頻率的弦波,相乘得來

\(x(t) = A cos(2 \pi f_1 t) \cdot cos(2 \pi f_2 t)\) ,A 為振幅, \(f_1\) 是低頻訊號的頻率,\(f_2\)是高頻訊號的頻率

低頻的訊號,構成訊號的 Envelop,高頻訊號,稱為載波訊號 Carrier Signal

ex: \(x(t) = A cos(2 \pi 20 t) \cdot cos(2 \pi 200 t)\)

import numpy as np
import matplotlib.pyplot as plt

t = np.linspace( 0, 0.1, 1000, endpoint = False )   # 定義時間陣列    

f1 = 20                                             # 低頻頻率
f2 = 200                                            # 高頻頻率
x = np.cos( 2 * np.pi * f1 * t ) * np.cos( 2 * np.pi * f2 * t )
envelop1 =  np.cos( 2 * np.pi * f1 * t )            # 包絡
envelop2 = -np.cos( 2 * np.pi * f1 * t )

plt.plot( t, x, '-' )                               # 繪圖
plt.plot( t, envelop1, '--', color = 'b' )
plt.plot( t, envelop2, '--', color = 'b' )
plt.xlabel( 't (second)' )
plt.ylabel( 'Amplitude' )
plt.axis( [ 0, 0.1, -1, 1 ] )

plt.show( )

振幅調變

調幅 Amplitude Modulation (AM) 可定義為

\(y(t)=x(t) \cdot cos(2 \pi f_ct)\) 其中 x(t) 是輸入訊號, \(f_c\) 稱為載波頻率 Carrier Frequency

跟 beat 乘法運算類似。常應用於 AM 收音機、無線電對講機。通常輸入訊號 x(t) 頻率較低,屬於人類的聽力範圍 20Hz ~ 20kHz,載波頻率比較高,例如低頻無線電波,落在 30k ~ 300k Hz

非週期性訊號

淡入與淡出

隨著時間,讓 amplitude 逐漸增加/減少的訊號

ex: \(x(t) = cos(2 \pi 5 t)\) 套用淡入、淡出效果

import numpy as np
import matplotlib.pyplot as plt

t = np.linspace( 0, 1, 1000, endpoint = False ) # 定義時間陣列

x = np.cos( 2 * np.pi * 5 * t )                 # 產生弦波
a = np.linspace( 1, 0, 1000, endpoint = False ) # 產生淡出陣列 
x = x * a                                       # 套用淡出效果 

plt.plot( t, x )                                # 繪圖
plt.xlabel( 't (second)' )
plt.ylabel( 'Amplitude' )
plt.axis( [ 0, 1, -1.2, 1.2 ] )

plt.show( )

剛剛是用線性方式產生淡出陣列,也可以用指數衰減方式產生

\(x(t) = A e^{-αt} cos(2 \pi f t)\)

A 為振幅,f 是頻率,α 為衰減參數,可調整作用時間

啁啾訊號 Chirp

隨著時間,頻率逐漸增加/減少的訊號,分別稱為 Up-Chirp/Down-Chirp

Chirp 經常稱為 Sweep Singal

常應用於 radar 或 sonar,在不同時間點掃描不同的頻率區間/頻帶,藉以偵測目標物

ex: 產生 0~5 秒,由 0Hz 線性增加至 5Hz

import numpy as np
import scipy.signal as signal
import matplotlib.pyplot as plt

t = np.linspace( 0, 5, 1000, endpoint = False ) # 定義時間陣列
x = signal.chirp( t, 0, 5, 5, 'linear' )        # 產生啁啾訊號

plt.plot( t, x )                                # 繪圖
plt.xlabel( 't (second)' )
plt.ylabel( 'Amplitude' )
plt.axis( [ 0, 5, -1.5, 1.5 ] )

plt.show( )

wave

需要的套件

pip install numpy
pip install scipy

程式裡面有以下這些波形 wav 的產生方式

  • sinusoid() 弦波
  • square() 方波
  • sawtooth() 鋸齒波
  • triangle() 三角波
  • harmonic() 諧波
  • beat() 節拍波
  • fadeout() 淡出
  • chirp() 啁啾
import numpy as np
import scipy.signal as signal
import wave
import struct
import sys

class WavFileParams:
    def __init__(self, filename, amplitude, frequency, duration, fs, num_channels, sampwidth, comptype, compname):
        self.filename = filename
        self.amplitude = amplitude                      # 振幅
        self.frequency = frequency                      # 頻率(Hz)
        self.duration = duration                        # 時間長度(秒)
        self.fs = fs                                    # 取樣頻率(Hz)
        self.num_samples = self.duration * self.fs      # 樣本數

        self.num_channels = num_channels                # 通道數
        self.sampwidth = sampwidth                      # 樣本寬度
        self.num_frames = self.num_samples              # 音框數 = 樣本數
        self.comptype = comptype                        # 壓縮型態
        self.compname = compname                        # 壓縮名稱

def write_wav_file(wav_params, digital_signel_points):
    wav_file = wave.open( wav_params.filename, 'w' )
    wav_file.setparams(( wav_params.num_channels, wav_params.sampwidth, wav_params.fs, wav_params.num_frames, wav_params.comptype, wav_params.compname ))

    for s in digital_signel_points :
        # 以 struct.pack 將 int 資料轉換為 16 bits
        wav_file.writeframes( struct.pack( 'h', int ( s ) ) )

    wav_file.close( )

# sinusoid 弦波
def sinusoid():
    wav_params = WavFileParams(
        filename = "sinusoid.wav",      # 檔案名稱

        amplitude = 30000,          # 振幅
        frequency = 100,            # 頻率(Hz)
        duration = 3,               # 時間長度(秒)
        fs = 44100,                 # 取樣頻率(Hz)
        # num_samples = duration * fs,  # 樣本數

        num_channels = 1,           # 通道數
        sampwidth = 2,              # 樣本寬度
        # num_frames = num_samples, # 音框數 = 樣本數
        comptype = "NONE",          # 壓縮型態
        compname = "not compressed" # 無壓縮
    )

    t = np.linspace( 0, wav_params.duration, wav_params.num_samples, endpoint = False );
    x = wav_params.amplitude * np.cos( 2 * np.pi * wav_params.frequency * t );

    write_wav_file(wav_params, x);

def square():
    # square 方波
    wav_params = WavFileParams(
        filename = "square.wav",    # 檔案名稱

        amplitude = 30000,          # 振幅
        frequency = 100,            # 頻率(Hz)
        duration = 3,               # 時間長度(秒)
        fs = 44100,                 # 取樣頻率(Hz)
        # num_samples = duration * fs,  # 樣本數

        num_channels = 1,           # 通道數
        sampwidth = 2,              # 樣本寬度
        # num_frames = num_samples, # 音框數 = 樣本數
        comptype = "NONE",          # 壓縮型態
        compname = "not compressed" # 無壓縮
    )

    t = np.linspace( 0, wav_params.duration, wav_params.num_samples, endpoint = False );
    x = wav_params.amplitude * signal.square( 2 * np.pi * wav_params.frequency * t );

    write_wav_file(wav_params, x);

def sawtooth():
    # sawtooth 鋸齒波
    wav_params = WavFileParams(
        filename = "sawtooth.wav",  # 檔案名稱

        amplitude = 30000,          # 振幅
        frequency = 100,            # 頻率(Hz)
        duration = 3,               # 時間長度(秒)
        fs = 44100,                 # 取樣頻率(Hz)
        # num_samples = duration * fs,  # 樣本數

        num_channels = 1,           # 通道數
        sampwidth = 2,              # 樣本寬度
        # num_frames = num_samples, # 音框數 = 樣本數
        comptype = "NONE",          # 壓縮型態
        compname = "not compressed" # 無壓縮
    )

    t = np.linspace( 0, wav_params.duration, wav_params.num_samples, endpoint = False );
    x = wav_params.amplitude * signal.sawtooth( 2 * np.pi * wav_params.frequency * t )

    write_wav_file(wav_params, x);

def triangle():
    # triangle 三角波
    wav_params = WavFileParams(
        filename = "triangle.wav",  # 檔案名稱

        amplitude = 30000,          # 振幅
        frequency = 100,            # 頻率(Hz)
        duration = 3,               # 時間長度(秒)
        fs = 44100,                 # 取樣頻率(Hz)
        # num_samples = duration * fs,  # 樣本數

        num_channels = 1,           # 通道數
        sampwidth = 2,              # 樣本寬度
        # num_frames = num_samples, # 音框數 = 樣本數
        comptype = "NONE",          # 壓縮型態
        compname = "not compressed" # 無壓縮
    )

    t = np.linspace( 0, wav_params.duration, wav_params.num_samples, endpoint = False );
    x = wav_params.amplitude * signal.sawtooth( 2 * np.pi * wav_params.frequency * t, 0.5 )

    write_wav_file(wav_params, x);

def harmonic():
    # harmonic 諧波
    wav_params = WavFileParams(
        filename = "harmonic.wav",  # 檔案名稱

        amplitude = 10000,          # 振幅
        frequency = 100,            # 頻率(Hz)
        duration = 3,               # 時間長度(秒)
        fs = 44100,                 # 取樣頻率(Hz)
        # num_samples = duration * fs,  # 樣本數

        num_channels = 1,           # 通道數
        sampwidth = 2,              # 樣本寬度
        # num_frames = num_samples, # 音框數 = 樣本數
        comptype = "NONE",          # 壓縮型態
        compname = "not compressed" # 無壓縮
    )

    t = np.linspace( 0, wav_params.duration, wav_params.num_samples, endpoint = False );
    x1 = wav_params.amplitude * np.cos( 2 * np.pi * wav_params.frequency * t );
    x2 = wav_params.amplitude * np.cos( 2 * np.pi * (2 * wav_params.frequency) * t );

    x = x1 + x2

    # 為避免相加後超過 16 bits 資料長度的值,選擇使用比較小的振幅,且在相加後,用 np.clip 抑制數值範圍
    x_clip = np.clip(x, -32768, 32767)

    write_wav_file(wav_params, x_clip);

def beat():
    # beat 節拍波
    wav_params = WavFileParams(
        filename = "beat.wav",      # 檔案名稱

        amplitude = 30000,          # 振幅
        frequency = 0,              # 頻率(Hz)
        duration = 10,              # 時間長度(秒)
        fs = 44100,                 # 取樣頻率(Hz)
        # num_samples = duration * fs,  # 樣本數

        num_channels = 1,           # 通道數
        sampwidth = 2,              # 樣本寬度
        # num_frames = num_samples, # 音框數 = 樣本數
        comptype = "NONE",          # 壓縮型態
        compname = "not compressed" # 無壓縮
    )
    f1 = 20                     # 低頻頻率(Hz)
    f2 = 200                    # 高頻頻率(Hz)

    t = np.linspace( 0, wav_params.duration, wav_params.num_samples, endpoint = False )
    x = wav_params.amplitude * np.cos( 2 * np.pi * f1 * t ) * np.cos( 2 * np.pi * f2 * t )

    write_wav_file(wav_params, x);

def fadeout():
    # fadeout 淡出
    wav_params = WavFileParams(
        filename = "fadeout.wav",   # 檔案名稱

        amplitude = 30000,          # 振幅
        frequency = 300,            # 頻率(Hz)
        duration = 3,               # 時間長度(秒)
        fs = 44100,                 # 取樣頻率(Hz)
        # num_samples = duration * fs,  # 樣本數

        num_channels = 1,           # 通道數
        sampwidth = 2,              # 樣本寬度
        # num_frames = num_samples, # 音框數 = 樣本數
        comptype = "NONE",          # 壓縮型態
        compname = "not compressed" # 無壓縮
    )

    t = np.linspace( 0, wav_params.duration, wav_params.num_samples, endpoint = False )
    # 產生淡出陣列, 1 -> 0, num_samples 個值
    a = np.linspace( 1, 0, wav_params.num_samples, endpoint = False )
    x = wav_params.amplitude * a * np.cos( 2 * np.pi * wav_params.frequency * t )

    write_wav_file(wav_params, x);

def chirp():
    # chirp 啁啾, 頻率隨著時間, 逐漸增加或減少
    wav_params = WavFileParams(
        filename = "chirp.wav",     # 檔案名稱

        amplitude = 30000,          # 振幅
        frequency = 0,              # 頻率(Hz)
        duration = 10,              # 時間長度(秒)
        fs = 44100,                 # 取樣頻率(Hz)
        # num_samples = duration * fs,  # 樣本數

        num_channels = 1,           # 通道數
        sampwidth = 2,              # 樣本寬度
        # num_frames = num_samples, # 音框數 = 樣本數
        comptype = "NONE",          # 壓縮型態
        compname = "not compressed" # 無壓縮
    )

    f0 = 0                      # 初始頻率(Hz)
    f1 = 1000                   # 終止頻率(Hz)

    t = np.linspace( 0, wav_params.duration, wav_params.num_samples, endpoint = False )
    # 以線性方式遞增頻率
    x = wav_params.amplitude * signal.chirp( t, f0, wav_params.duration, f1, 'linear' )

    write_wav_file(wav_params, x);

def main():
    sinusoid()
    square()
    sawtooth()
    triangle()
    harmonic()
    beat()
    fadeout()
    chirp()

if __name__ == "__main__":
    sys.exit(main())

References

數位訊號處理:Python程式實作(附範例光碟)(第二版)

2020/11/16

數位訊號

類比訊號透過取樣 sampling 與量化 quantization 兩個步驟,擷取數位訊號,並以數學表示法討論數位訊號。

數位訊號定義為:隨著時間改變的離散訊號,也稱為離散時間訊號 Discrete-Time Signals

自然界的訊號通常都是類比訊號,因此必須先透過類比/數位轉換器 Analog/Digital Converter, A/D Converter 將類比訊號轉成數位訊號,以便電腦系統處理。過程是根據類比訊號,在時間軸上擷取離散的樣本 samples,藉以產生數位訊號。x(t) 代表類比訊號,x[n] 代表數位訊號,t 為時間,n 是索引。

取樣與量化

取樣 sampling 可定義為 \(x[n]=x(nT_s)\),\(T_s\) 稱為取樣週期 sampling period 或取樣間隔 sampling interval,單位為 second,另外 \(f_s=\frac{1}{T_s}\) 稱為取樣頻率 sampling frequency,或取樣率 sampling rate

取樣是訊號在時間軸上的數位化過程,每隔 \(T_s\) 時間,擷取一個樣本 sample,產生一個數字序列,因每個樣本來自短暫的時間框,也稱為音框 frame

取樣率 sampling frequency 解釋為:每秒取樣的次數。由於取樣頻率固定不變,又稱為均勻取樣 Uniform Sampling

ex: 弦波 \(x(t)=A cos(ωt+ϕ) = Acos(2 \pi ft+ϕ)\) ,若取樣週期 \(T_s\),取樣頻率 \(f_s\),則弦波的數位訊號可表示為

\(x[n]=x(nT_s)=A cos(2 \pi fnT_s+ϕ)=A cos(2 \pi fn/f_s+ϕ)\),n為整數

通常可假設 \(\hat{ω} = 2 \pi f/f_s\) 稱為正規化角頻率 Normalized Angular Frequency,單位是弧度 Radians,因此數位訊號也可表示為

\(x[n] = A cos(\hat{ω}n+ϕ)\)

Nyquist-Shannon 取樣定理

假設原始訊號為頻帶限制訊號 Band-Limited Signal,最高頻率為 \(f_H\),若取樣頻率為 \(f_s\) ,則 \(f_s > 2 f_H\) 時,才能保證可重建原始訊號

若取樣頻率超過原始訊號的最高頻率的兩倍,可充分表示原始訊號,如取樣頻率不足,會產生混疊 aliasing 現象。

ex: 人類聽力範圍 20Hz ~ 20k Hz,最高為 20kHz,如果 \(f_s>40kHz\) 可充分表示人類可感知的原始訊號。目前 mp3 通常設定為 44kHz or 48kHz,符合基本條件,不會發生 aliasing

根據取樣定理,取樣頻率決定了可取樣的原始最高頻率,又稱為 Nyquist 頻率。例如取樣頻率 44kHz,則 Nyquist 頻率為 22kHz

量化 Quantization

量化是將訊號的振幅 Amplitude 經過數位化轉換為數值,常用的數值範圍:

  • 8 bits: 0~255 or -128~127
  • 16 bits: -32768 ~ 32767

每個樣本可使用的位元數稱為位元解析度 bit resolution,或稱為位元深度 bit depth。

數學表示法

\(x=\{x[n]\}, -∞<n<∞\),n 為整數

DSP 系統中,數位訊號通常為有限 finite 數字序列,可表示為

\(x=\{x[n]\}, n=0,1,2..., N-1\) ,這是從 t=0 開始的樣本,N為樣本數

import numpy as np
import matplotlib.pyplot as plt

n = np.array( [ 0, 1, 2, 3, 4, 5 ] )    # 定義n陣列
x = np.array( [ 1, 2, 4, 3, 2, 1 ] )    # 定義x陣列

plt.stem( n, x, use_line_collection=True )                      # 繪圖
plt.xlabel( 'n' )
plt.ylabel( 'x[n]' )
plt.show( )

基本的數位訊號

單位脈衝函數

Unit Impulse Function 也稱為狄拉克 δ 函數 (Dirac Delta Function),以英國物理學家 Paul Dirac 命名,定義:

\(δ(t)=0, t \neq 0\) ,且 \(\int_{-∞}^{∞}δ(t) {\rm d}t = 1\)

單位脈衝函數是連續時間函數,除了原點 t=0 以外,函數值均為 0,在時間域的積分(總面積)為 1,且集中在原點

單位脈衝

在離散時間域的 Unit Impulse 定義為

\( δ[n] = \left\{ \begin{array}{ll} 1, & \mbox{if n=0} \\ 0, & \mbox{if n≠0} \end{array} \right.\)

單位步階函數

Unit Step Function 也稱為黑維塞步階函數 (Heaviside Step Function),以英國科學家 Oliver Heaviside 命名,定義為

\( μ(t) = \left\{ \begin{array}{ll} 1, & \mbox{if t ≥0} \\ 0, & \mbox{if t<0} \end{array} \right.\)

單位步階

Unit Step 定義為

\( μ[n] = \left\{ \begin{array}{ll} 1, & \mbox{if n ≥0} \\ 0, & \mbox{if n<0} \end{array} \right.\)


單位脈衝的時間延遲 Time Delay 定義為 \(δ[n-n_0]\)

ex: \(δ[n-2]\) 的圖形為

因此 Unit Step 也可表示為

\( μ[n] = δ[n]+δ[n-1]+δ[n-2]+... = \sum_{k=0}^{n}δ[n-k]\)

單位脈衝 Unit Impulse 也可表示為

\(δ[n]=μ[n]-μ[n-1]\)

任意數位訊號都可以用單位脈衝表示為

\(x[n]=...+x[-1]δ[n+1]+x[0]δ[n]+x[1]δ[n-1]+... = \sum_{k=-∞}^{∞}x[k]δ[n-k]\)

數位語音檔

波型音訊檔案格式 Waveform Audio File Format、wave,是 Microsoft 與 IBM 制定的音訊編碼格式。另外 Apple Mac 定義了 aiff 音訊格式。

wav 是根據 Resource Interchange File Format(RIFF) ,為了存取 CD 數位音樂而設計的。前面是 header 共44 bytes,內容由多個區塊 chunks 組成,每個區塊是 4 bytes

起始位址(Bytes) 位址範圍 區塊名稱 區塊大小 ( Bytes) 內容 說明
0 1 ~ 4 區塊編號 4 RIFF Marks the file as a riff file.
4 5 ~ 8 總區塊大小 4 N + 36 File size (integer) Size of the overall file - 8 bytes
8 9 ~ 12 檔案格式 4 "WAVE" File Type Header. For our purposes, it always equals "WAVE".
12 13~16 子區塊 1 標籤 4 "fmt " Format chunk marker. Includes trailing null
16 17~20 子區塊 1 大小 4 16 Length of format data as listed above
20 21~22 音訊格式 2 1(PCM) Type of format (1 is PCM)
22 23~24 通道數量 2 1: (mono), 2: stereo Number of Channels
24 25~28 取樣頻率 4 Hz Sample Rate, Common values are 44100 (CD), 48000 (DAT). Sample Rate = Number of Samples per second, or Hertz
28 29~32 位元組 ByteRate 4 ByteRate = (Sample Rate * BitsPerSample * Channels) / 8 取樣頻率 * 位元深度 / 8
32 33~34 區塊對齊 BlockAlign 2 4 (BitsPerSample * Channels) / 8 The number of bytes for one sample including all channels ex: 1 -> 8 bit mono, 2 -> 8 bit stereo/16 bit mono, 4 -> 16 bit stereo
34 35~36 位元深度 2 16 Bits per sample
36 37~40 子區塊2標籤 4 "data" "data" chunk header. Marks the beginning of the data section.
40 41~44 子區塊2大小 4 N Size of the data section, i.e. file size - 44 bytes header.
44 45~ 資料 N 音訊資料

wav 沒有採用壓縮技術,檔案大小比其他格式大,但 wav 不會發生失真的狀況。

import wave

filename = input( "Please enter file name: " )
wav = wave.open( filename, 'rb' )

num_channels = wav.getnchannels( )  # 通道數
sampwidth   = wav.getsampwidth( )   # 樣本寬度
frame_rate  = wav.getframerate( )   # 取樣率
num_frames  = wav.getnframes( )     # 音框數
comptype    = wav.getcomptype( )    # 壓縮型態
compname    = wav.getcompname( )    # 壓縮名稱

print( "Number of Channels =", num_channels )
print( "Sample Width =", sampwidth )
print( "Sampling Rate =", frame_rate )
print( "Number of Frames =", num_frames )
print( "Comptype =", comptype )
print( "Compname =", compname )

wav.close( )

要讀取 wav 的資料,可改用 SciPy 的 io.wavfile 套件,讀取後以 numpy 的陣列回傳

from scipy.io import wavfile
import matplotlib.pyplot as plt

filename = input( "Please enter file name: " )
sampling_rate, x = wavfile.read( filename )

plt.plot( x )
plt.xlabel( 'n' )
plt.ylabel( 'Amplitude' )

plt.show( )

可直接取得 microphone 語音的波形

pip install PyAudio
import numpy as np
import pyaudio
import matplotlib.pyplot as plt

# sampling rate
fs = 11000
# 每次擷取樣本數 1024
CHUNK = 1024
pa = pyaudio.PyAudio( )
stream = pa.open( format = pyaudio.paInt16, channels = 1, rate = fs, 
                  input = True, output = False, frames_per_buffer = CHUNK )
            
try:            
    while True:                     
        data = stream.read( CHUNK )
    # 字串轉換為 int16
        x = np.fromstring( data, np.int16 )

        plt.clf( )
        plt.plot( x )
        plt.axis( [ 0, CHUNK, -30000, 30000 ] )

        plt.pause( 0.1 )

except KeyboardInterrupt:
    print( "Quit" )
    pa.close( stream )
    quit( )

References

數位訊號處理:Python程式實作(附範例光碟)(第二版)

2020/11/9

類比訊號

典型的類比訊號稱為弦波 Sinusoids,弦波的數學模型,可表示成複數指數系統。最後介紹相量 Phasor 的定義,同時討論與證明相量加法規則 Phasor Addition Rule

類比訊號 analog signals 可定義為:隨著時間改變的連續訊號,用函數表示為 \(x=f(t)\),其中 t 為時間,x 是隨著時間改變的連續訊號

弦波 sinusoids

可用餘弦函數定義為 \(x(t)= A cos (ωt+ϕ)\) 或 \(x(t)=A cos(2 \pi ft+ϕ)\)

其中 A 為振幅 Amplitude,ω 為角頻率 Angular Frequency,f 為頻率,ϕ 為相位移 Phase Shift,且 \(ω = 2 \pi f\)

具有週期性 \(T=\frac{1}{f}\)

ω 為角頻率,單位是 弧度/秒 (Radians/Second) ,\(ω = 2 \pi f = \frac{2 \pi}{T}\)

頻率的單位是 次數/秒 (Cycles/Second) 或 Hz

相位移的單位是 弧度 (Radians)

import numpy as np
import matplotlib.pyplot as plt

def sinusoids(amplitude, frequency, phase_shift, plotpos):
    t = np.linspace( 0, 2, 1000, endpoint = False ) # 定義時間陣列
    x = amplitude * np.cos( 2 * np.pi * frequency * t + phase_shift ) # 產生弦波

    plt.subplot(plotpos)
    # plt.ylim(-4,4)

    plt.plot( t, x )                                # 繪圖
    plt.xlabel( 't (second)' )
    plt.ylabel( 'Amplitude' )

# 振幅 = 1, 2, 4
plt.figure( 1 )
# 1*cos(2*pi*2*t)
sinusoids(1, 2, 0, '131')
# 2*cos(2*pi*2*t)
sinusoids(2, 2, 0, '132')
# 4*cos(2*pi*2*t)
sinusoids(4, 2, 0, '133')

# 頻率 = 1,2,4
plt.figure( 2 )
# 1*cos(2*pi*1*t)
sinusoids(1, 1, 0, '131')
# 1*cos(2*pi*2*t)
sinusoids(1, 2, 0, '132')
# 1*cos(2*pi*4*t)
sinusoids(1, 4, 0, '133')


# 相位移 = 0, pi/4, pi/2
plt.figure( 3 )
# 1*cos(2*pi*1*t)
sinusoids(1, 1, 0, '131')
# 1*cos(2*pi*2*t)
sinusoids(1, 1, np.pi/4, '132')
# 1*cos(2*pi*4*t)
sinusoids(1, 1, np.pi/2, '133')

plt.show( )

ex: \(x(t)=Acos(2 \pi ft+ϕ)\)

振幅 A = 1,2,4

頻率 f = 2

相位移 ϕ = 0

結果:當 A 越大,音量越大

ex: \(x(t)=Acos(2 \pi ft+ϕ)\)

振幅 A = 1

頻率 f = 1,2,4

相位移 ϕ = 0

結果:當 f 越大,音頻越高,每秒震盪次數越大

ex: \(x(t)=Acos(2 \pi ft+ϕ)\)

振幅 A = 1

頻率 f = 1

相位移 ϕ = 0, π/4, π/2

結果:弦波會向左移動 0, π/4, π/2,若 ϕ 為負值,則是向右移,稱為時間延遲 (Time Delay)。相位移不會改變波形

複數 complex number

定義為 \(z=a+bj\) ,其中 a 為實部 real part, b 為虛部 imaginary part,\(j=\sqrt{-1}\) 為虛數的單位

  • 複數可用複數平面 complex plane 表示

  • 極座標 Polar Coordinate System 的方式表示

\(z = |z|(cosθ + j sinθ)\) ,其中

\(|z|=\sqrt{a^2+b^2}\),稱為複數的強度 (magnitude)

\(θ = tan^{-1}(b/a)\) ,稱為複數的幅角 (argument) 或相位角 (Phase Angle)

note: arctan 的值域為 \((-\frac{\pi}{2}, \frac{\pi}{2})\),第二、三象限的角度,無法直接用 arctan 計算

  • 根據尤拉公式(Euler's Equation) \(e^{jθ} = cos θ + j sinθ\),複數也可表示為極座標表示法

    \(z=|z|e^{jθ}\)

ex: 複數 \(z=3+4j\) ,求強度 magnitude,相位角 Phase Angle

import numpy as np

# z = - 3 + 4j                          # 定義複數
z = complex(3,4)
magnitude = abs( z )                # 計算強度(Magnitude)
theta = np.angle( z ) * 180 / np.pi # 計算相位角(Phase Angle)

print( "z =", z )
print( "Magnitude =", magnitude )
print( "Phase Angle =", theta )
$ python complex_number.py
z = (3+4j)
Magnitude = 5.0
Phase Angle = 53.13010235415598

強度 magnitude

\(|z|=\sqrt{3^2+4^2} = 5\)

相位角

\(θ = tan^{-1}(4/3) = 52.13^{\circ}\)


複數的運算

  • \(j=\sqrt{-1}, j^2 = -1\)

  • 加法

    \((a+bj)+(c+dj) = (a+c)+(b+d)j\)

  • 減法

    \((a+bj)-(c+dj) = (a-c)+(b-d)j\)

  • 乘法

    \((a+bj)(c+dj) = (ac-bd)+(bc+ad)j\)

  • 除法

    \(\frac{a+bj}{c+dj} = \frac{(a+bj)(c-dj)}{(c+dj)(c-dj)} = \frac{(ac+bd)+(bc-ad)j}{c^2+d^2}\)

  • 反尤拉公式

    \(cosθ = \frac{e^{jθ}+e^{-jθ}}{2}, sinθ= \frac{e^{jθ}-e^{-jθ}}{2j}\)


ex: 用複數證明三角函數的和角公式

\(cos(α+β) = Re\{cos(α+β) + jsin(α+β)\} \\ = Re\{e^{j(α+β)}\} \\ = Re\{e^{jα}+e^{jβ}\} \\ = Re\{(cosα+jsinα) \cdot (cosβ+jsinβ)\} \\ = Re\{(cosα \cdot cosβ - sinα \cdot sinβ) + j (sinα \cdot cosβ+cosα \cdot sinβ)\}\)

因此

\(cos(α+β) = cosα \cdot cosβ - sinα \cdot sinβ\)

\(sin(α+β) = sinα \cdot cosβ+cosα \cdot sinβ\)


複數指數訊號

complex exponential signals 定義為

\(z(t) = A e^{j(ωt+ϕ)}\) ,其中 A 是振幅 amplitude,(ωt+ϕ) 是相位角 Phase Angle

根據弦波定義 \(x(t)=A cos(ωt+ϕ)\) 與尤拉公式 \(e^{jθ} = cosθ+jsinθ\)

\(z(t) = A e^{j(ωt+ϕ)} = A cos(ωt+ϕ)+A \cdot jsin(ωt+ϕ)\)

因此 \(x(t) = Re\{z(t)\}\) 弦波,是複數指數訊號 z(t) 的實部

相量

相量 Phasor 定義為 \(X= A e^{jϕ}\),其中 A 是振幅 amplitude,ϕ 是相位移 phase shift

根據複數指數訊號的定義

\(z(t) = A e^{j(ωt+ϕ)} = Ae^{jωt} \cdot e^{jϕ} = Ae^{jϕ} \cdot e^{jωt}\)

因此定義 \(X=Ae^{jϕ}\),就是 Phasor


ex: 求弦波 \(x(t)=10 cos(2 \pi t+\pi /4)\) 的 phasor

因為 A =10, f=1, ϕ=π/4

phasor = \(Ae^{jϕ} = 10e^{j\pi/4} = 10 \cdot (cos\frac{\pi}{4}+jsin\frac{\pi}{4}) = 5\sqrt{2}+5\sqrt{2}j\)


Phasor 就是複數平面上的向量 vector


ex: 兩個頻率相同的弦波相加的結果,頻率不變

\(x_1(t) = 3 cos(2 \pi 10 t + \pi/4)\)

\(x_2(t) = 4 cos(2 \pi 10 t + 3\pi/4)\)

import numpy as np
import matplotlib.pyplot as plt

t = np.linspace( 0, 1, 1000, endpoint = False )         # 定義時間陣列
x1 = 3 * np.cos( 2 * np.pi * 10 * t + np.pi / 4 )       # 第一個弦波
x2 = 4 * np.cos( 2 * np.pi * 10 * t + 3 * np.pi / 4 )   # 第二個弦波
x3 = x1 + x2                                            # 弦波相加

plt.plot( t, x1, '--', label = 'x1(t)' )                # 繪圖
plt.plot( t, x2, '--', label = 'x2(t)' )
plt.plot( t, x3, '-', label = 'x3(t)' )

plt.legend( loc = 'upper right' )
plt.xlabel( 't (second)' )
plt.ylabel( 'Amplitude' )
plt.axis( [ 0, 1, -6, 6 ] )

plt.show( )

相量加法規則

相量加法規則:有 N 個弦波,角頻率都是 \(ω_0\),振幅與相位移分別為 \(A_k, ϕ_k, k=1,2,...N\),則

\(\sum_{k=1}^{N}A_kcos(ω_0t+ϕ_k) = Acos(ω_0t+ϕ)\)

換句話說,若有 N 個弦波,角頻率 \(ω_0\) (或頻率 \(f_0\)) 都相同,則相加後的弦波,角頻率 (或頻率) 會維持不變

證明:用複數的運算規則

\(\sum_{k=1}^{N}A_kcos(ω_0t+ϕ_k) = \sum_{k=1}^{N}Re\{A_ke^{j(ω_0t+ϕ_k)}\} \\ = Re\{ \sum_{k=1}^{N} A_ke^{j(ω_0t+ϕ_k)}\} \\ = Re\{ \sum_{k=1}^{N} A_ke^{jϕ_k} \cdot e^{jω_0t}\} \\ = Re\{ (\sum_{k=1}^{N} A_ke^{jϕ_k}) \cdot e^{jω_0t}\} \\ = Re\{ Ae^{jϕ} \cdot e^{jω_0t}\} \\ = Re\{ Ae^{j(ω_0t+ϕ)}\} \\ = Acos(ω_0t+ϕ)\)

以上推導過程要滿足 \(\sum_{k=1}^{N} A_ke^{jϕ_k} = Ae^{jϕ} \)

也就是 N 個弦波相加後結果,振幅 A 與 相位移 ϕ ,可根據個弦波的 Phasors,取其總和來決定


ex: 有兩個弦波,計算加總後 \(x_3(t)=x_1(t)+x_2(t)\) 的振幅及相位移

\(x_1(t) = 3 cos(2 \pi 10 t + \pi/4)\)

\(x_2(t) = 4 cos(2 \pi 10 t + 3\pi/4)\)

先計算兩個弦波的 phasors

\(A_1e^{jϕ_1} = 3 e^{j \pi/4} = 3 cos(\frac{\pi}{4}) + j sin(\frac{\pi}{4})\)

\(A_2e^{jϕ_1} = 4 e^{j 3 \pi/4} = 4 cos(\frac{3\pi}{4}) + j sin(\frac{3\pi}{4})\)

相加後的 phasor (複數加法)

\(Ae^{jϕ} = (3 cos(\frac{\pi}{4})+4 cos(\frac{3\pi}{4}) ) + j(sin(\frac{\pi}{4})+sin(\frac{3\pi}{4})) \\ = -\frac{1}{\sqrt{2}} + j \frac{7}{\sqrt{2}}\)

轉換為極座標 \(z = |z| (cosθ+jsinθ)\) \( z=a+bj, |z| = \sqrt{a^2+b^2}, θ = tan^{-1}(b/a)\)

\(A=|z| = 5\)

\(ϕ = \pi - tan^{-1}(7) = 1.7127\) note: 第二象限的 arctan

因此 \(x_3(t) = 5 cos(2 \pi 10 t+1.7127)\)

import numpy as np

phasor1 = complex( 3 * np.cos( np.pi / 4 ), 3 * np.sin( np.pi / 4 ) )
phasor2 = complex( 4 * np.cos( 3 * np.pi / 4 ), 4 * np.sin( 3 * np.pi / 4 ) )
phasor = phasor1 + phasor2

A = abs( phasor )                   
phi = np.angle( phasor ) 

print( "Phasor1 =", phasor1 )
print( "Phasor2 =", phasor2 )
print( "Phasor =", phasor )
print( "Amplitude =", A )
print( "Phase Angle =", phi )

執行結果

Phasor1 = (2.121320343559643+2.1213203435596424j)
Phasor2 = (-2.82842712474619+2.8284271247461903j)
Phasor = (-0.707106781186547+4.949747468305833j)
Amplitude = 5.0
Phase Angle = 1.7126933813990604

References

數位訊號處理:Python程式實作(附範例光碟)(第二版)

2020/11/2

TensorFlow手寫數字辨識_MLP

tensorflow 的 MNIST 資料及共有訓練資料 55000 筆,驗證資料 5000筆,每一筆資料由 feature (影像)與 label (數字) 組成。

注意:要改用 tensorflow.keras.datasets

tensorflow.examples.tutorials is now deprecated and it is recommended to use tensorflow.keras.datasets

MNIST 資料處理

import tensorflow as tf
import numpy as np

mnist = tf.keras.datasets.mnist
# Tuple of Numpy arrays: (x_train, y_train), (x_test, y_test)

(x_train, y_train), (x_test, y_test) = mnist.load_data()
# 將每個 pixel 的值從 Int 轉成 floating point 同時做normalize(這是很常見的preprocessing)
# x_train, x_test = x_train / 255.0, x_test / 255.0

# 查看 train Data
print('x_train length = ', len(x_train), ', x_test length = ', len(x_test))
# x_train length =  60000 , x_test length =  10000
print('x_train.shape = ', x_train.shape, ', x_train[0].shape = ', x_train[0].shape, ', x_test[0].shape=', x_test[0].shape)
# 每張圖片 大小為 28x28
# x_train.shape =  (60000, 28, 28) , x_train[0].shape =  (28, 28) , x_test[0].shape= (28, 28)

print('x_train[0].length = ', len(x_train[0]) )
# x_train[0].length =  28
print('y_train length = ', len(y_train), ', y_train[0] = ', y_train[0])
# y_train length =  60000 , y_train[0] =  5


# 將 第一張 x_train 的圖片儲存到檔案
import matplotlib.pyplot as plt
def plot_image(image, filename):
    plt.clf()
    plt.imshow(image.reshape(28,28), cmap='binary')
    plt.savefig(filename)
plot_image(x_train[0], "x_train_index_0.png")


# 將 training 的 input 資料 28*28 的 2維陣列 轉為 1維陣列,再轉成 float32
# 每一個圖片,都變成 784 個 float 的 array
# training 與 testing 資料數量分別是 60000 與 10000 筆
# X_train_2D 是 [60000, 28*28] 的 2維陣列
x_train_2D = x_train.reshape(60000, 28*28).astype('float32')
x_test_2D = x_test.reshape(10000, 28*28).astype('float32')
print('x_train_2D.shape=', x_train_2D.shape)
# x_train_2D.shape=(60000, 784)


# 將圖片的數字 (0~255) 標準化,最簡單的方法就是直接除以 255
# x_train_norm 是標準化後的結果,每一個數字介於 0~1 之間
x_train_norm = x_train_2D/255
x_test_norm = x_test_2D/255

# 將 training 的 label 進行 one-hot encoding,例如數字 7 經過 One-hot encoding 轉換後是 array([0., 0., 0., 0., 0., 0., 0., 1., 0., 0.], dtype=float32),即第7個值為 1

one_hot=tf.one_hot(y_train,10)

with tf.compat.v1.Session() as sess:
    init = tf.compat.v1.global_variables_initializer()
    sess.run(init)
    y_train_one_hot = sess.run(one_hot)

    print( y_train_one_hot )
    print( 'y_train[0] = ', y_train[0], ", y_train_one_hot[0]=", y_train_one_hot[0] )
    # y_train[0] =  5 , y_train_one_hot[0]= [0. 0. 0. 0. 0. 1. 0. 0. 0. 0.]

    # 也可以用 np.argmax 將 one_hot 陣列,轉換回原本的數字
    print( 'y_train[0] = ', np.argmax(y_train_one_hot[0]) )
    # y_train[0] =  5

    # 列印前10筆 one hot
    for i in range(10):
        print(y_train_one_hot[i])
        # [0. 0. 0. 0. 0. 1. 0. 0. 0. 0.]
        # [1. 0. 0. 0. 0. 0. 0. 0. 0. 0.]
        # [0. 0. 0. 0. 1. 0. 0. 0. 0. 0.]
        # [0. 1. 0. 0. 0. 0. 0. 0. 0. 0.]
        # [0. 0. 0. 0. 0. 0. 0. 0. 0. 1.]
        # [0. 0. 1. 0. 0. 0. 0. 0. 0. 0.]
        # [0. 1. 0. 0. 0. 0. 0. 0. 0. 0.]
        # [0. 0. 0. 1. 0. 0. 0. 0. 0. 0.]
        # [0. 1. 0. 0. 0. 0. 0. 0. 0. 0.]
        # [0. 0. 0. 0. 1. 0. 0. 0. 0. 0.]

用一個 function 列印多筆圖片, label 資訊

import tensorflow as tf
import numpy as np

mnist = tf.keras.datasets.mnist
# Tuple of Numpy arrays: (x_train, y_train), (x_test, y_test)

(x_train, y_train), (x_test, y_test) = mnist.load_data()

# 將 training 的 input 資料 28*28 的 2維陣列 轉為 1維陣列,再轉成 float32
# 每一個圖片,都變成 784 個 float 的 array
# training 與 testing 資料數量分別是 60000 與 10000 筆
# X_train_2D 是 [60000, 28*28] 的 2維陣列
x_train_2D = x_train.reshape(60000, 28*28).astype('float32')
x_test_2D = x_test.reshape(10000, 28*28).astype('float32')
print('x_train_2D.shape=', x_train_2D.shape)
# x_train_2D.shape=(60000, 784)

# 將圖片的數字 (0~255) 標準化,最簡單的方法就是直接除以 255
# x_train_norm 是標準化後的結果,每一個數字介於 0~1 之間
x_train_norm = x_train_2D/255
x_test_norm = x_test_2D/255

# 將 training 的 label 進行 one-hot encoding,例如數字 7 經過 One-hot encoding 轉換後是 array([0., 0., 0., 0., 0., 0., 0., 1., 0., 0.], dtype=float32),即第7個值為 1

y_train_one_hot_tf=tf.one_hot(y_train,10)
y_test_one_hot_tf=tf.one_hot(y_test,10)

with tf.compat.v1.Session() as sess:
    init = tf.compat.v1.global_variables_initializer()
    sess.run(init)
    y_train_one_hot = sess.run(y_train_one_hot_tf)
    y_test_one_hot = sess.run(y_test_one_hot_tf)


# 查看多筆資料,以及 label
import matplotlib.pyplot as plt
def plot_images_labels_prediction(images,labels,prediction,idx,filename, num=10):
    fig = plt.gcf()
    fig.set_size_inches(12, 14)
    if num>25: num=25
    for i in range(0, num):
        ax=plt.subplot(5,5, 1+i)

        # 將 images 的 784 個數字轉換為 28x28
        ax.imshow(np.reshape(images[idx],(28, 28)), cmap='binary')

        # 轉換 one_hot label 為數字
        title= "label=" +str(np.argmax(labels[idx]))
        if len(prediction)>0:
            title+=",predict="+str(prediction[idx])

        ax.set_title(title,fontsize=10)
        ax.set_xticks([]);ax.set_yticks([])
        idx+=1
    plt.savefig(filename)

plot_images_labels_prediction(x_train_2D, y_train_one_hot,[], 0, 'x_train_0.png', 10)
plot_images_labels_prediction(x_train_2D, y_train_one_hot,[], 10, 'x_train_1.png', 10)

plot_images_labels_prediction(x_test_2D, y_test_one_hot,[], 0, 'x_test_0.png', 10)
plot_images_labels_prediction(x_test_2D, y_test_one_hot,[], 10, 'x_test_1.png', 10)

以 tensorflow 建立 MLP

訓練部分資料共有 60000 筆,經過預處理後,會產生 feature, label,然後輸入 MLP model 進行訓練,訓練完成的模型,可在預測階段使用。

import tensorflow as tf
import numpy as np

# STEP 1 讀取資料
mnist = tf.keras.datasets.mnist
# Tuple of Numpy arrays: (x_train, y_train), (x_test, y_test)

(x_train, y_train), (x_test, y_test) = mnist.load_data()

# 將 training 的 input 資料 28*28 的 2維陣列 轉為 1維陣列,再轉成 float32
# 每一個圖片,都變成 784 個 float 的 array
# training 與 testing 資料數量分別是 60000 與 10000 筆
# X_train_2D 是 [60000, 28*28] 的 2維陣列
x_train_2D = x_train.reshape(60000, 28*28).astype('float32')
x_test_2D = x_test.reshape(10000, 28*28).astype('float32')
print('x_train_2D.shape=', x_train_2D.shape)
# x_train_2D.shape=(60000, 784)

# 將圖片的數字 (0~255) 標準化,最簡單的方法就是直接除以 255
# x_train_norm 是標準化後的結果,每一個數字介於 0~1 之間
x_train_norm = x_train_2D/255
x_test_norm = x_test_2D/255

# 將 training 的 label 進行 one-hot encoding,例如數字 7 經過 One-hot encoding 轉換後是 array([0., 0., 0., 0., 0., 0., 0., 1., 0., 0.], dtype=float32),即第7個值為 1

y_train_one_hot_tf=tf.one_hot(y_train,10)
y_test_one_hot_tf=tf.one_hot(y_test,10)

y_train_one_hot = None
y_test_one_hot = None
with tf.compat.v1.Session() as sess:
    init = tf.compat.v1.global_variables_initializer()
    sess.run(init)
    y_train_one_hot = sess.run(y_train_one_hot_tf)
    y_test_one_hot = sess.run(y_test_one_hot_tf)

# 將 x_train, y_train 分成 train 與 validation 兩個部分
x_train_norm_data = x_train_norm[0:50000]
x_train_norm_validation = x_train_norm[50000:60000]

y_train_one_hot_data = y_train_one_hot[0:50000]
y_train_one_hot_validation = y_train_one_hot[50000:60000]


### 建立模型
# keras 只需要用 model = Sequential() 建立線性堆疊模型,再用 model.add() 將各神經網路層加入模型,但 tensorflow 需要自己定義 layer 函數
def layer(output_dim,input_dim,inputs, activation=None):
    W = tf.Variable(tf.random.normal([input_dim, output_dim]))
    b = tf.Variable(tf.random.normal([1, output_dim]))
    XWb = tf.matmul(inputs, W) + b
    if activation is None:
        outputs = XWb
    else:
        outputs = activation(XWb)
    return outputs

# 輸入層, 784 個神經元, 資料型別為 float
# 第一維是 None,因為輸入資料的筆數還不確定,所以設定為 None
# 第二維是 784,因為每個圖片是 784 個像素點
x = tf.compat.v1.placeholder("float", [None, 784])

# 隱藏層, 256 個神經元
h1=layer(output_dim=256,input_dim=784, inputs=x ,activation=tf.nn.relu)

# 輸出層, 10 個神經元
y_predict=layer(output_dim=10,input_dim=256, inputs=h1,activation=None)


#### 定義訓練方式
# keras 要用 model.compile,設定 loss function 及 optimizer 與 metrics 設定評估模型的方法
# tensorflow 需要自己定義 loass function、最優化方法 optimizer,及設定參數,以及定義評估模型準確率的公式

# 建立訓練資料 label 真實值 placeholder
y_label = tf.compat.v1.placeholder("float", [None, 10])
# 定義loss function
loss_function = tf.reduce_mean(
                  tf.nn.softmax_cross_entropy_with_logits
                         (logits=y_predict ,
                          labels=y_label))

# 選擇optimizer
optimizer = tf.compat.v1.train.AdamOptimizer(learning_rate=0.001).minimize(loss_function)


### 定義評估模型的準確率
#計算每一筆資料是否正確預測
correct_prediction = tf.equal(tf.argmax(y_label  , 1),
                              tf.argmax(y_predict, 1))
#將計算預測正確結果,加總平均
accuracy = tf.reduce_mean(tf.cast(correct_prediction, "float"))

### 訓練模型

trainEpochs = 15
batchSize = 100
totalBatchs = int(len(x_train_norm_data)/batchSize)
epoch_list=[];loss_list=[];accuracy_list=[]

from time import time

with tf.compat.v1.Session() as sess:
    startTime=time()

    sess.run(tf.compat.v1.global_variables_initializer())

    for epoch in range(trainEpochs):
        for i in range(totalBatchs):
            # batch_x, batch_y = mnist.train.next_batch(batchSize)
            batch_x = x_train_norm_data[i*batchSize:(i+1)*batchSize]
            batch_y = y_train_one_hot_data[i*batchSize:(i+1)*batchSize]

            sess.run(optimizer,feed_dict={x: batch_x,y_label: batch_y})

        # loss,acc = sess.run([loss_function,accuracy],
        #                     feed_dict={x: mnist.validation.images,
        #                                y_label: mnist.validation.labels})
        loss,acc = sess.run([loss_function,accuracy],
                            feed_dict={x: x_train_norm_validation,
                                       y_label: y_train_one_hot_validation})

        epoch_list.append(epoch);loss_list.append(loss)
        accuracy_list.append(acc)
        print("Train Epoch:", '%02d' % (epoch+1), "Loss=", "{:.9f}".format(loss)," Accuracy=",acc)

    duration =time()-startTime
    print("Train Finished takes:",duration)

    ### 評估模型準確率
    print("Accuracy:", sess.run(accuracy,
                           feed_dict={x: x_test_norm,
                                      y_label: y_test_one_hot}))

    ### 進行預測
    prediction_result=sess.run(tf.argmax(y_predict,1),
                           feed_dict={x: x_test_norm })


# matplotlib 列印 loss, accuracy 折線圖
import matplotlib.pyplot as plt

fig = plt.gcf()
# fig.set_size_inches(4,2)
plt.plot(epoch_list, loss_list, label = 'loss')
plt.ylabel('loss')
plt.xlabel('epoch')
plt.legend(['loss'], loc='upper left')
plt.savefig('loss.png')


fig = plt.gcf()
# fig.set_size_inches(4,2)
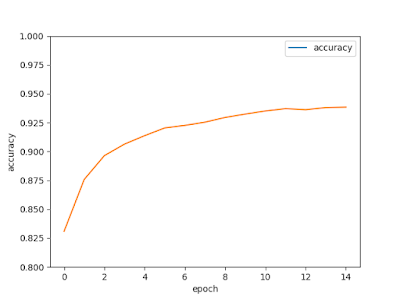
plt.plot(epoch_list, accuracy_list,label="accuracy" )

plt.ylim(0.8,1)
plt.ylabel('accuracy')
plt.xlabel('epoch')
plt.legend(['accuracy'], loc='upper right')
plt.savefig('accuracy.png')

############
# 查看多筆資料,以及 label
import matplotlib.pyplot as plt
def plot_images_labels_prediction(images,labels,prediction,idx,filename, num=10):
    fig = plt.gcf()
    fig.set_size_inches(12, 14)
    if num>25: num=25
    for i in range(0, num):
        ax=plt.subplot(5,5, 1+i)

        # 將 images 的 784 個數字轉換為 28x28
        ax.imshow(np.reshape(images[idx],(28, 28)), cmap='binary')

        # 轉換 one_hot label 為數字
        title= "label=" +str(np.argmax(labels[idx]))
        if len(prediction)>0:
            title+=",predict="+str(prediction[idx])

        ax.set_title(title,fontsize=10)
        ax.set_xticks([]);ax.set_yticks([])
        idx+=1
    plt.savefig(filename)


plot_images_labels_prediction(x_test_norm,
                              y_test_one_hot,
                              prediction_result,0, "result.png", num=10)

# 找出預測錯誤
for i in range(400):
    if prediction_result[i]!=np.argmax(y_test_one_hot[i]):
        print("i="+str(i)+
              "   label=",np.argmax(y_test_one_hot[i]),
              "predict=",prediction_result[i])

Train Epoch: 01 Loss= 6.828331470  Accuracy= 0.8309
Train Epoch: 02 Loss= 4.488496780  Accuracy= 0.8758
Train Epoch: 03 Loss= 3.577744246  Accuracy= 0.8964
Train Epoch: 04 Loss= 3.057111502  Accuracy= 0.9064
Train Epoch: 05 Loss= 2.736637831  Accuracy= 0.9137
Train Epoch: 06 Loss= 2.479548931  Accuracy= 0.9204
Train Epoch: 07 Loss= 2.278975010  Accuracy= 0.9226
Train Epoch: 08 Loss= 2.162630558  Accuracy= 0.9254
Train Epoch: 09 Loss= 2.005532503  Accuracy= 0.9295
Train Epoch: 10 Loss= 1.911731601  Accuracy= 0.9324
Train Epoch: 11 Loss= 1.785833955  Accuracy= 0.9351
Train Epoch: 12 Loss= 1.694522023  Accuracy= 0.9371
Train Epoch: 13 Loss= 1.660093784  Accuracy= 0.9362
Train Epoch: 14 Loss= 1.623517632  Accuracy= 0.938
Train Epoch: 15 Loss= 1.616030455  Accuracy= 0.9384
Train Finished takes: 36.676905393600464
Accuracy: 0.9361

## 預測錯誤的圖片
i=8   label= 5 predict= 6
i=33   label= 4 predict= 0
i=41   label= 7 predict= 3
i=59   label= 5 predict= 8
i=63   label= 3 predict= 2
i=78   label= 9 predict= 7
i=115   label= 4 predict= 6
i=121   label= 4 predict= 8
i=126   label= 0 predict= 2
i=175   label= 7 predict= 2
i=215   label= 0 predict= 2
i=241   label= 9 predict= 8
i=247   label= 4 predict= 2
i=282   label= 7 predict= 8
i=290   label= 8 predict= 4
i=320   label= 9 predict= 8
i=321   label= 2 predict= 8
i=324   label= 0 predict= 8
i=325   label= 4 predict= 9
i=333   label= 5 predict= 3
i=359   label= 9 predict= 4
i=389   label= 9 predict= 4


將隱藏層的神經元由 256 改為 1000

# 隱藏層, 1000 個神經元
h1=layer(output_dim=1000,input_dim=784, inputs=x ,activation=tf.nn.relu)

# 輸出層, 10 個神經元
y_predict=layer(output_dim=10,input_dim=1000, inputs=h1,activation=None)

剛剛的正確率為

Accuracy: 0.9361

改為 1000 後的正確率提升為

Accuracy: 0.95

建立兩個隱藏層

x = tf.compat.v1.placeholder("float", [None, 784])

# 隱藏層 h1, 1000 個神經元
h1=layer(output_dim=1000,input_dim=784, inputs=x ,activation=tf.nn.relu)

# 隱藏層 h2, 1000 個神經元
h2=layer(output_dim=1000,input_dim=1000, inputs=h1 ,activation=tf.nn.relu)

# 輸出層, 10 個神經元
y_predict=layer(output_dim=10,input_dim=1000, inputs=h2,activation=None)

正確率可提升到

Accuracy: 0.9636

References

TensorFlow 2 教學:Keras–MNIST–數字辨識

tensorflow中將label索引轉換成one-hot形式